 Carlos Peña
Overview
FUME Engine is a long-term project focused on exploring and understanding the main components of a game engine. The goal of the project is to show practical knowledge and technical skills across these areas by applying common software development best practices, well-known design patterns, and performance optimization techniques, using modern C++20 features and OPP principles.

Technical Features
FUME Engine is currently in an early stage of development, with a strong focus on modular design, API abstraction, and clean engine architecture. The following features are already implemented:
Engine SDK
-
✔Custom build tooling with CMake and Premake -
✔Application Module and Entry Point system -
✔Runtime Application architecture with configurable Runtime Systems -
✔Cross-Platform Windowing, Input, and Library loader abstraction -
✔Entity Component System (ECS) manager -
✔Scene Management system -
✔API-agnostic GUI system based on ImGui
Rendering
-
✔Graphics API-agnostic Rendering Architecture -
✔Render Hardware Interface (RHI) with DirectX 12 and Vulkan backends -
✔FrameGraph -
✔Render Pipelines Methods-
›Forward Rendering -
›Deferred Rendering
-
-
✔Built-in Rendering Techniques-
›Cubemap Skybox -
›Grid rendering -
›Geometry rendering -
›Phong lighting -
›PBR lighting -
›Shadow mapping -
›Reflection & Refraction -
›Normal Mapping
-
Editor & Tools
-
✔Custom C++ native scripting system -
✔Editor UI Widget management system -
✔Editor UI Layout management system
Runtime Application Architecture
The runtime application architecture in FUME Engine defines how an application is built and executed end to end. It starts with a custom build system based on CMake and Premake, continues through the application entry point with support for monolithic and modular builds, and ends in the runtime application layer, driven by a set of modular runtime systems.
Build System
FUME Engine has been designed to support multiple build systems as part of a learning-driven approach to exploring and gaining experience in modern build technologies.
Currently, the project can be built using both Premake and CMake as a software development tools for generating project builds.
Both build systems are executed through dedicated automation scripts, through batch files on Windows and bash scripts on Linux, providing a consistent and streamlined build workflow across platforms.
Both systems share a common design philosophy: project configuration is centralized through a collection of reusable build configuration files that define variables, helper functions, and macros related to platform setup, project configuration, utility helpers, and environment detection for external SDKs such as Vulkan and DirectX 12.
Custom Build Abstraction Layer
In both CMake and Premake, FUME introduces a custom abstraction layer built around reusable target macros and helper utilities. This layer standardizes how engine modules and applications are declared, configured, and built across different build systems.
At the core of this abstraction lies the Target configuration file, which exposes a highly configurable ADD_TARGET macro. This macro provides a unified way to define projects of any type, including static libraries, shared libraries, and executables.
Through this single entry point, a target can declaratively specify:
- Source files and include directories
- Internal dependencies and external third-party libraries
- Platform-specific compile definitions and flags
- Linker flags and precompiled header support
This approach keeps target definition mechanism really straightforward and well-structured from low-level build-system details.
Target Definition in CMake
In CMake, this abstraction is implemented via the ADD_TARGET macro,
which encapsulates all configuration required to build a FUME engine target module:
################################################################################
# FumeSDK Target
################################################################################
ADD_TARGET(
    NAME ${PROJECT_NAME}
    TYPE STATIC
    NAMESPACE FUME
    OUTPUT_PATH ${ENGINE_LIB_PATH}
    SOURCE_FILES
            ${CORE_SOURCE_FILES}
    INCLUDE_DIRECTORIES
        PRIVATE
            ${CORE_INCLUDES}
    TARGET_DEPENDENCIES
        PRIVATE
            FumeCommon
            FumePlatform
            FumeGUI
        PUBLIC
            FumeRenderer
    EXTERNAL_DEPENDENCIES
            ${CORE_DEPENDENCIES}
    PRECOMPILED_HEADERS
        PRIVATE
            ${FUME_PRECOMPILED_HEADER}
    COMPILE_DEFINITIONS
        PRIVATE
            ${PLATFORM_COMPILE_DEFS}
    COMPILE_FLAGS
        PRIVATE
            ${PLATFORM_COMPILE_FLAGS}
    LINK_FLAGS
        PRIVATE
        ${PLATFORM_LINK_FLAGS}
)
By centralizing all target-related configuration into a single macro invocation, complex build setups can be expressed without duplicating logic or scattering platform-specific rules across multiple files.
Target Definition in Premake
Premake mirrors this same abstraction through a Lua-based ADD_TARGET helper,
preserving both structure and semantics across build systems:
-- ################################################################################
-- # FumeSDK Target
-- ################################################################################
project"FumeCore"

local prj = project()
print("#================================================")
print("# Building " .. prj.name .."...")
print("#================================================")

    ADD_TARGET({
        NAME = prj.name,
        TYPE ="STATIC",
        OUTPUT_PATH = ENGINE_LIB_PATH,

        SOURCE_FILES = CORE_SOURCE_FILES,
        INCLUDE_DIRECTORIES = CORE_INCLUDES,

        TARGET_DEPENDENCIES = {"FumeCommon","FumeGUI","FumePlatform","FumeRenderer" },
        EXTERNAL_DEPENDENCIES = CORE_DEPENDENCIES,

        PRECOMPILED_HEADERS = { header = FUME_PRECOMPILED_HEADER, source = FUME_PRECOMPILED_SOURCE },

        COMPILE_DEFINITIONS = PLATFORM_COMPILE_DEFS,
        COMPILE_FLAGS = PLATFORM_COMPILE_FLAGS,
        LINK_FLAGS = PLATFORM_LINK_FLAGS,
    })
This build system design provides a flexible, extensible, and maintainable foundation that scales alongside the engine’s ongoing development.
Entry Point
FUME Engine exposes a clean and extensible application entry point designed to allow developers to create engine-powered applications with minimal boilerplate. This entry point is based on a modular architecture where user applications are defined as app modules and integrated into the runtime through a well-defined lifecycle.
Module Interface and Application Base Class
All applications in FUME Engine are implemented as modules.
At the core of this system lies the IModule interface, which defines the standard lifecycle
callbacks commonly found in game and application loops:
class IModule
{
public:
    virtual ~IModule() = default;

    virtual const std::string& GetName() const = 0;

    virtual bool OnStart()          = 0;
    virtual void OnPreUpdate()      = 0;
    virtual void OnUpdate()         = 0;
    virtual void OnPostUpdate()     = 0;
    virtual void OnDraw()           = 0;
    virtual void OnClose()          = 0;
    virtual void OnEvent(Event& e)  = 0;
};
To simplify application development, FUME provides the ModuleApp base class,
which implements this interface and supplies default behavior for all lifecycle methods.
User applications only need to override the callbacks relevant to their specific logic:
class ModuleApp : public IModule
{
public:
    explicit ModuleApp(const std::string& aName) : mName {aName} {}
    virtual ~ModuleApp() = default;

    virtual const std::string& GetName() const override { return mName; }

    virtual bool OnStart() override         { return true; }
    virtual void OnPreUpdate() override     {}
    virtual void OnUpdate() override        {}
    virtual void OnPostUpdate() override    {}
    virtual void OnDraw() override          {}
    virtual void OnClose() override         {}
    virtual void OnEvent(Event& e) override {}

private:
    std::string mName {};
};
Application Specification and Runtime Systems
Once an application class is defined, it is described through a ModuleSpecification. This structure defines the application name and specifies which runtime systems are required via a bitmask. This allows applications to include only the systems they need:
static FUME::ModuleSpecification EditorSpec
{
    .Name           ="FumeEditor",
    .RuntimeMask    = FUME::RuntimeSystemFlags::Platform
                    | FUME::RuntimeSystemFlags::Render
                    | FUME::RuntimeSystemFlags::Input
                    | FUME::RuntimeSystemFlags::GUI
                    | FUME::RuntimeSystemFlags::Scene
};
For example, applications that do not rely on a UI framework can simply omit the GUI flag to avoid GUI runtime system.
Module Registration and Entry Macro
To register the application with the engine, FUME provides the MODULE_ENTRY macro.
This macro generates the necessary factory function and ensures the module is correctly registered depending on the build configuration:
MODULE_ENTRY(FUME::Editor, EditorSpec.Name, EditorSpec)
In monolithic builds, this macro expands into a static registration mechanism that automatically inserts the application module into
the ModuleManager at startup:
#if defined(MONOLITHIC_BUILD)
    #define MODULE_REGISTER(ModuleClass, ModuleName, ModuleSpec) \
            FUME::ModuleManager::Instance().RegisterModule(ModuleName, ModuleSpec, MakeModule_ModuleName);
#else
    #define MODULE_REGISTER(ModuleClass, ModuleName)
#endif
The generated factory function instantiates the application module and binds it to the engine’s application system:
extern "C" MODULE_API std::unique_ptr<FUME::IModule> MakeModule_ModuleName()
{
    return std::make_unique<ModuleClass>(ModuleName);
}
Monolithic vs Modular Build
In monolithic builds, application modules are compiled directly into the executable and registered automatically at startup. This approach simplifies deployment and is ideal for editor and standalone applications.
In contrast, modular builds rely on dynamically loaded shared libraries. In this model, module registration occurs at runtime when the shared library is loaded by the engine, rather than being statically linked at compile time. This approach is primarily intended for launcher-style applications, where the engine can present a selection of available applications or games and load the desired one dynamically as a shared library.
Such a design enables advanced workflows, including external plugin systems and hot-reloading. Notice that full support for modular builds is not yet implemented and this functionality is planned for future development.
Engine Launching
Execution begins in the application’s main function, which calls the global LaunchEngine(...) entry point.
This function is responsible for initializing the engine, loading the application module, and driving the main execution loop:
int LaunchEngine(const std::string& aName, const std::vector<std::string>& aArgs)
{
    try
    {
        std::cout << "Engine Application: " << aName <<"\n";
        Application::Create();
        {
            auto GameModule = Application::Get().Load(aArgs);
            if (Application::Get().Start(GameModule.get()))
            {
                Application::Get().Run();
            }
            Application::Get().Close();
        }
        Application::Destroy();
    }
    catch (std::exception& e)
    {
        std::cerr << "exception caught: " << e.what() <<'\n';
    }

    return 0;
}
This centralized launch mechanism ensures a consistent startup, loop and shutdown sequence across all applications built on top of FUME Engine, while fully decoupling user application logic from the engine’s internal bootstrap process.
Application & Systems
Once the application module is instantiated and the engine Application object is created, the engine proceeds to configure its runtime application environment. This environment is defined by a set of runtime systems (Platform, Input, Scene, Render, GUI, etc.) that are selectively enabled through a bitmask provided by the application.
Runtime Systems
During application startup, the engine iterates over the runtime system bitmask and registers only the systems explicitly requested by the application:
void Application::RegisterSystems(RuntimeSystemFlags aRuntimeMask)
{
    for (auto& RuntimeType : sRuntimeSystemTypeArray)
    {
        if (HasRuntime(aRuntimeMask, RuntimeType))
        {
            switch (RuntimeType)
            {
                case RuntimeSystemFlags::Platform: RuntimeSystemManager::Instance().RegisterSystem<Runtime::PlatformSystem>(0); break;
                case RuntimeSystemFlags::Input:    RuntimeSystemManager::Instance().RegisterSystem<Runtime::InputSystem>(50); break;
                case RuntimeSystemFlags::Scene:    RuntimeSystemManager::Instance().RegisterSystem<Runtime::SceneSystem>(75); break;
                case RuntimeSystemFlags::Render:   RuntimeSystemManager::Instance().RegisterSystem<Runtime::RenderSystem>(100); break;
                case RuntimeSystemFlags::GUI:      RuntimeSystemManager::Instance().RegisterSystem<Runtime::GUISystem>(200); break;
            }
        }
    }

    RuntimeSystemManager::Instance().Order();
}
Each runtime system is registered with an explicit execution priority, defining its relative order within the frame lifecycle.
Runtime System Manager
All runtime systems are orchestrated by the RuntimeSystemManager, which acts as a centralized dispatcher for the engine lifecycle.
Instead of storing systems in a flat list and invoking every method every frame, the manager builds a phase-based invocation table at registration time.
Runtime execution is split into well-defined phases:
enum class RuntimePhase
{
    Init,
    PreUpdate,
    Update,
    PostUpdate,
    Draw,
    Shutdown
};
Each phase is associated with a list of invokers, ordered by priority.
Compile-Time Registration & Runtime Invocation
When a runtime system is registered, the manager uses C++ concepts and type traits to detect which lifecycle methods are actually implemented by the system:
template <typename T> concept HasUpdate = requires(T t) { t.Update(); };
template <typename T> concept HasDraw   = requires(T t, IModule* m) { t.Draw(m); };
Only the methods that exist are bound and stored. For example, if a system does not implement Update(), no invoker is generated for that phase.
template <typename T> requires HasUpdate<T>
void AddUpdate(std::shared_ptr<T> instance, int aPriority)
{
    AddInvoker(RuntimePhase::Update, std::make_shared<RuntimeInvoker<T,void>>(instance, &T::Update, aPriority));
}
This design ensures that empty or unused lifecycle methods are never executed, avoiding unnecessary virtual calls and branching.
Priority-Based Execution Model
Each runtime method is wrapped inside a RuntimeInvoker, which stores:
- A weak reference to the system
- The bound member function
- An execution priority
Before entering the main loop, all invokers are sorted by priority:
void RuntimeSystemManager::Order()
{
    for (auto& FnList : mRuntimeSystemFncs | std::ranges::views::values)
    {
        std::ranges::sort(FnList, [](const auto& lhs, const auto& rhs)
        {
            return lhs->Order() < rhs->Order();
        });
    }

    std::ranges::reverse(mRuntimeSystemFncs.at(RuntimePhase::Shutdown));
}
This allows fine-grained control over system execution order (e.g., Platform → Input → Scene → Render → GUI).
Engine Application Loop
Once all runtime systems have been registered and ordered by priority,
the engine can drive the main application loop in a clean and well-structured manner.
The Application::Run() method defines the high-level execution flow of the engine:
void Application::Run()
{
    if (mInitialized)
    {
        Initialize();

        while (mRunning)
        {
            PreUpdate();
            Update();
            PostUpdate();
            Draw();
        }

        Shutdown();
    }
}
Each stage of this loop acts as a dispatch point, delegating execution to the RuntimeSystemManager,
which invokes the corresponding lifecycle functions for all registered runtime systems:
void Application::Update()
{
    RuntimeSystemManager::Instance().Execute<RuntimePhase::Update>();
    pModInstance->OnUpdate();
}
After the engine-level systems have been processed, control is handed to the active application module (ModuleApp). This ensures that user-defined logic is executed on top of a fully updated engine state, allowing application code to react coherently to input, scene updates, rendering, and other subsystems.
Overall, this runtime architecture promotes a modular, efficient, and scalable execution model. Only the required systems are instantiated, and only the lifecycle methods that are actually implemented are bound and executed. This avoids unnecessary virtual calls, empty function executions, and rigid system coupling.
As a result, the engine achieves a data-driven and deterministic runtime pipeline, where execution order is explicit, extensibility is straightforward, and new runtime systems can be introduced without affecting the core application loop or existing subsystems.
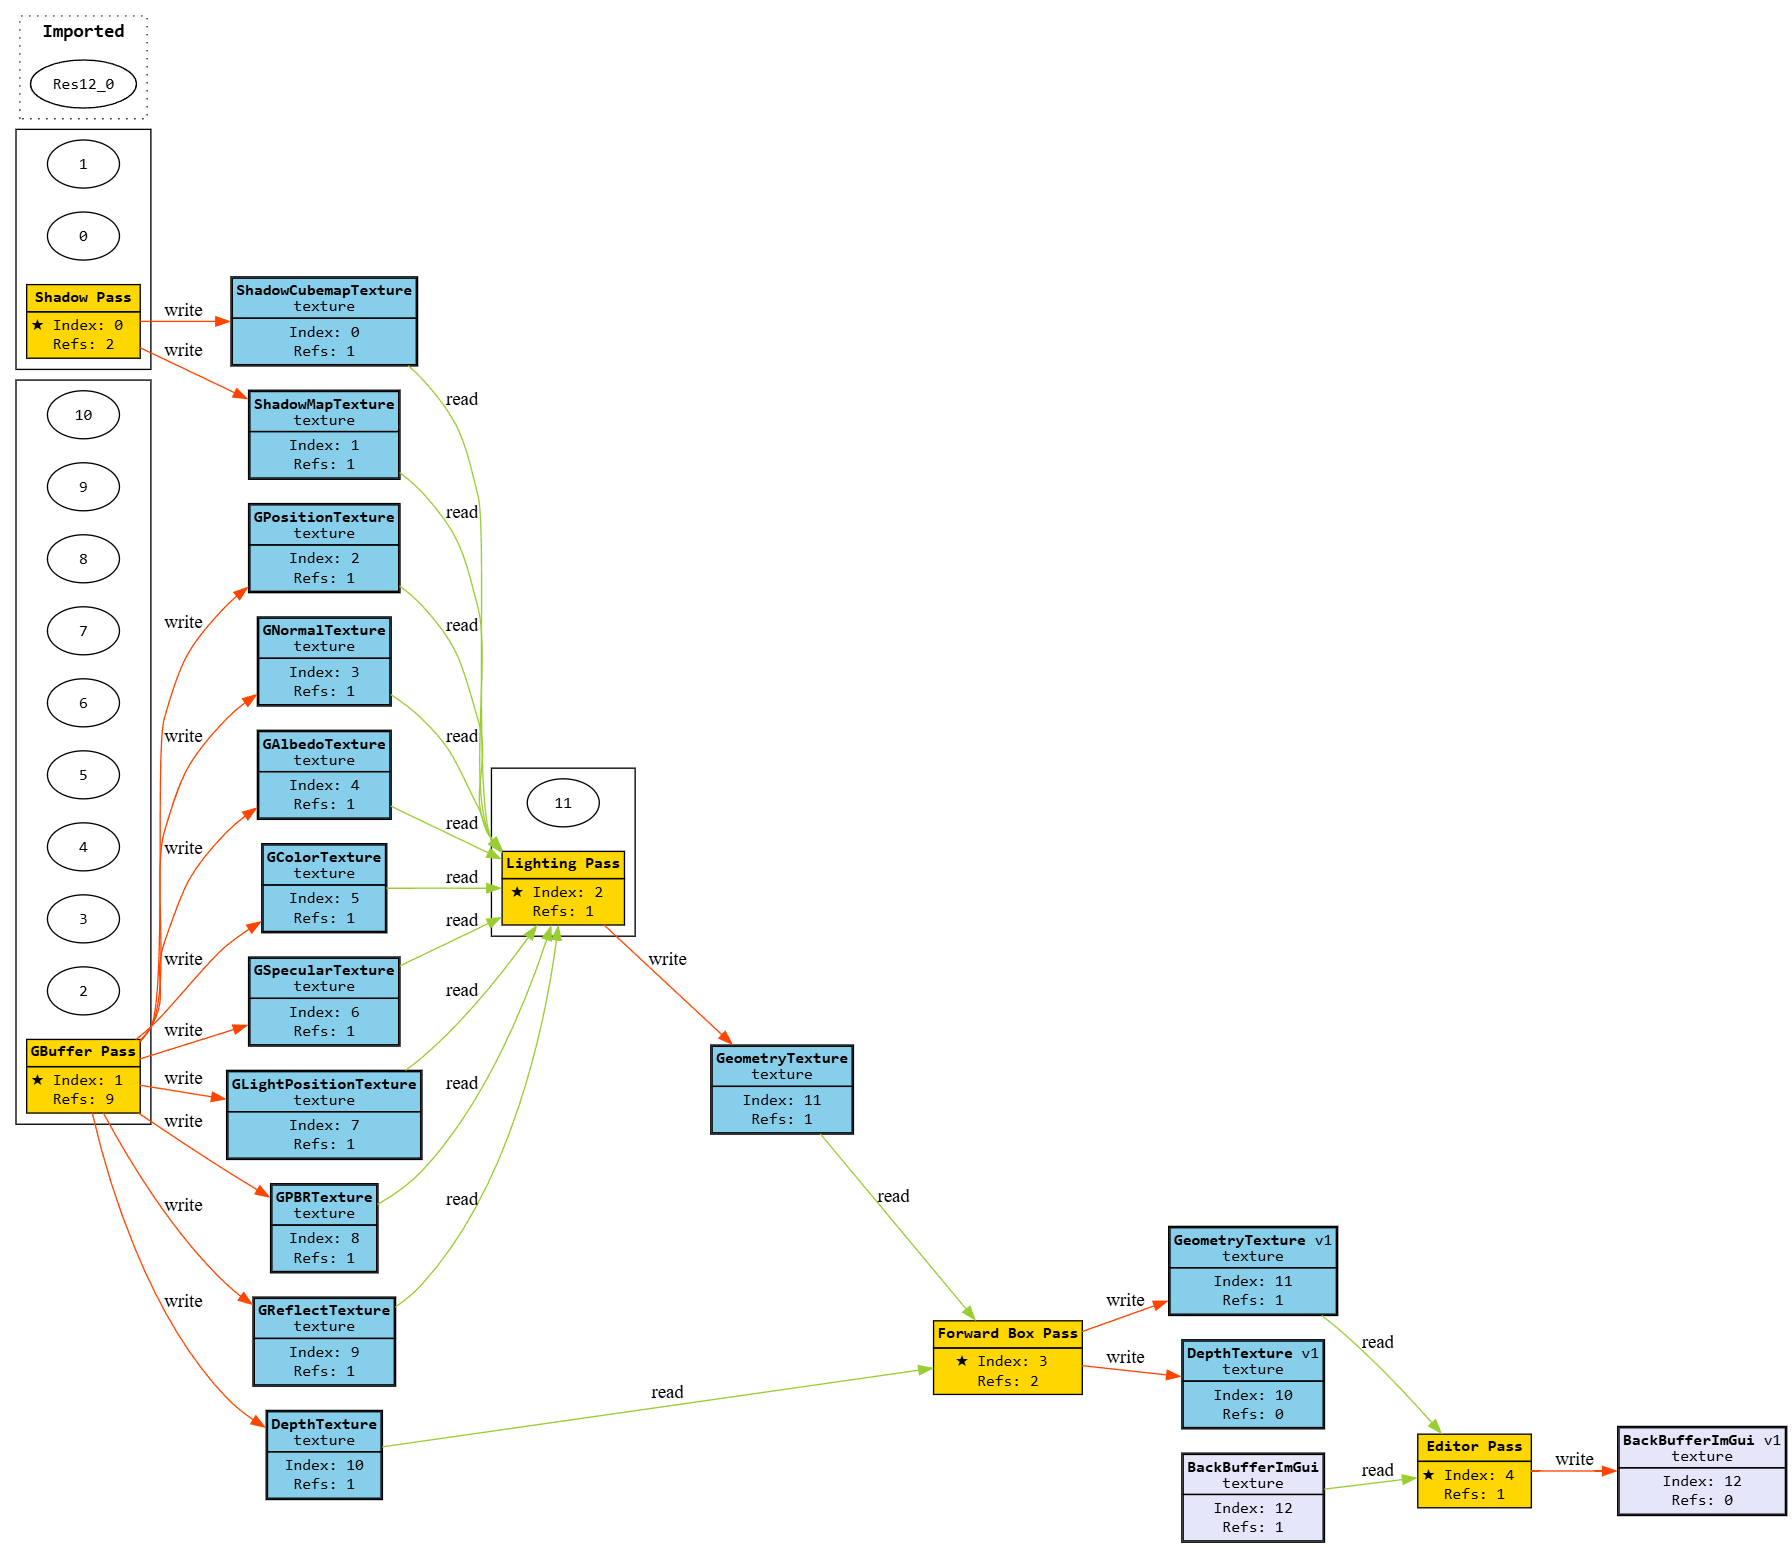
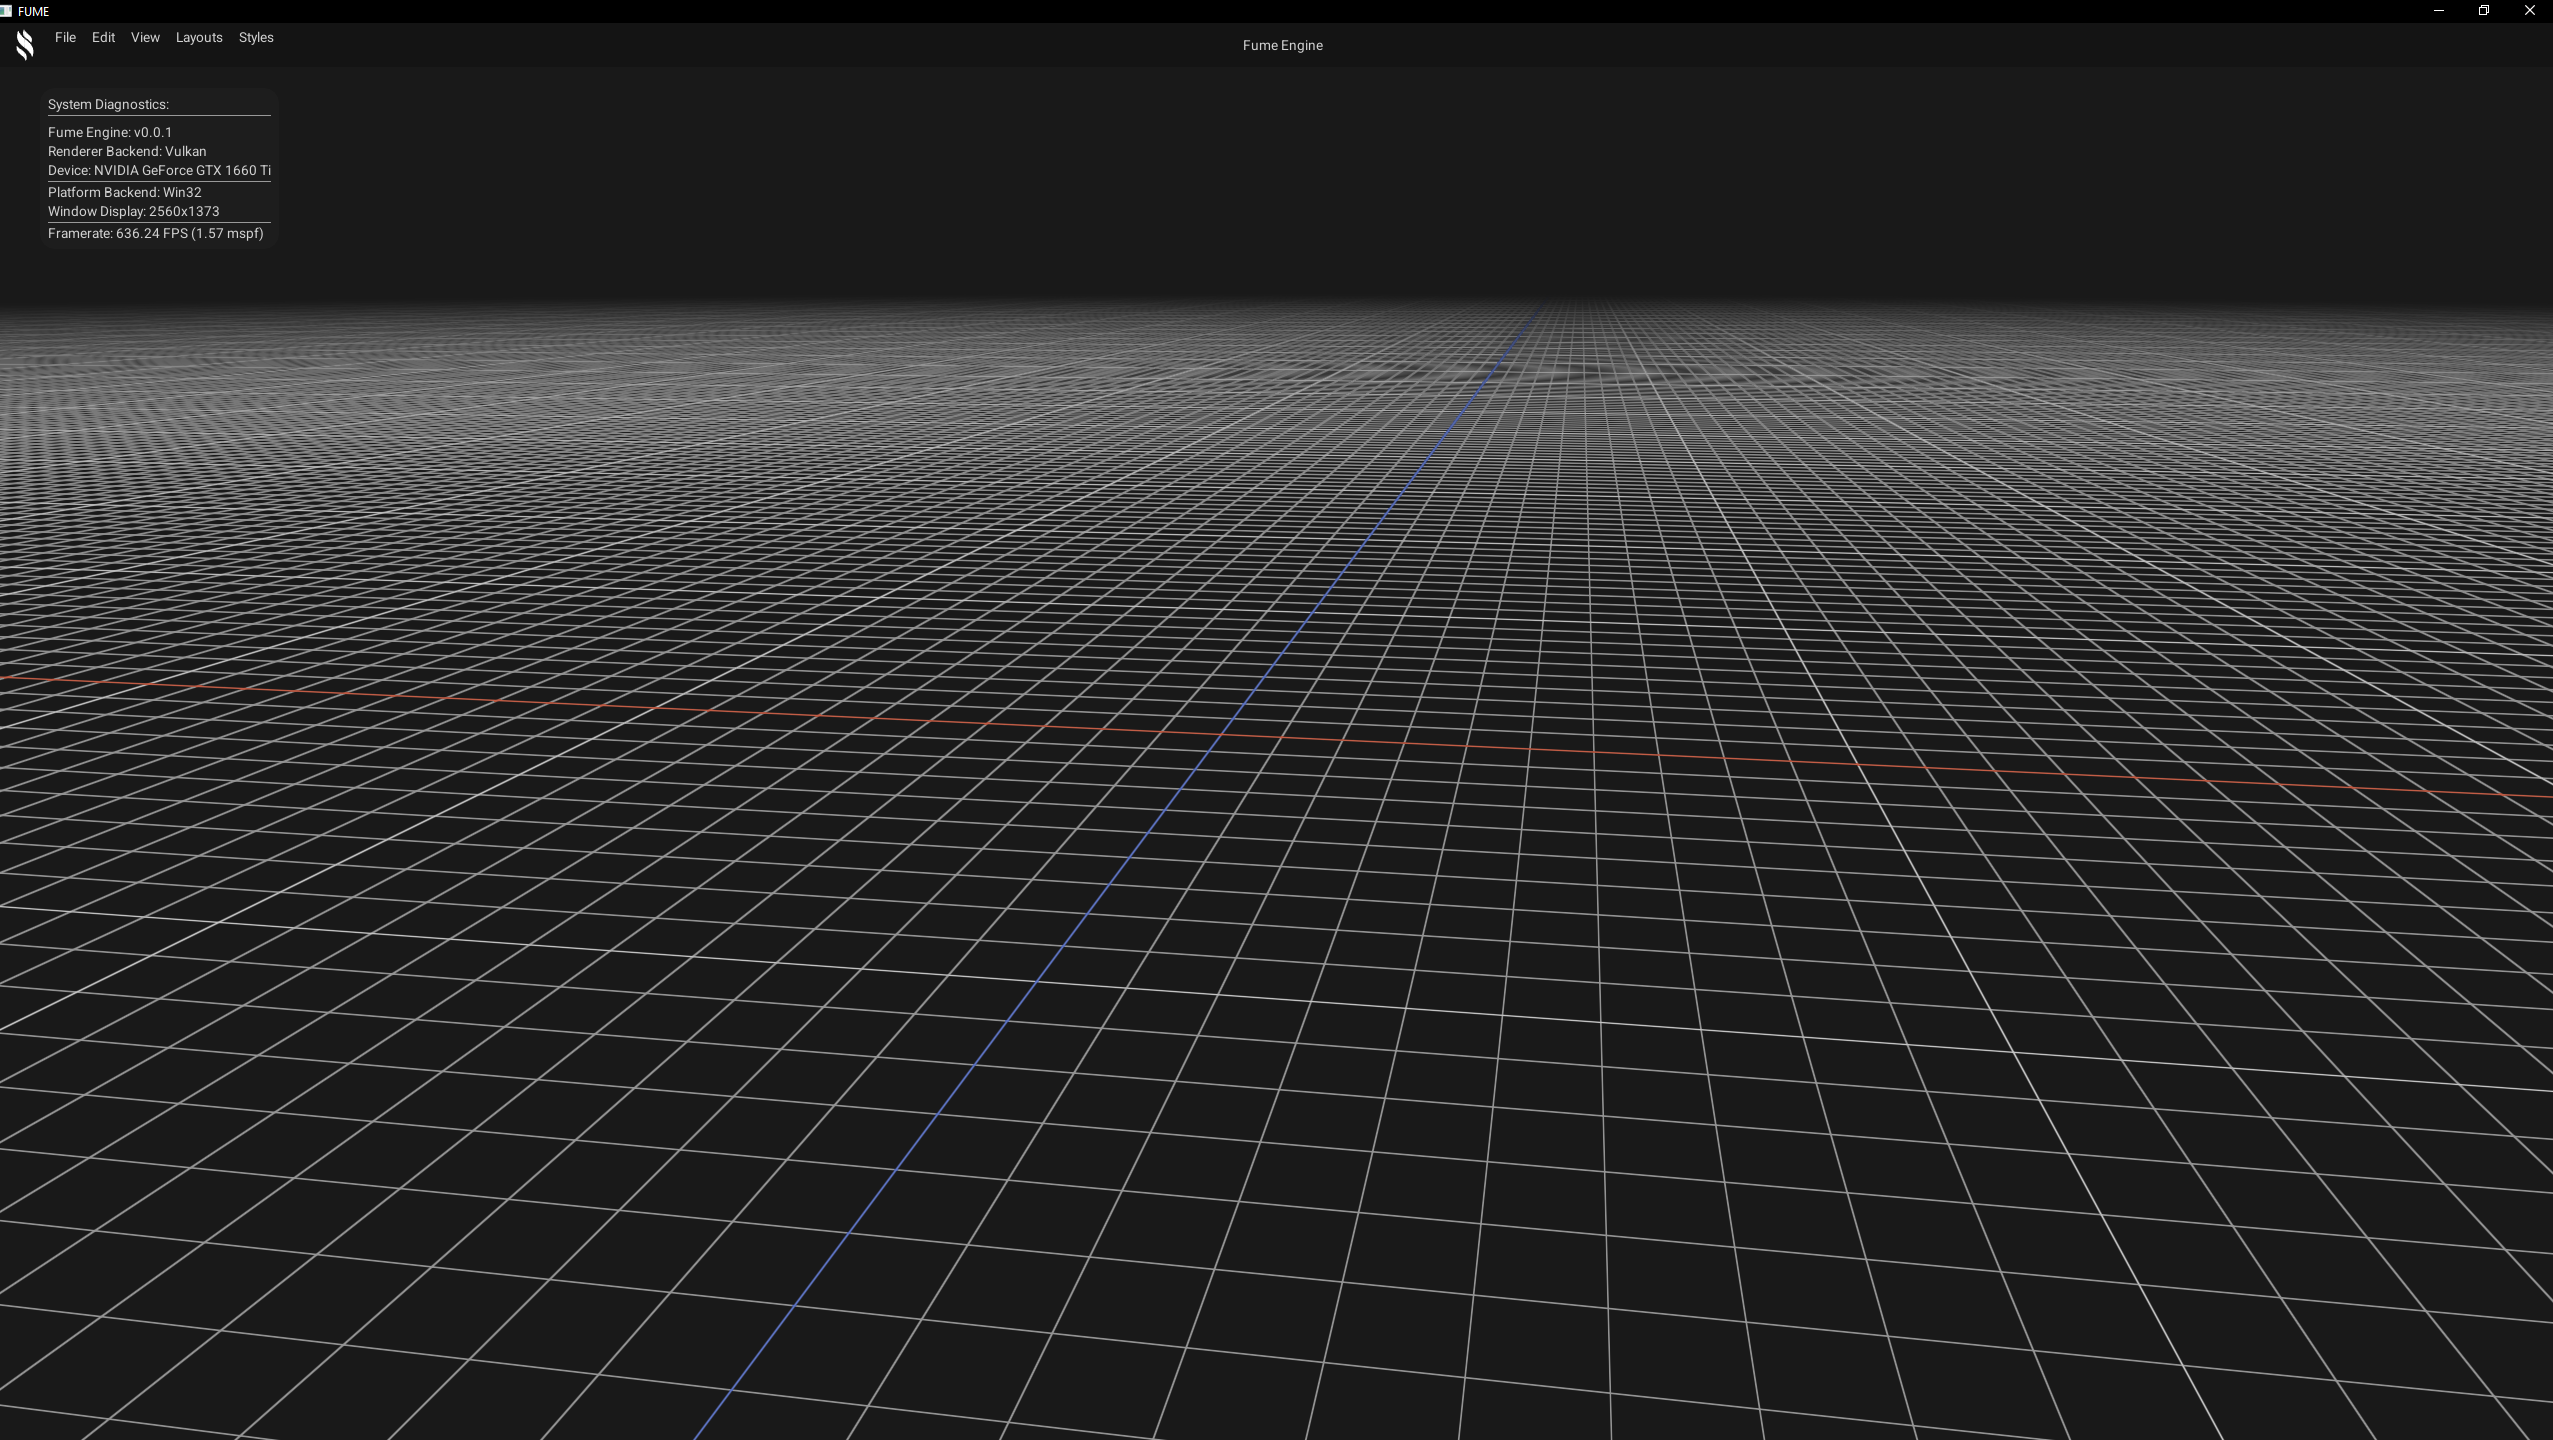
The following diagram briefly shows what has been explained above and how the engine architecture is organized:
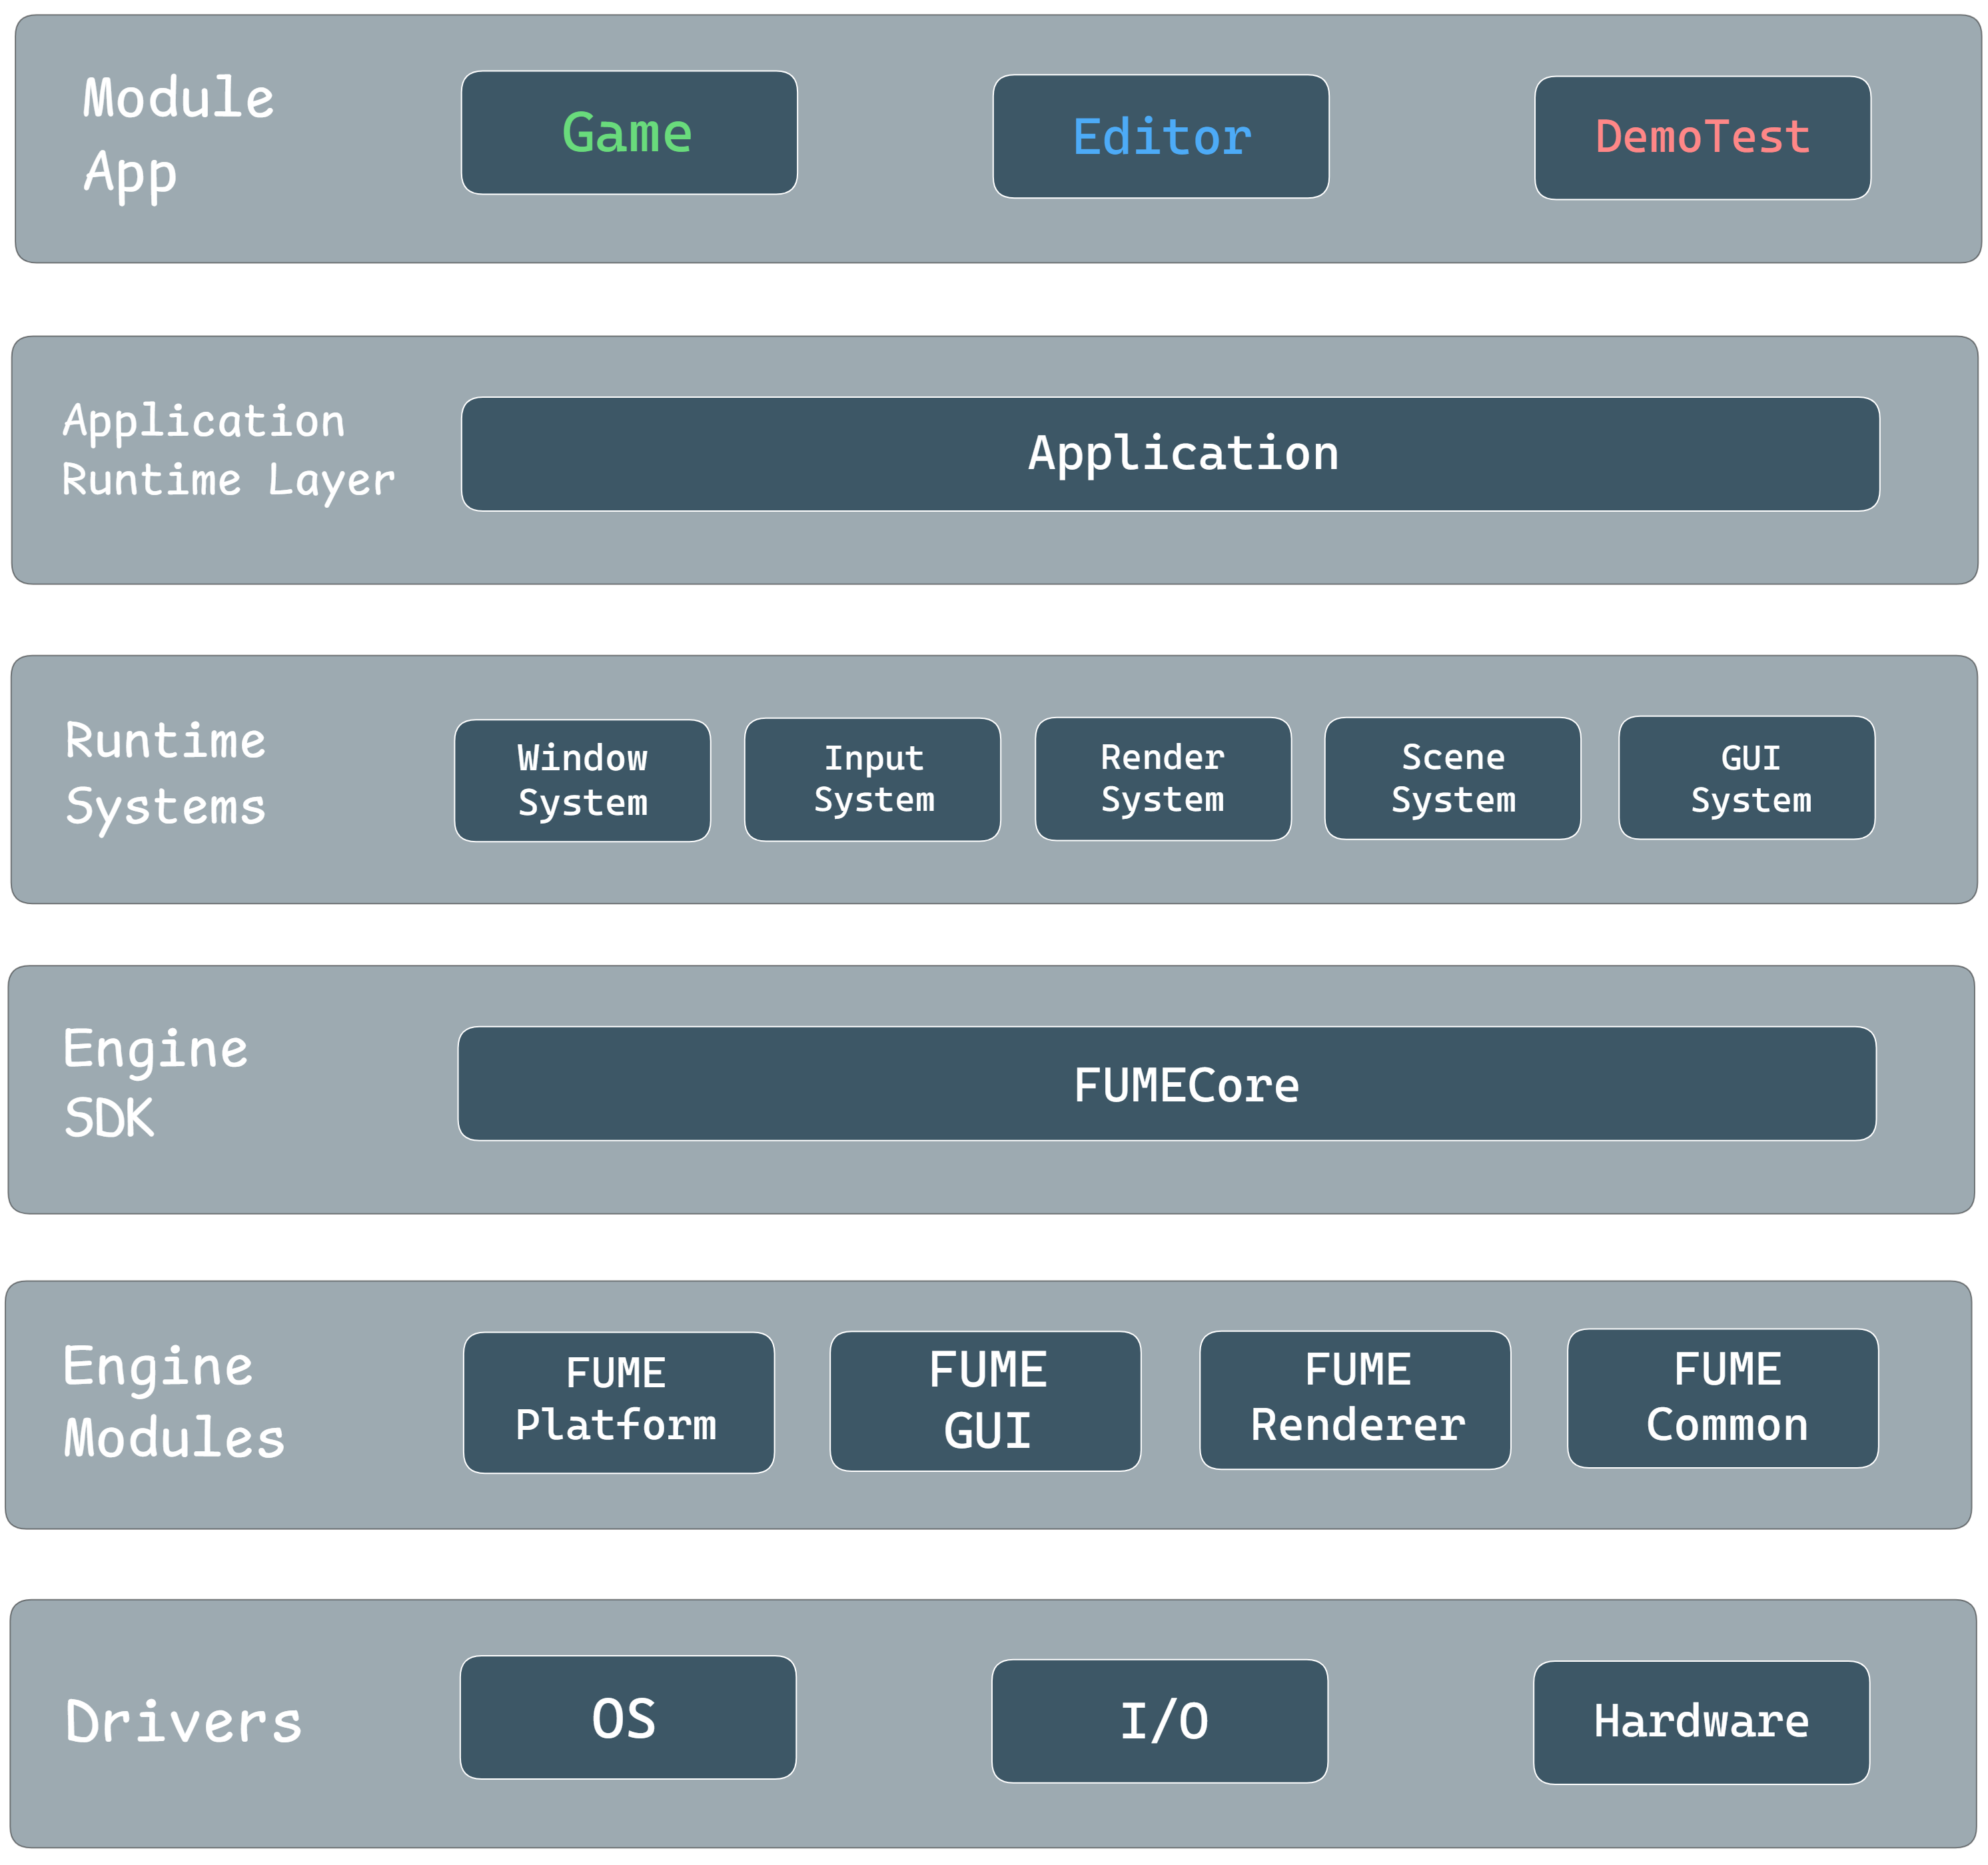
FUME Engine Architecture diagram
FUME Platform
The FUME Platform module is a static library responsible for all low-level platform system tasks, including windowing, input handling, event processing, and dynamic library loading. The module is divided into a common core and platform-specific implementations for Linux and Windows. The selected build system (CMake | Premake) ensures that the correct platform implementation is compiled depending on the target operating system.
Platform API Abstraction
The entry point to the platform module is the static Platform class, which exposes functions for initialization and release of the platform system through the engine SDK.
Internally, the Platform class owns a PlatformWindowSystem instance, responsible for managing all windows and providing factory methods, such as window creation:
std::uint32_t PlatformWindowSystem::CreateWindow(const WindowDesc& aDesc)
{
    mActiveWindow = mWindows.size();

    auto NewWindow = mWindowDevice->MakeWindow(aDesc);
    NewWindow->Initialize();

    mWindows.push_back(std::move(NewWindow));
    return mActiveWindow;
}
The platform window system also handles the update loop for all windows and closing windows when requested:
void PlatformWindowSystem::Update()
{
    for (const auto& Window : mWindows)
            Window->Update();

    auto WinIter = mWindows.begin();
    while (WinIter != mWindows.end())
    {
        const auto& Window = *WinIter;
        if (Window->CloseRequested())
        {
            Window->Release();
            WinIter = mWindows.erase(WinIter);
        }
        else
        {
            ++WinIter;
        }
    }
}
This design allows the engine to create and manage windows in a platform-agnostic way, while delegating OS-specific tasks to the WindowDevice.
Device and Windows
All platform-specific logic is encapsulated in the WindowDevice interface. Each operating system provides its own implementation, which handles window initialization, event polling, and input processing.
For example, on Windows, the WindowsWindowDevice implementation calls Win32 functions such as CoInitializeEx and RegisterClassEx.
Through this implementation, the WindowsWindow class encapsulates Win32 functionality for window creation and event handling, ensuring a clean separation between platform-specific code and the engine’s platform-agnostic logic.
The following diagram briefly illustrates how the cross-platform platform layer is designed in FUME Engine:
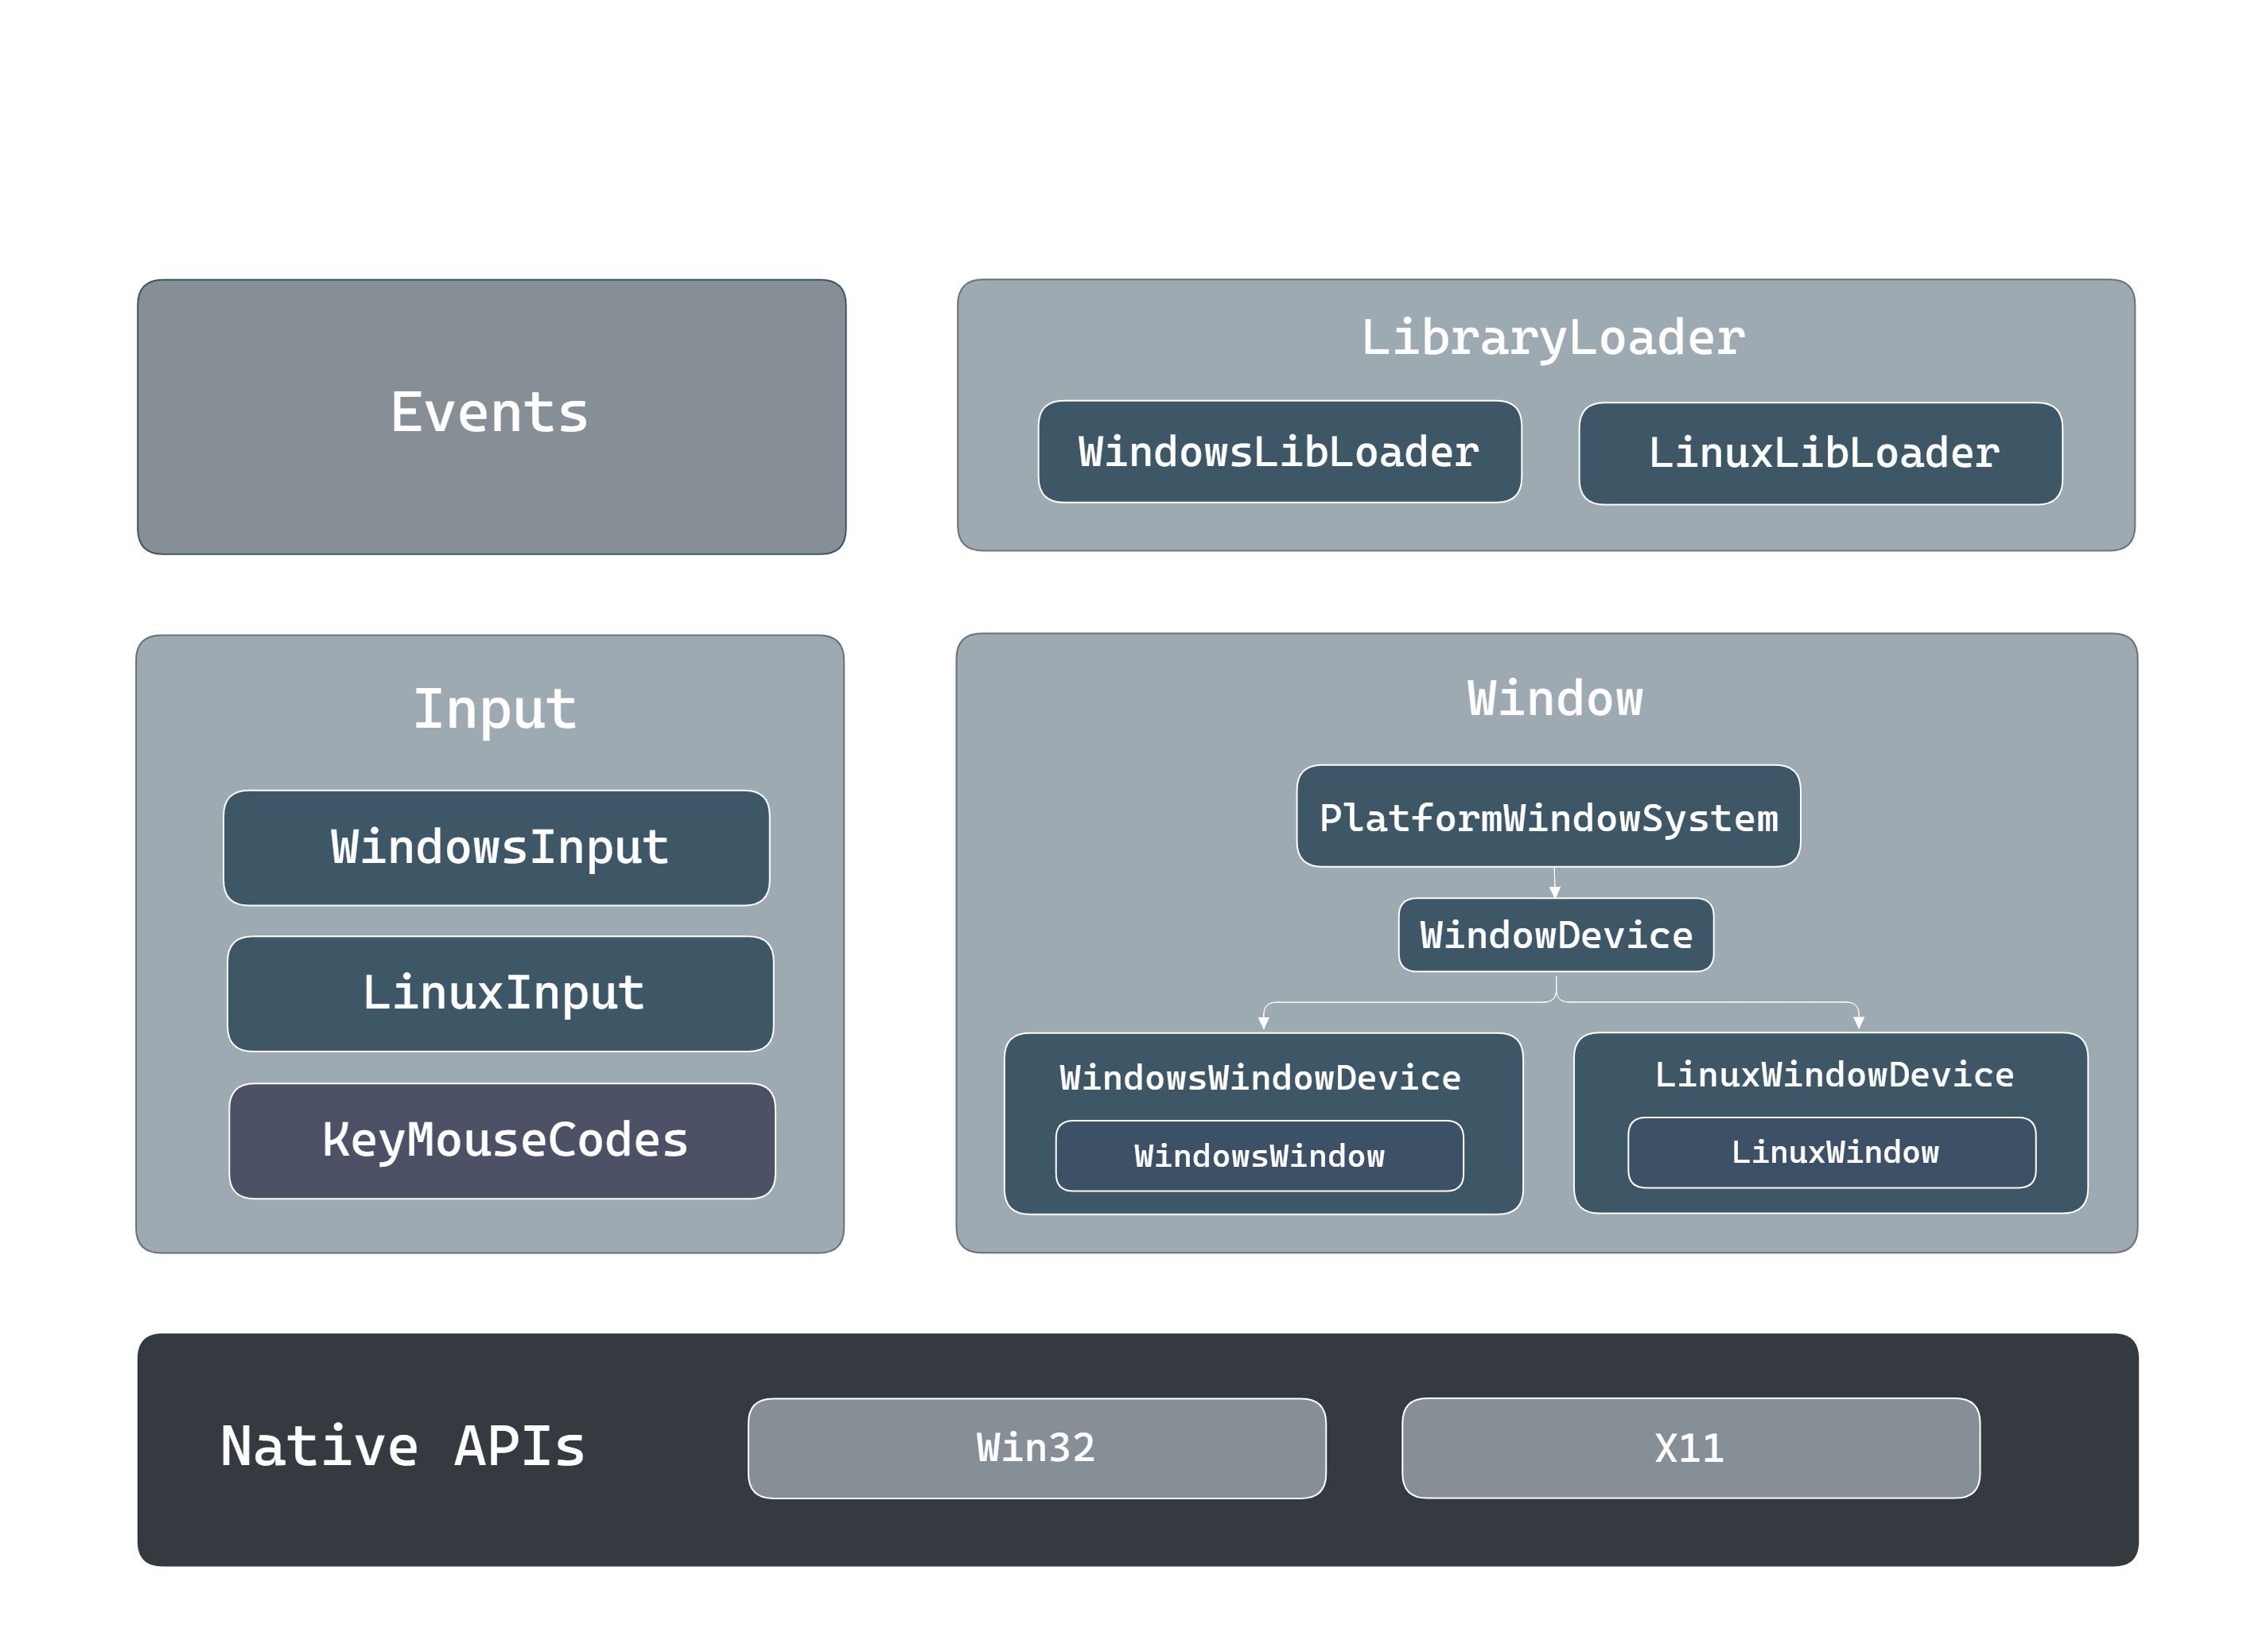
FUME Platform layer diagram
Platform-Dependent RHI Resources
Each concrete implementation of IWindow exposes graphics native handles required by rendering APIs, such as Vulkan surfaces or DirectX swap chains.
This design explicitly supports the development of an RHI fully independent of platform-specific details like Win32 handles, X11/Wayland objects, or other OS-dependent constructs.
By separating these responsibilities, the RHI can remain API-agnostic and independent of any particular OS. More details about this RHI design will be extended in the FUME Renderer section.
FUME Renderer
The most developed and actively evolving core module in the project is the FUME Renderer. This section explains how it was designed from the ground up to provide a cross-platform, API-agnostic rendering architecture, with a strong focus on modular design, API abstraction, and long-term scalability.
Rendering Architecture
The rendering architecture starts with the RenderSystem, which works as a runtime subsystem of the application and can be enabled or disabled through a configuration flag.
This system controls the full rendering flow of the engine.
The RenderSystem is divided into four main stages:
-
Load Stage: Selects and loads the rendering backend at runtime based on user input, currently supporting DirectX 12 on Windows and Vulkan on Windows and Linux. -
Init Stage: Retrieves the active main window and sets up all platform-dependent and core graphics resources, such as the window surface, swapchain, device, command and other backend-specific objects. -
Release Stage: Handles the clean shutdown of all rendering RHI state and resources. -
Draw Stage: Represents the core of the pipeline. Scene data is collected into graphics-level representations, submitted into the enqueued render passes, and scheduled through a FrameGraph. These passes record GPU operations through the RHI which are translated into concrete API calls by the active render backend when FrameGraph is compiled and executed later. This design supports different rendering pipelines, such as forward and deferred, and provides an extensible and modualr rendering architecture.
API-Agnostic Rendering Layer

Rendering Architecture UML design
Now that the render system has been introduced, we can break down how the rendering module is structured internally to provide an API-agnostic layer.
As illustrated in the diagram, the primary entry point of the rendering module is the Renderer layer,
which is responsible for core functionality such as RHI loading, GPU resource initialization and release,
and drives rendering using the current application context.
The Renderer owns the IRHI instance, graphics-level representations from scene data,
and a configurable render pipeline.
At the moment, two pipelines are provided: forward and deferred rendering, both derived from IRenderPipeline.
These pipelines register and enqueue render passes, which are stored, ordered, and executed by the RenderPassSystem.
Each pass is implemented as a render feature with a single Execute() method, parameterized with render-related data and built on top of a domain-specific command-based design. Examples of such passes include ShadowMap, GBufferPass, and LightingPass, etc.
Each render pass uses the FrameGraph to define its execution in a data-driven way.
Passes describe the resources they need and the operations they perform, while the FrameGraph decides when and how they run.
A TransientResourceSystem works alongside it to efficiently allocate, reuse, and alias GPU memory based on real resource lifetimes.
During FrameGraph compilation and execution, passes record GPU commands through RHI-agnostic abstractions,
accessed via the RenderEngine and the active backend implementation.
This approach allows the renderer to work only with abstract representations, keeping it fully decoupled from the underlying graphics API and maintaining a clean, modular design.
RHI
At the core of the renderer’s API-agnostic design is the Render Hardware Interface (RHI). The RHI defines the abstraction layer that keeps the renderer fully decoupled from the underlying graphics API.
Its main role is to provide a unified interface for resource creation, command recording, and GPU synchronization, by providing a common language for both Vulkan and DirectX 12 backends.
Thanks to this layer, high-level rendering systems can implement complex logic without dealing with API-specific boilerplate or platform details, while still keeping access to low-level control when needed.
RHI Interface Entry Points
The RHI is designed with a clear hierarchical structure, where ownership and responsibilities are well defined. At the top level, the engine interacts only with a small set of interfaces that expose the rendering subsystem in an abstract way.
-
IRHI: represents the main entry point to the Render Hardware Interface. From the engine perspective, it behaves as an opaque handle to a dynamically loaded rendering backend, providing basic backend identification and telemetry while hiding all graphics API–specific details. -
IRenderBackend: Built upon IRHI, the IRenderBackend interface represents the concrete backend implementation. It owns all rendering-related subsystems and is responsible for creating the main RHI controllers through factory methods. These controllers define the core execution domains of the renderer and form the foundation for all API-agnostic rendering logic.
RHI Core Interface Controllers
Below the backend entry interfaces, the RHI exposes a set of specialized controller interfaces that split rendering responsibilities into clear and independent domains. Together, these controllers define what GPU resources are available, where rendering occurs, and how commands are executed.
-
IRenderDevice (What): This interface handles GPU initialization and ownership of core API resources. Backend implementations (Vulkan, DirectX 12) are responsible for loading the API, selecting the physical device, creating the logical device, and setting up global GPU state. It acts as the root for GPU resource creation and lifetime management. -
IRenderContext (Where): IRenderContext manages platform-dependent presentation data, such as the swapchain, backbuffers, and synchronization objects linked to the window system. It encapsulates surface handling in Vulkan and DXGI-related presentation in DirectX 12, keeping platform-specific details isolated from the renderer. -
IRenderCommand (How): This interface defines how rendering commands are recorded and submitted. It provides a command-based API to bind resources, set pipelines, and issue draw or dispatch calls. Each backend translates these abstract commands into the corresponding Vulkan or DirectX 12 command buffer operations.
GPU Resource Abstractions
Below the core RHI interfaces, the system defines extra abstractions that wrap lower-level API concepts.
Interfaces such as IQueue, ICommandList, and ISwapchain provide structured access to GPU queues, command buffers/lists, and presentation.
Their concrete implementations manage the native Vulkan or DirectX 12 objects, while exposing a consistent interface to the renderer.
The RHI also exposes resource abstractions used by higher-level systems, such as IBuffer, ITexture, IShader, IPipeline, IPipelineLayout, and ISampler.
Each interface represents a specific GPU resource, with backend implementations owning the corresponding native API handles.
These objects form the main interaction surface between the engine-level systems and the rendering pipeline.
With this layered abstraction, the renderer works only with abstract interfaces, while all API-specific logic and data ownership stay inside the backend implementations.
The following diagram illustrates the conceptual boundary between the renderer and the RHI layer:
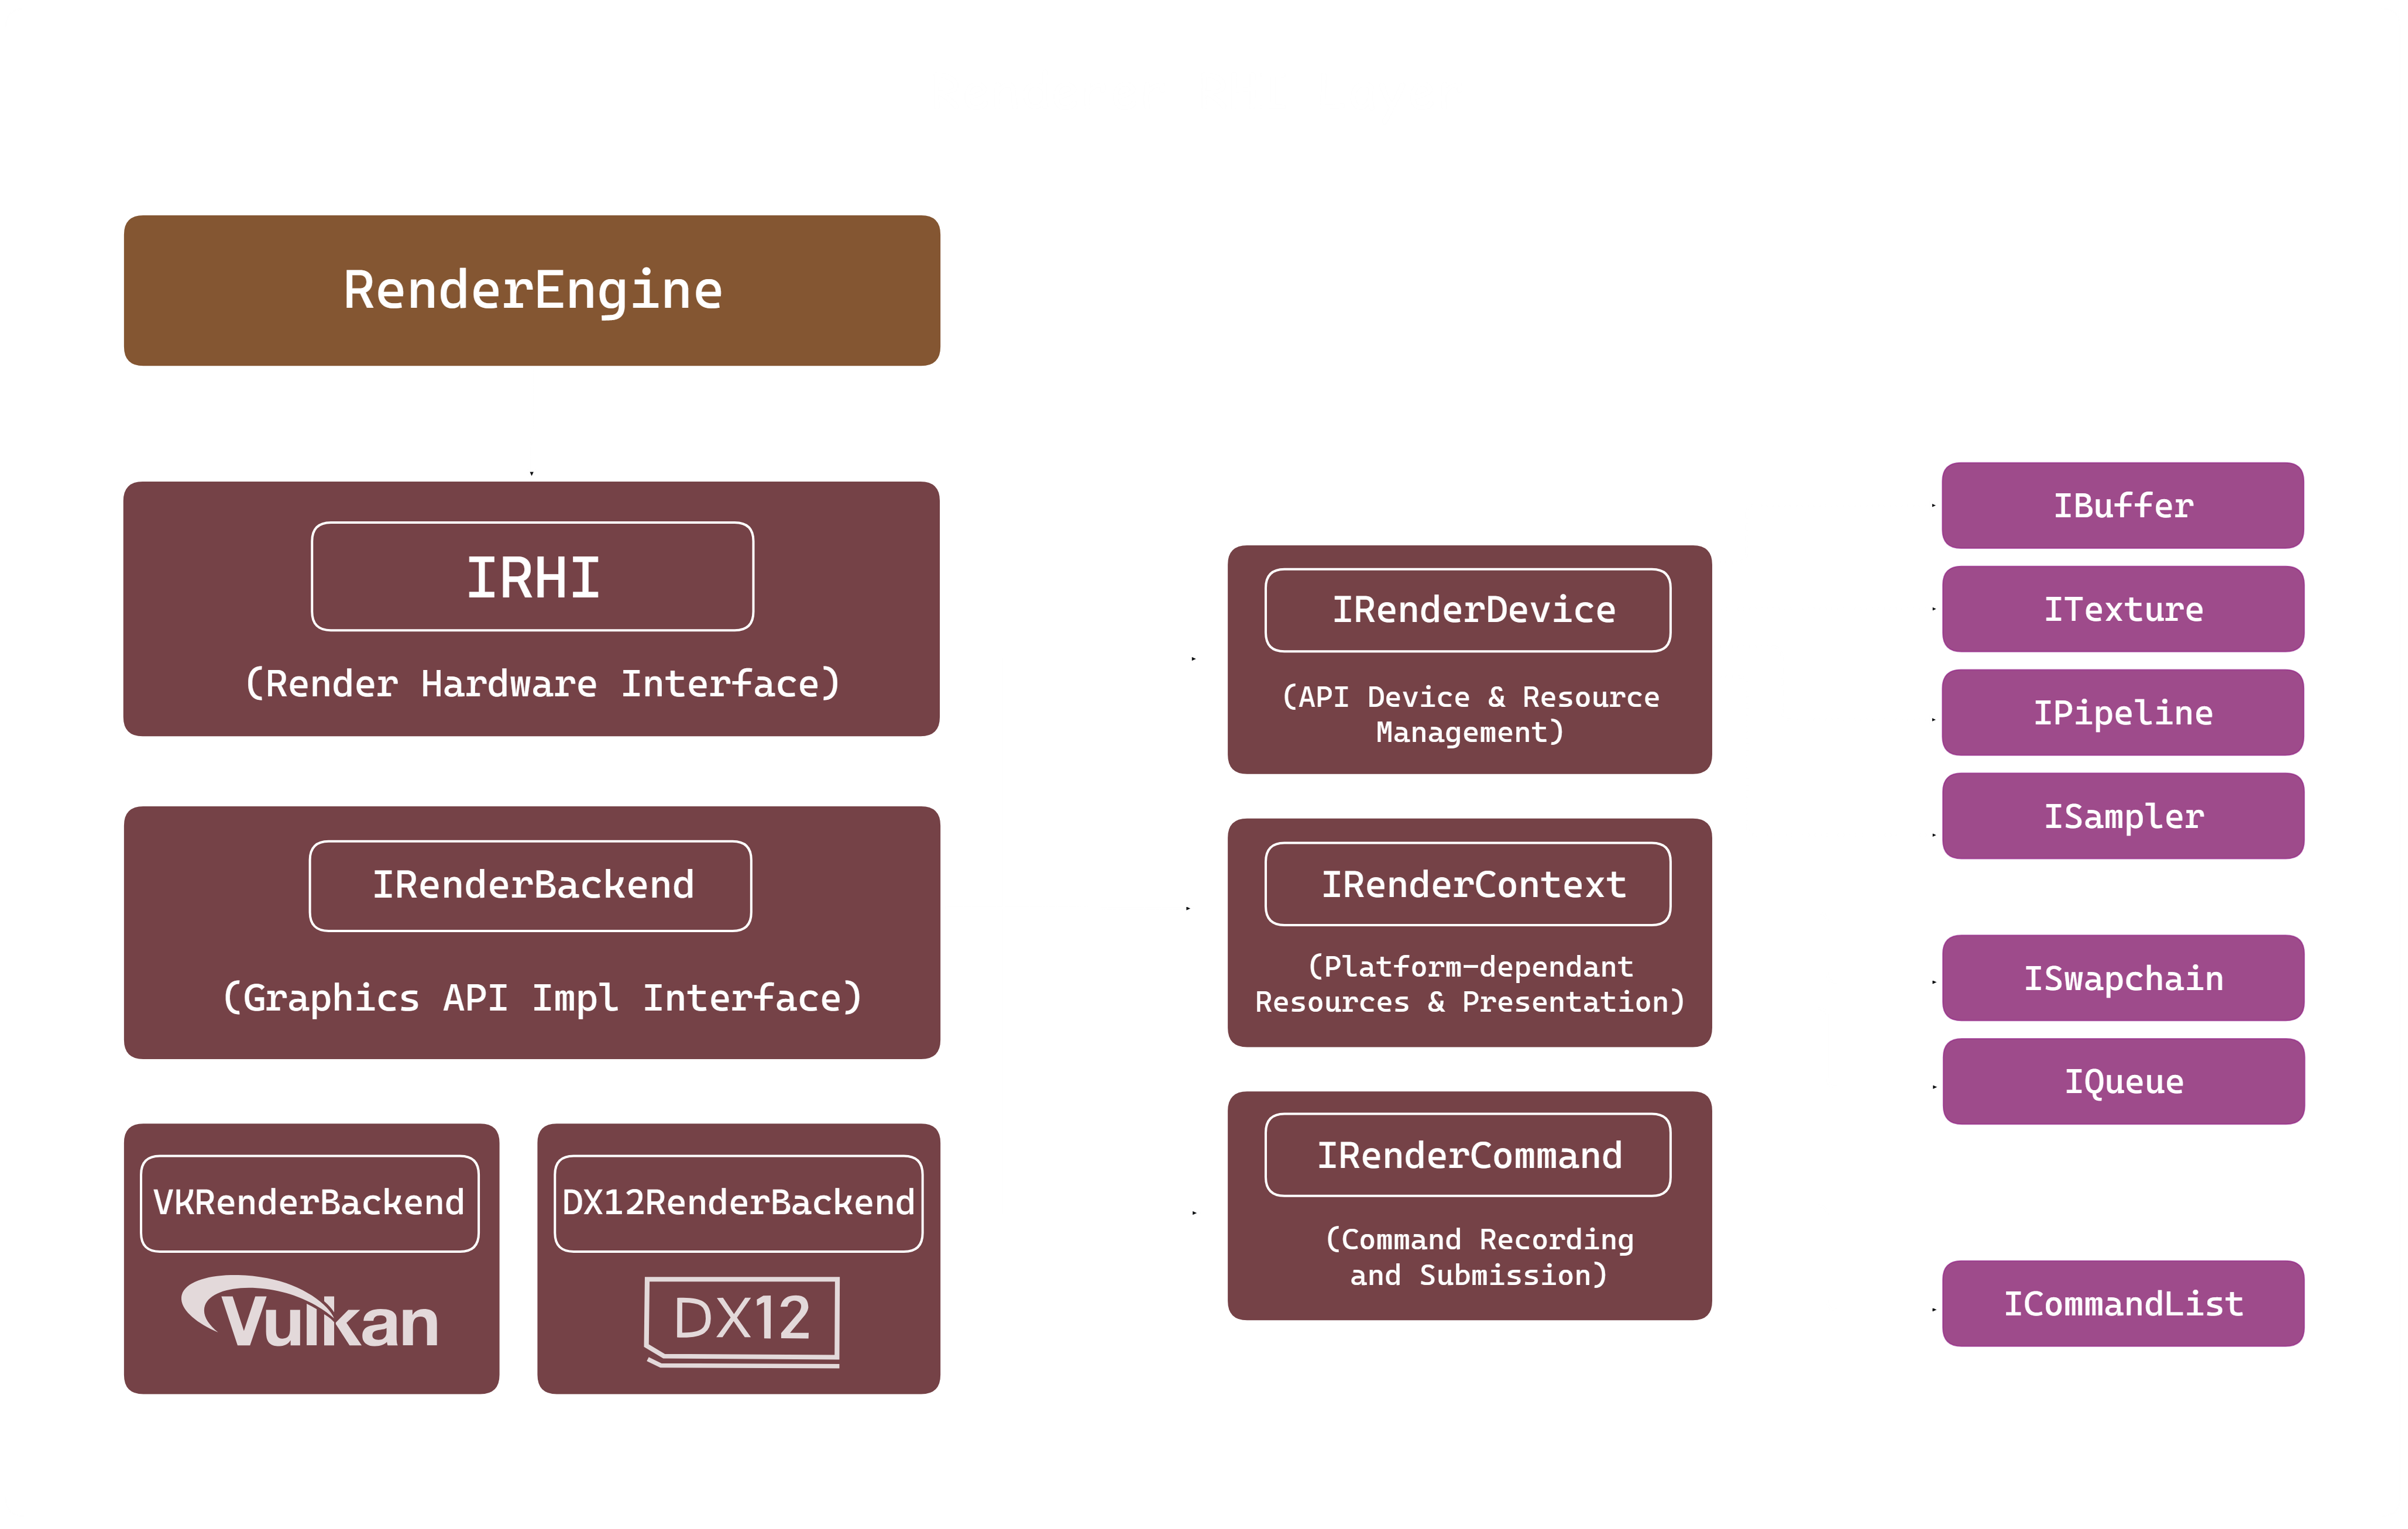
RHI Abstraction diagram
Plugin-Based RHI Loading
The engine supports runtime loading of rendering backends and is built around a plugin-based architecture. This allows the application to choose the graphics API through configuration or command-line arguments, without recompiling the engine.
In this model, the RHI is treated as a modular hot-swappable plugin, where each backend is compiled as an independent shared library (.dll on Windows, .so on Linux). To ensure binary compatibility and avoid C++ name mangling issues, each RHI plugin exposes a single, stable entry point.
extern "C" FUME_RHI_API IRHI* GetRHI();
This function works as the factory entry point for the backend and returns a pointer to the IRHI interface.
By using extern "C", the symbol name remains stable across different compilers and platforms, so the engine can safely locate and load it through dynamic symbol lookup.
Loading the backend module
The rendering API to use is defined through a command-line flag (for example, --rhi=vk or --rhi=dx12) and is parsed when the application starts.
The ILibraryLoader system hides the platform-specific calls such as LoadLibrary or dlopen, and it is used to load the backend module (for example, libVulkanRHI.so or DirectX12RHI.dll) dynamically into memory.
After the library is loaded, the engine looks for the GetRHI symbol and calls it to obtain the backend instance. This function returns a pointer to the concrete IRenderBackend implementation, which is then stored inside the RenderSystem using a smart pointer.
mLibrary = platform::ILibraryLoader::Create();
std::string LibraryName
{
    mLibrary->GetLibraryPrefix()
    + Render::RenderAPIToString(SelectedAPI) + "RHI" +
    mLibrary->GetLibraryExtension()
};

if (mLibrary->Load(LibraryName))
{
    typedef Render::IRHI* (*RHIINSTANCER)();
    RHIINSTANCER RHICreator = reinterpret_cast<RHIINSTANCER>(mLibrary->GetSymbol("GetRHI"));
    if (RHICreator)
    {
        pRHI = RHICreator();
    }
    else
    {
        std::cerr << "Error loading symbol: " << mLibrary->GetErrorMessage() << "\n";
    }
}
else
{
    std::cerr << "Error loading library: " << mLibrary->GetErrorMessage() << "\n";
}

if (pRHI != nullptr)
{
    pRHI->Initialize();
    std::cout << pRHI->QueryAPIString() << "\n";
}
Internally, each backend implements this method by returning a singleton of its concrete IRenderBackend.
This ensures there is only one backend instance during the application lifetime and keeps all graphics resources managed in a single place.
// VKRenderBackend.cpp

FUME_RHI_API IRHI* GetRHI()
{
    return VKRenderer::GetBackend();
};

IRendererBackend* VKRenderer::GetBackend()
{
    if (sRHIBackend == nullptr)
    {
        sRHIBackend.reset(new VKRenderer{});
    }

    return sRHIBackend.get();
}
Once the plugin is loaded, the engine communicates with it only through the IRHI and IRenderBackend interfaces.
The RenderEngine fully owns and manages the lifetime of the RHI instance.
From this point onward, all rendering work goes through the abstract RHI interfaces, without any direct dependency on the concrete backend implementation.
This dynamic loading approach brings several benefits. It keeps a clear separation between the engine and the graphics APIs, allows choosing the rendering backend at runtime, helps with cross-platform support, and makes it easier to add new graphics APIs as standalone modules without changing existing engine code. This keeps the renderer modular, flexible, and easy to extend.
Native Resource Interface Layer
One of the key design goals of the RHI is to remain completely independent from any operating system, windowing system, or platform-specific API. While the RHI provides a unified abstraction over graphics APIs such as Vulkan and DirectX 12, certain low-level objects —particularly those related to presentation— are inherently platform-dependent.
Examples include Vulkan surfaces (VkSurfaceKHR) or native window handles (HWND) required by DirectX 12.
Embedding platform logic directly into the RHI would make it more complex and less portable, adding platform checks, conditional compilation directives (#ifdefs), and extra SDK dependencies,
which would create tightly coupled and hard-to-maintain code.
To solve this, the RHI uses a native resource interface layer, letting external systems access native API objects safely while keeping the core rendering abstraction clean and platform-agnostic.
IResource Interface
At the core of this layer lies the IResource interface.
It acts as a common base for several RHI abstractions, such as devices, contexts, swapchains, and GPU resources.
Its main goal is to offer a standard way to access or inject native API objects without exposing backend-specific implementation details.
Concrete RHI implementations override these functions only when needed, exposing just the native objects that are relevant for each resource and backend. This keeps native access explicit, controlled, and backend-aware.
class FMRHI_API IResource
{
protected:
    explicit IResource() = default;
    virtual ~IResource() = default;

public:
    virtual NativeObject GetNativeObject(NativeObjectType objectType)
    {
        (void)objectType;
        return nullptr;
    }

    virtual void SetNativeObject(NativeObjectType objectType, NativeObject object)
    {
        (void)objectType;
        (void)object;
    }

    // Non-copyable and non-movable
    IResource(const IResource&) = delete;
    IResource(const IResource&&) = delete;
    IResource& operator=(const IResource&) = delete;
    IResource& operator=(const IResource&&) = delete;
};
The interface defines two virtual functions:
-
GetNativeObject(...), which allows external systems to retrieve a native object owned by the RHI. -
SetNativeObject(...), which allows external systems to provide native objects required by the RHI.
Both functions use a strongly typed NativeObjectType enum to clearly identify which native object is being accessed.
enum class NativeObjectType
{
    VKInstance,
    VKSurface,
    HWND
};
This enumeration enables explicit interaction with native handles, avoiding ambiguous casts or unsafe assumptions about the underlying API.
NativeObject Wrapper
To safely transport native objects across the RHI boundary, the engine introduces the NativeObject wrapper.
This lightweight utility type acts as a tagged container capable of holding either a pointer or an integer-based handle, depending on the API’s requirements.
struct FMRHI_API NativeObject
{
    enum class Kind { None, Integer, Pointer };
    union
    {
        std::uint64_t integer;
        void* pointer;
    };
    Kind kind = Kind::None;

    NativeObject(std::uint64_t i) : integer(i), kind(Kind::Integer) {}
    NativeObject(void* p)         : pointer(p), kind(Kind::Pointer) {}
};
The wrapper provides explicit conversion operators and type-safe accessors through assertions, ensuring that misuse is detected early during development.
Native Resource Access
From the application or platform layer point of view, native resource setup is explicit and API-driven. The user creates the platform-dependent graphics objects using the selected windowing system (such as Win32, GLFW, or X11) and then passes them to the RHI when required.
A typical example for swapchain preparation on Windows is shown below:
void WindowsWindow::PrepareSwapchain(Render::IRHI* aRHI)
{
    if (aRHI->QueryAPI() == Render::RenderAPI::Vulkan)
    {
        VkInstance Instance  = aRHI->GetContext()->GetNativeObject(Render::NativeObjectType::VKInstance);

        VkSurfaceKHR Surface = CreateVulkanSurface(
                                Instance,
                                mWindowHandle,
                                mHandleInstance);

        aRHI->GetContext()->SetNativeObject(Render::NativeObjectType::VKSurface, Surface);
    }
    else if (aRHI->QueryAPI() == Render::RenderAPI::DirectX12)
    {
        aRHI->GetContext()->SetNativeObject(Render::NativeObjectType::HWND, mWindowHandle);
    }
    else
    {
        std::cout << "API not supported for swapchain preparation\n";
    }
}
For example, in the Vulkan backend, the rendering context (VKContext) exposes access to the Vulkan instance
and allows the platform-created VkSurfaceKHR to be provided to the RHI.
NativeObject VKContext::GetNativeObject(NativeObjectType aType)
{
    auto* Device = static_cast<VKDevice*>(VKRenderer::GetBackend()->GetDevice());
    switch (aType)
    {
        case NativeObjectType::VKInstance:  return NativeObject { (VkInstance)Device->GetInstance() };
        default:                            return NativeObject{nullptr };
    }
}
In this model, the application layer explicitly decides how native objects are created and passed, depending on the active graphics API. The RHI simply consumes these objects, without needing to know where they come from or which platform created them.
As a result, the RHI stays fully platform-agnostic and free of OS-specific dependencies, while still supporting advanced use cases that require access to native graphics objects.
Frame Rendering Workflow
The frame rendering workflow explains how scene data is translated into graphics-level data and executed on the GPU in an API-agnostic way.
At the start of each frame, scene components are processed and packed into a RenderFrame,
which acts as a transient container for all renderable information.
This RenderFrame is then handled by the active render pipeline, such as forward or deferred. The pipeline registers render passes that describe each render feature using a two-phase FrameGraph model. After compilation, the FrameGraph executes these passes, recording RHI-agnostic commands that are finally translated into backend-specific API calls.
Scene-to-Render Data
The first step of the frame rendering workflow is converting scene data into graphics-ready data. In FUME, ECS scene components are translated into a transient structure called RenderFrame. This creates a clear boundary between gameplay logic and rendering, so the renderer only works with graphics-domain abstractions.
To build this data, the renderer creates a FrameBuilder, which is used to assemble all frame-local render data.
The builder is initialized using the active render pipeline configuration, allowing the pipeline to define how the render data is organized from the start.
Render::FrameBuilder RFBuilder {mGFXFrame, Renderer::GetRenderPipeline()->GetConfig()};
Render Camera Assignment
Before processing renderable entities, the system resolves which camera will be used for the current frame. A valid camera controller is selected from the active scenes and assigned to the FrameBuilder. This guarantees that view and projection matrices are available before any geometry or lighting data is collected.
The system supports both primary and secondary cameras, making it possible to handle multi-camera rendering scenarios.
if (auto it = std::ranges::find_if(aScenes, [](const auto& scene)
{
    return (scene->GetCameraController() && scene->GetState() == SceneState::Stopped);
});
it != aScenes.end())
{
    RFBuilder.AddFrameCamera((*it)->GetCameraController().get());
}
Render World Constructs
Each scene is converted into its own RenderWorld, which represents a graphics-domain snapshot of the scene for the current frame.
The RenderWorld aggregates meshes, cameras, and lights, while staying fully decoupled from ECS-specific structures.
Memory for some renderable elements is reserved in advance using scene predefined limits, reducing per-frame dynamic allocations and improving performance.
RWorld.Meshes.reserve(Scene->GetEntityCount());
RWorld.DirLights.reserve(Render::RenderDirectionalLight::MAX_DIR_LIGHTS);
RWorld.PointLights.reserve(Render::RenderPointLight::MAX_POINT_LIGHTS);
RWorld.SpotLights.reserve(Render::RenderSpotLight::MAX_SPOT_LIGHTS);
Transform Evaluation
Before extracting renderable data, the system updates all transform components flagged for recalculation. Each transform combines translation, rotation, and scale, so the Local-Space Transform matrix is recomputed whenever needed.
if (aTRSCmp.RecalculateFlag)
{
    aTRSCmp.Transform = Math::ComposeTRS(
        aTRSCmp.Position,
        aTRSCmp.Rotation,
        aTRSCmp.Scale
    );
    aTRSCmp.RecalculateFlag =false;
}
Mesh and Material Translation
Entities with mesh components are converted into RenderMesh structures.
For each mesh, the final world transform is calculated considering entity hierarchies,
and all draw-relevant info such as vertex/index ranges, buffer references, material bindings, and shadow-casting flags are collected.
Render::RenderMesh RMesh{};
Math::Mat4 WorldTRS{
CalculateTransformEntityHierarchy(
        EM, aEntity, aTRSCmp.Transform, aMeshCmp.WorldTransform
    )
};

RFBuilder.SetTransform(RMesh, WorldTRS);
RFBuilder.SetMesh(
    RMesh,
    aMeshCmp.BaseVertex,
    aMeshCmp.BaseIndex,
    aMeshCmp.NumVertices,
    aMeshCmp.NumIndices,
    aMeshCmp.VB,
    aMeshCmp.IB,
    aMeshCmp.CastShadows
);
RFBuilder.SetMaterial(RMesh, aMeshCmp.Material);
RFBuilder.AddRenderMesh(RWorld, RMesh);
This step turns ECS entities into geometry ready for rendering, stripping away all non-essential gameplay data.
Light Data Translation
Lighting components are processed independently by type. Directional, point, and spot lights are converted into compact render-light structures containing only the parameters required for shading.
For example, point lights include both base lighting parameters and attenuation factors:
Render::PointLight LightData
{
    .Base {
        .Color            = aPointLightCmp.Color,
        .AmbientIntensity = aPointLightCmp.AmbientIntensity,
        .DiffuseIntensity = aPointLightCmp.DiffuseIntensity
    },
    .Attenuation {
        .Constant = aPointLightCmp.Constant,
        .Linear   = aPointLightCmp.Linear,
        .Exp      = aPointLightCmp.Exp
    }
};

RFBuilder.SetPointLight(RWorld, aTRSCmp.Transform, LightData);
Shadow-Casting Translation
Once all lights have been collected, the frame builder performs an additional translation method to identify shadow-casting lights and extract its transform data. This information is explicitly stored in the RenderWorld and later consumed by shadow-related render passes.
RFBuilder.AddShadowCastingLights(RWorld);
Based on the light type priority configured by the pipeline method, the method stores the light's transforms taking into account the maximum permitted by the configuration. The following snippet code describes how shadow casters from spot lights are calculated:
// Spot lights
auto CastSpotLightShadows = [&]()
{
    const std::size_t MaxSpotLights = std::min
    (
        aRWorld.SpotLights.size(),
        static_cast<std::size_t>(mConfig.MaxShadowCastSpotLights)
    );

    for (size_t i = 0; i < MaxSpotLights && aRWorld.ShadowCasters.size() < mConfig.MaxShadowCastingLights; ++i)
    {
        const auto& SpotLight = aRWorld.SpotLights[i];

        auto View       = Math::View(SpotLight.Light.WorldPos, SpotLight.Light.WorldDir, {0.f, 1.0f, 0.f});
        auto Projection = Math::Perspective(45.0f, 1.f, 1.f, 100.f);

        AddShadowCaster(eLightType::Spot, { View }, std::move(Projection));
    }
};
Frame Assembly
Once all scenes are processed, their RenderWorld instances are added to the RenderFrame. This frame holds all graphics-level data needed for rendering the current frame.
RFBuilder.AddRenderWorld(RWorld);
return RFBuilder.GetFrame();
By resolving scenes upfront and producing a self-contained RenderFrame, the renderer keeps a clean separation from ECS and scene management, working only on stable, frame-local data.
Render Pipeline System
Render pipelines in FUME define the high-level rendering methods provided by the renderer which manage a series of render passes. Each pipeline sets up and enqueue the passes needed to produce the final frame. Currently, the renderer supports the forward and deferred render pipelines.
Render pipelines don’t render directly. They are compositional layers that just organize and schedule the render passes for each frame. This design allows how render work is decomposed and scheduled.
Rendering Method Design
An example of FUME’s render pipeline in action is the Deferred Rendering Pipeline.
Here, the pipeline defines which set of passes are used for deferred rendering and their execution order.
When the pipeline is created, it registers and sets up all necessary passes establishing what the pipeline can do, not how each frame runs. Passes such as shadow mapping, G-buffer, lighting, and Skybox are created and owned by the pipeline:
DeferredRenderPipeline::DeferredRenderPipeline()
{
    GetPassManager()->MakePass(ShadowPass::TypeID);
    GetPassManager()->MakePass(GBufferPass::TypeID);
    GetPassManager()->MakePass(LightingPass::TypeID);
    GetPassManager()->MakePass(ForwardBoxPass::TypeID);
    GetPassManager()->MakePass(SkyboxPass::TypeID);
    GetPassManager()->MakePass(GridPass::TypeID);
    GetPassManager()->MakePass(SwapchainPass::TypeID);
    GetPassManager()->MakePass(GUIPass::TypeID);
}
The next step is the the setup stage. The pipeline selects and enqueues which passes to run and in what order for the deferred rendering. Core passes always run, while optional passes are enabled only if the runtime configuration requires them.
void DeferredRenderPipeline::Setup()
{
    GetPassManager()->EnqueuePass<ShadowPass>();
    GetPassManager()->EnqueuePass<GBufferPass>();
    GetPassManager()->EnqueuePass<LightingPass>();
    GetPassManager()->EnqueuePass<ForwardBoxPass>();

    if (Config.SkyboxEnabled)
        GetPassManager()->EnqueuePass<SkyboxPass>();
    if (Config.GridEnabled)
        GetPassManager()->EnqueuePass<GridPass>();

    GetPassManager()->EnqueuePass<SwapchainPass>();
}
Data-Driven Pass Managment
The PassManager is the main system that handles the lifetime, activation, and execution
order of render passes within a pipeline.
It keeps track of two distinct data structures:
- A map of all instantiated passes owned by the pipeline.
- A queue of active passes that will be executed for the current frame.
Passes are instantiated through the PassFactory, which provides a registry-based mechanism for creating pass instances by type identifier.
void PassManager::MakePass(const std::string& aName)
{
    auto NewPass = PassFactory::Get().Create(aName);
    if (NewPass)
    {
        NewPass->Init();
        mPasses[aName] = std::move(NewPass);
    }
}
Once created, passes can be dynamically enqueued or dequeued on a per-frame basis.
The EnqueuePass(...) method optionally allows parameters to be passed into the pass, enabling fine-grained runtime configuration:
template<typename TPass, typename... TArgs>
void EnqueuePass(TArgs&&... aArgs)
{
    const std::string Name = TPass::TypeID;

    // Check if pass exists
    auto it = mPasses.find(Name);
    if (it == mPasses.end()) return;

    // Set pass parameters
    if constexpr (HasSetParameters<TPass, TArgs...>)
    {
        static_cast<TPass*>(it->second.get())->SetParameters(std::forward<TArgs>(aArgs)...);
    }

    // Check if pass is active
    if (std::find(mActivePasses.begin(), mActivePasses.end(), it->second.get()) != mActivePasses.end()) return;

    mActivePasses.push_back(it->second.get());
}
During frame rendering, the engine goes through the active pass queue and calls each pass’s Execute() method, passing a shared execution context as a parameter. This context lets the pass access the RenderFrame, RHI, and FrameGraph amongst other stuff to record its rendering work in a data-driven way.
void ExecutePass(std::size_t aIdx, RenderExecutionContext& aExeCtx)
{
    assert(aIdx >= 0 && aIdx < mActivePasses.size());
    mActivePasses[aIdx]->Execute(aExeCtx);
}
Higher-Level Access and Runtime Control
The renderer lets the application access the active render pipeline, so higher-level systems like the editor can change rendering behavior on the fly. This makes it possible to have multiple views or presentation modes to be built on top of the same rendering method.
For example, in the editor, different view modes need different pass setups. The application can enqueue or dequeue passes on the active pipeline.
void Editor::OnDraw()
{
    auto* RenderPipeline = Renderer::GetRenderPipeline();

    switch (mLayoutManager.GetViewMode())
    {
        case eLayoutViewMode::Editor:
        {
            RenderPipeline->DequeuePass<Render::SwapchainPass>();
            RenderPipeline->EnqueuePass<Render::GUIPass>();
        }
        break;

        case eLayoutViewMode::Showcase:
        {
            RenderPipeline->EnqueuePass<Render::SwapchainPass>();
            RenderPipeline->EnqueuePass<Render::GUIPass>(true);
        }
        break;

        default:
        {
            RenderPipeline->DequeuePass<Render::GUIPass>();
            RenderPipeline->EnqueuePass<Render::SwapchainPass>();
        }
        break;
    }
}
Treating render pipelines as runtime-configurable rendering methods makes it easy for editor, gameplay, or showcase modes to coexist without duplicating pipeline logic.
FrameGraph
The FrameGraph is the renderer’s core system for scheduling passes and managing resources.
It decouples what each pass needs from when and how it runs, making explicit frame construction fully data-driven.
The design of this FrameGraph is inspired by the Extensible FrameGraph presented by Ubisoft at GDC. It uses the same core principles of declarative resource usage, automatic dependency resolution, and lifetime-based memory management, while it keeps tailored to the architecture of this engine.
At runtime, the active pipeline iterates over its passes and calls Execute() with a shared RenderExecutionContext,
which bundles together the FrameGraph, the RenderEngine, RenderFrame data, amongst other stuff:
mGFXPipeline->Execute(Render::RenderExecutionContext
{
    mGFXContext,
    *mGFXEngine.get(),
    mGFXFrame
});
Each pass gets access to the FrameGraph as part of the graphics context, letting it define its work in a structured, API-agnostic way.
Compile-time Resource Configuration
The FrameGraph is fully independent from both the renderer and the graphics API. Resource types are defineda and configured at compile time using trait specialization, which lets the renderer describe how abstract FrameGraph resources map to concrete graphics interfaces.
template <>
struct FrameGraphTraits<eFrameGraphResourceType::Texture>
{
    using Resource  = ITexture;
    using Desc      = TextureDesc;
    using Allocator = TransientResourcesAllocator;
};

template <>
struct FrameGraphTraits<eFrameGraphResourceType::Buffer>
{
    using Resource  = IBuffer;
    using Desc      = BufferDesc;
    using Allocator = TransientResourcesAllocator;
};
With this approach, the FrameGraph stays reusable and renderer-agnostic, while still integrating cleanly with the RHI abstractions and the transient resource allocator.
Transient Resource Allocator
his last alias declared using TransientResourcesAllocator type is responsible for allocating, reusing, aliasing, and destroying transient GPU resources.
It leverages the lifetime information generated by the FrameGraph to manage memory safely across passes, creating resources only when needed and releasing them as soon as they are no longer used.
This separation allows efficient transient memory management while keeping the FrameGraph fully decoupled from the renderer and the underlying graphics API.
Two-Phase Pass Definition
Render passes are defined using a two-phase model: a declaration phase and an execution phase. This aproach enables the FrameGraph to reason globally about resource lifetimes, dependencies, and scheduling before any GPU work is submitted.
Using the GeometryPass from the Forward Renderer
as an example, the first phase describes the pass in terms of resources and access patterns:
auto& GeometryData = FG.AddPass<GeometryPassData>("Geometry Pass",
[&](GeometryPassData& aData, FrameGraphBuilder& aBuilder)
{
    aData.Geometry = aBuilder.Create<FrameGraphTexture>("GeometryTexture", GeoDesc, FGAlloc);
    aData.Depth    = aBuilder.Create<FrameGraphTexture>("DepthTexture", DepthDesc, FGAlloc);

    aData.Geometry = aBuilder.WriteRenderTarget(aData.Geometry, ClearPreserve, GeoDesc.mClearColor);
    aData.Depth    = aBuilder.WriteDepthStencil(aData.Depth);

    aData.ShadowMap     = aBuilder.Read(TR.ShadowMapDepth, AccessPixelShaderSRV);
    aData.ShadowMapCube = aBuilder.Read(TR.ShadowMapCubemap, AccessPixelShaderSRV);

    aBuilder.SetImmuneToCull();
});
In this phase, the pass declares:
- Which resources it creates (color and depth targets),
- Which resources it reads from previous passes,
- Which resources it writes to during this pass,
- How each resource is accessed (shader stages, color/depth usage),
- Whether the pass is eligible for culling.
No rendering commands are issued at this stage; the pass only describes intent.
RHI-Agnostic Command Recorder
The second phase defines how the pass executes once the FrameGraph has been compiled. This phase receives an opaque render command interface:
[&](const GeometryPassData& aData, FrameGraphContext& aResourceCTX, void* aRenderCmd)
{
    auto* RenderCommand = static_cast<IRenderCommand*>(aRenderCmd);

    // ...
    // RHI commands...
    // ...
}
All GPU interaction is performed through IRenderCommand, which provides a command-based API independent of the underlying graphics backend.
It covers actions such as starting or ending render passes, binding buffers and resources, and issuing draw calls.
const auto& PassInfo = MakeRenderPassInfo(aResourceCTX, {aData.Geometry}, aData.Depth, PR.GeometryPSO);

RenderCommand->BeginRenderPass(PassInfo);
RenderCommand->SetVertexBuffer(RenderItem.VB.get());
RenderCommand->SetIndexBuffer(RenderItem.IB.get(), IndexType::Uint32);
RenderCommand->SetPipeline(*RenderItem.Material.Shader->GetPSO());
RenderCommand->DrawIndexed(RenderItem.NumIndices, RenderItem.BaseIndex, RenderItem.BaseVertex);
RenderCommand->EndRenderPass();
Since these commands work only with abstract objects —buffers, textures, pipelines, and descriptors— the pass logic stays API-agnostic, while the active RHI backend handles the translation to Vulkan, DirectX 12, or any other API internally.
Compilation and Scheduling
Once all active passes have submitted their definitions, the FrameGraph is compiled, preferably on a dedicated render thread. During this step, a dependency graph is built to capture pass and resource relationships:
void FrameGraph::Compile()
{
    mDAG.BuildGraph<PassNodeGraph, ResourceNodeGraph>([&](auto& PassNodes, auto& ResourceNodes)
    {
        UpdateReferences(PassNodes, ResourceNodes);
        Culling(ResourceNodes);
        Scheduling(PassNodes);
        ResolveLifetimes(ResourceNodes);
    });
}
This process:
- Updates resource and pass references from read/write operations,
- Removes unused resources and passes (culling),
- Orders passes to satisfy data dependencies,
- Calculates precise resource lifetimes,
The result is an optimized execution plan for the frame.
Frame Execution
After compilation, the FrameGraph is executed layer by layer. Each layer represents a set of passes that can safely execute together based on resolved dependencies:
for (auto& PassLayer : mScheduler.mLayers)
{
    PassLayer.Setup();

    // Realize Resources
    for (auto& NodeId : PassLayer.mCreates)
        GetResource(GetResourceNode(NodeId)).Realize();

    // Execute Passes
    for (auto& Pass : PassLayer.mPasses)
    {
        assert((Pass->mRefCount > 0 || Pass->mCullImmune) && "Pass should be valid!");

        for (auto [ReadId, AccessView] : Pass->mReads  )
            GetResource(GetResourceNode(ReadId)).ResolveBarrier(AccessView);
        for (auto [WriteId, AccessView] : Pass->mWrites)
            GetResource(GetResourceNode(WriteId)).ResolveBarrier(AccessView);

        auto& RenderPass {GetRenderPass(*Pass)};
        {
            FrameGraphContext ResourcesCTX {*this, *Pass};
            RenderPass.Execute(ResourcesCTX, aRenderCTX);
        }
    }

    // Derealize Resources
    for (auto& NodeId : PassLayer.mDestroys)
        GetResource(GetResourceNode(NodeId)).Derealize();
}
During execution, the FrameGraph automatically handles resource state transitions, synchronization barriers, and transient memory allocation. This lets each render pass focus only on its rendering logic, without dealing with explicit synchronization or resource lifetimes.
After all passes are executed, the frame contains the final rendering output produced by the active pipeline and is ready to be presented to the screen through the swapchain.
The FrameGraph has support for generating graph visualizations in DOT format using Graphviz,
which can be uploaded to online platforms to easily inspect and analyze the graph structure.
The graph visualization shown below corresponds to the execution of the Deferred Rendering Pipeline.
Deferred Rendering graph visualization
Rendering Techniques
This section presents the main rendering techniques currently implemented in the renderer. Each technique is showcased through visual examples in order to demonstrate the visual fidelity of the rendering architecture. In future iterations, new rendering techniques and visual effects will be progressively introduced, while the existing ones will continue to be refined and improved.
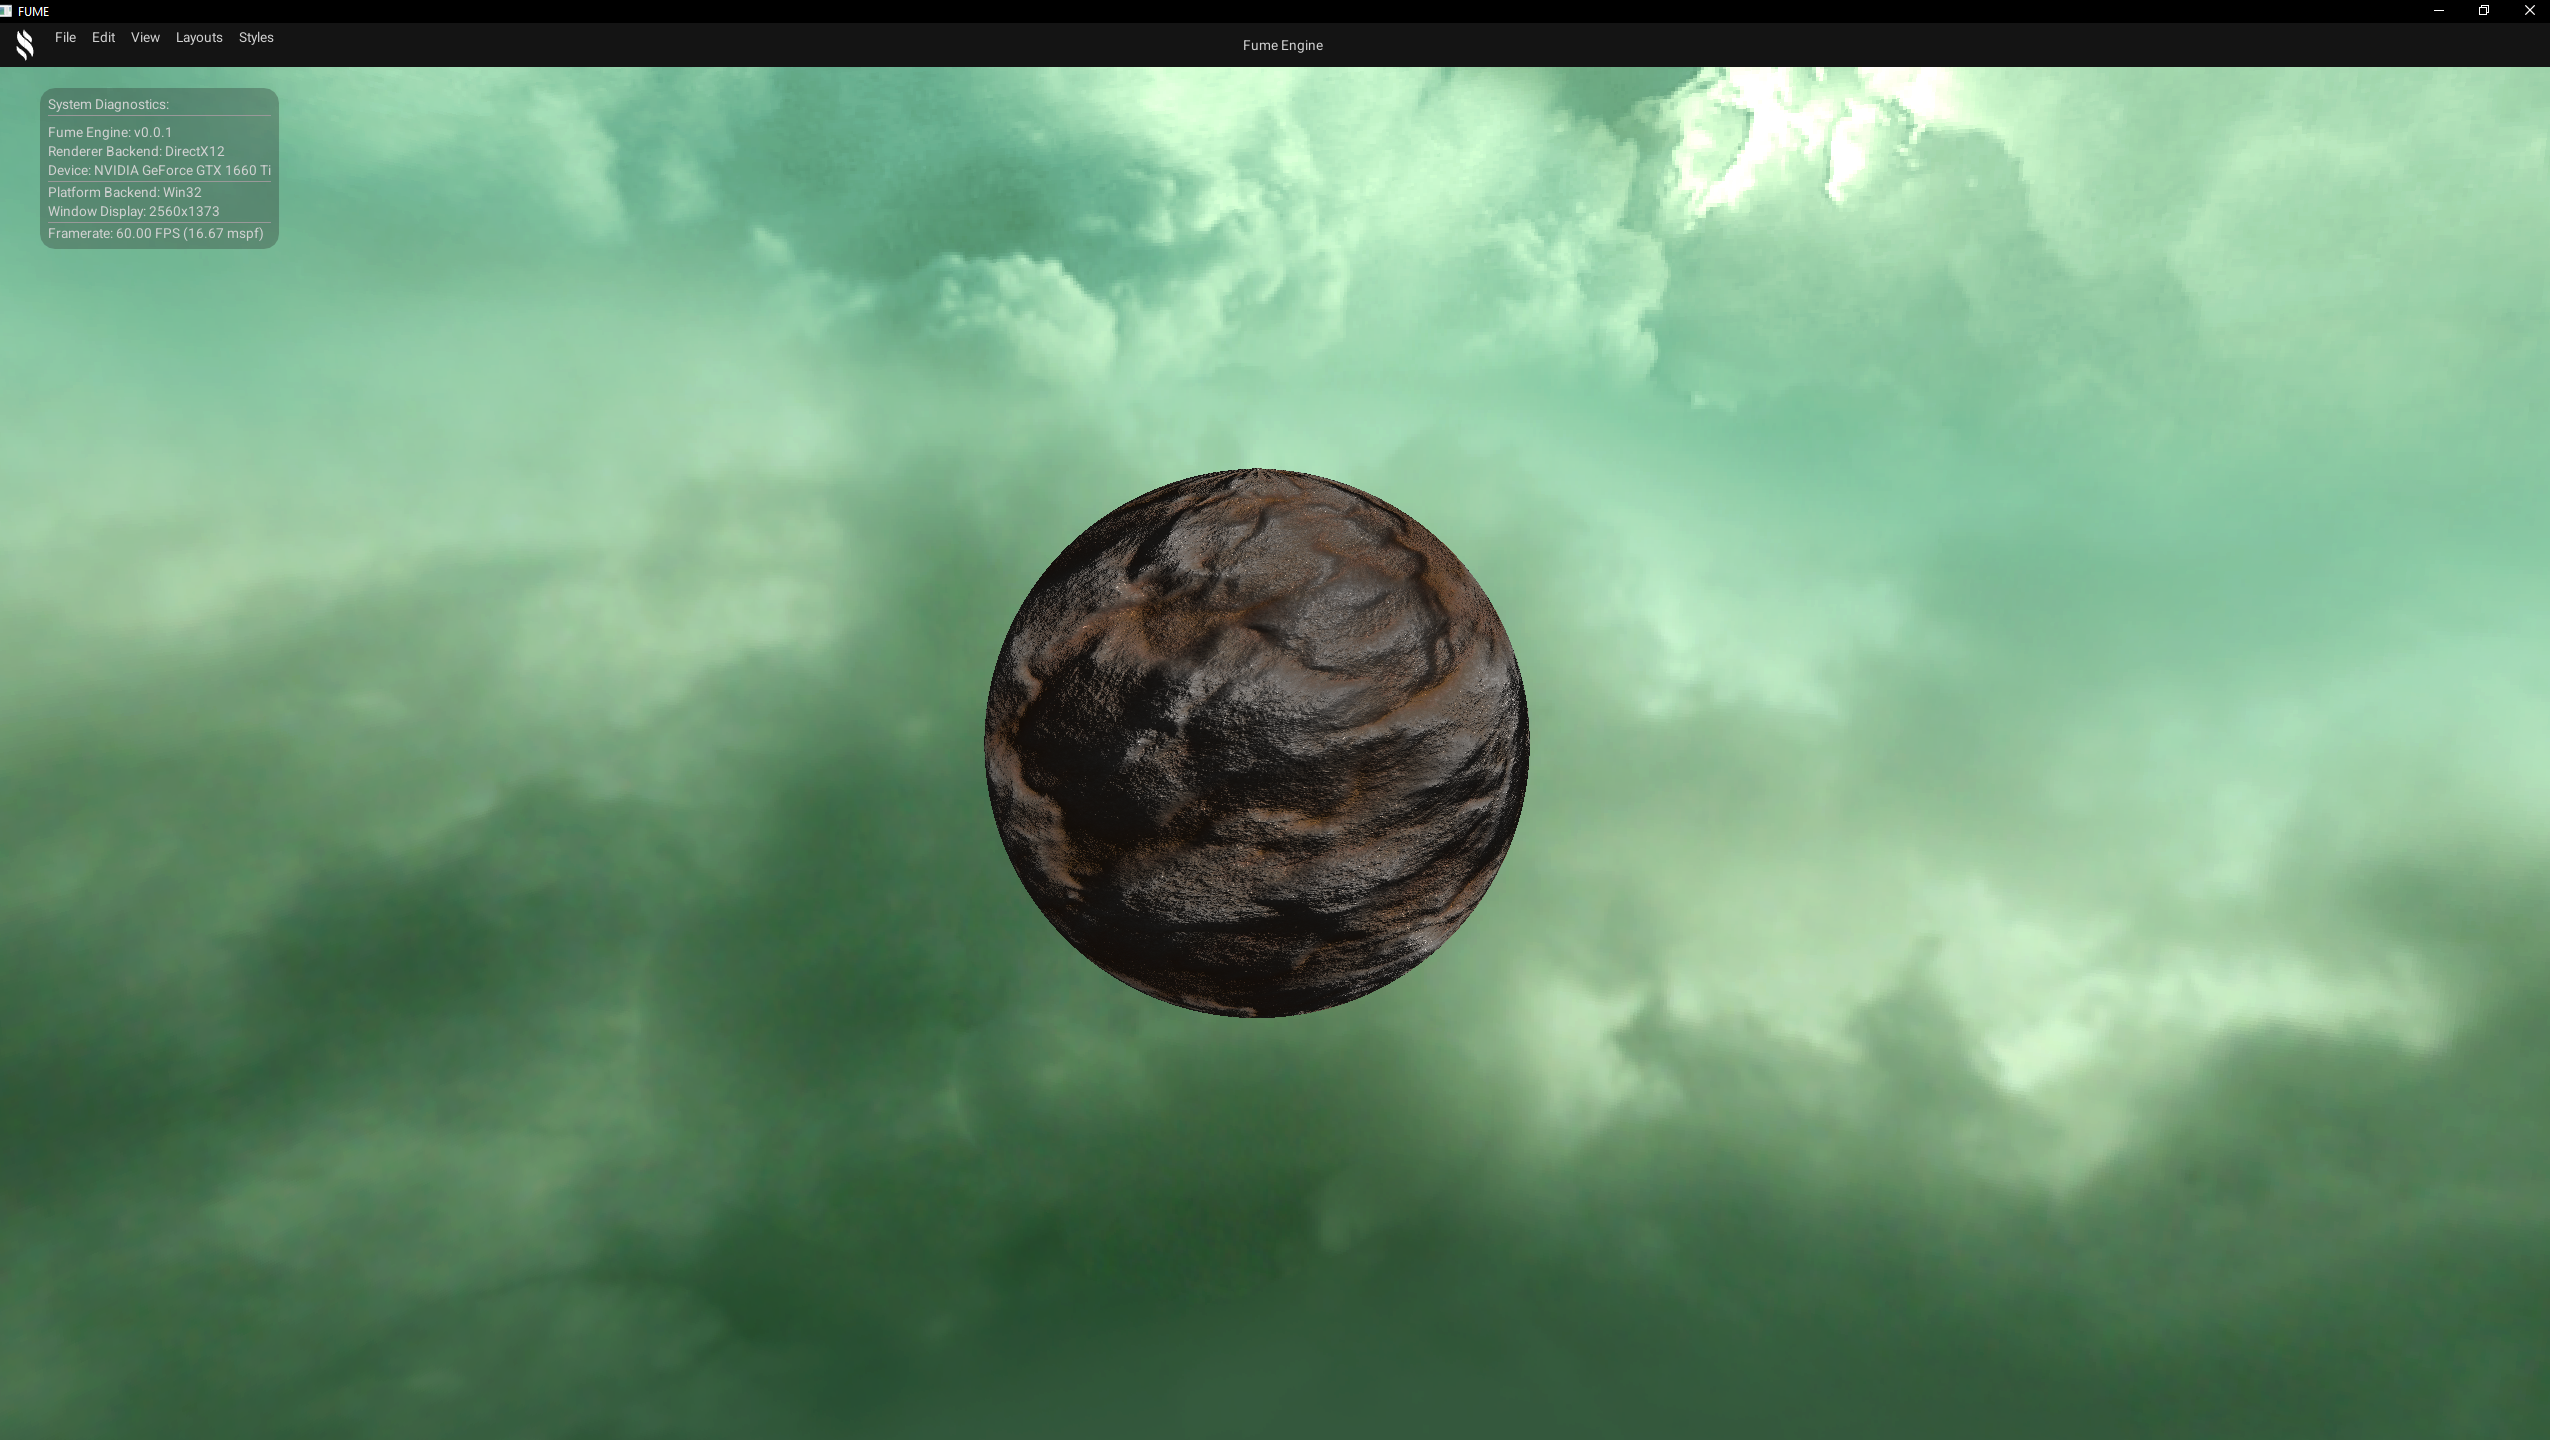
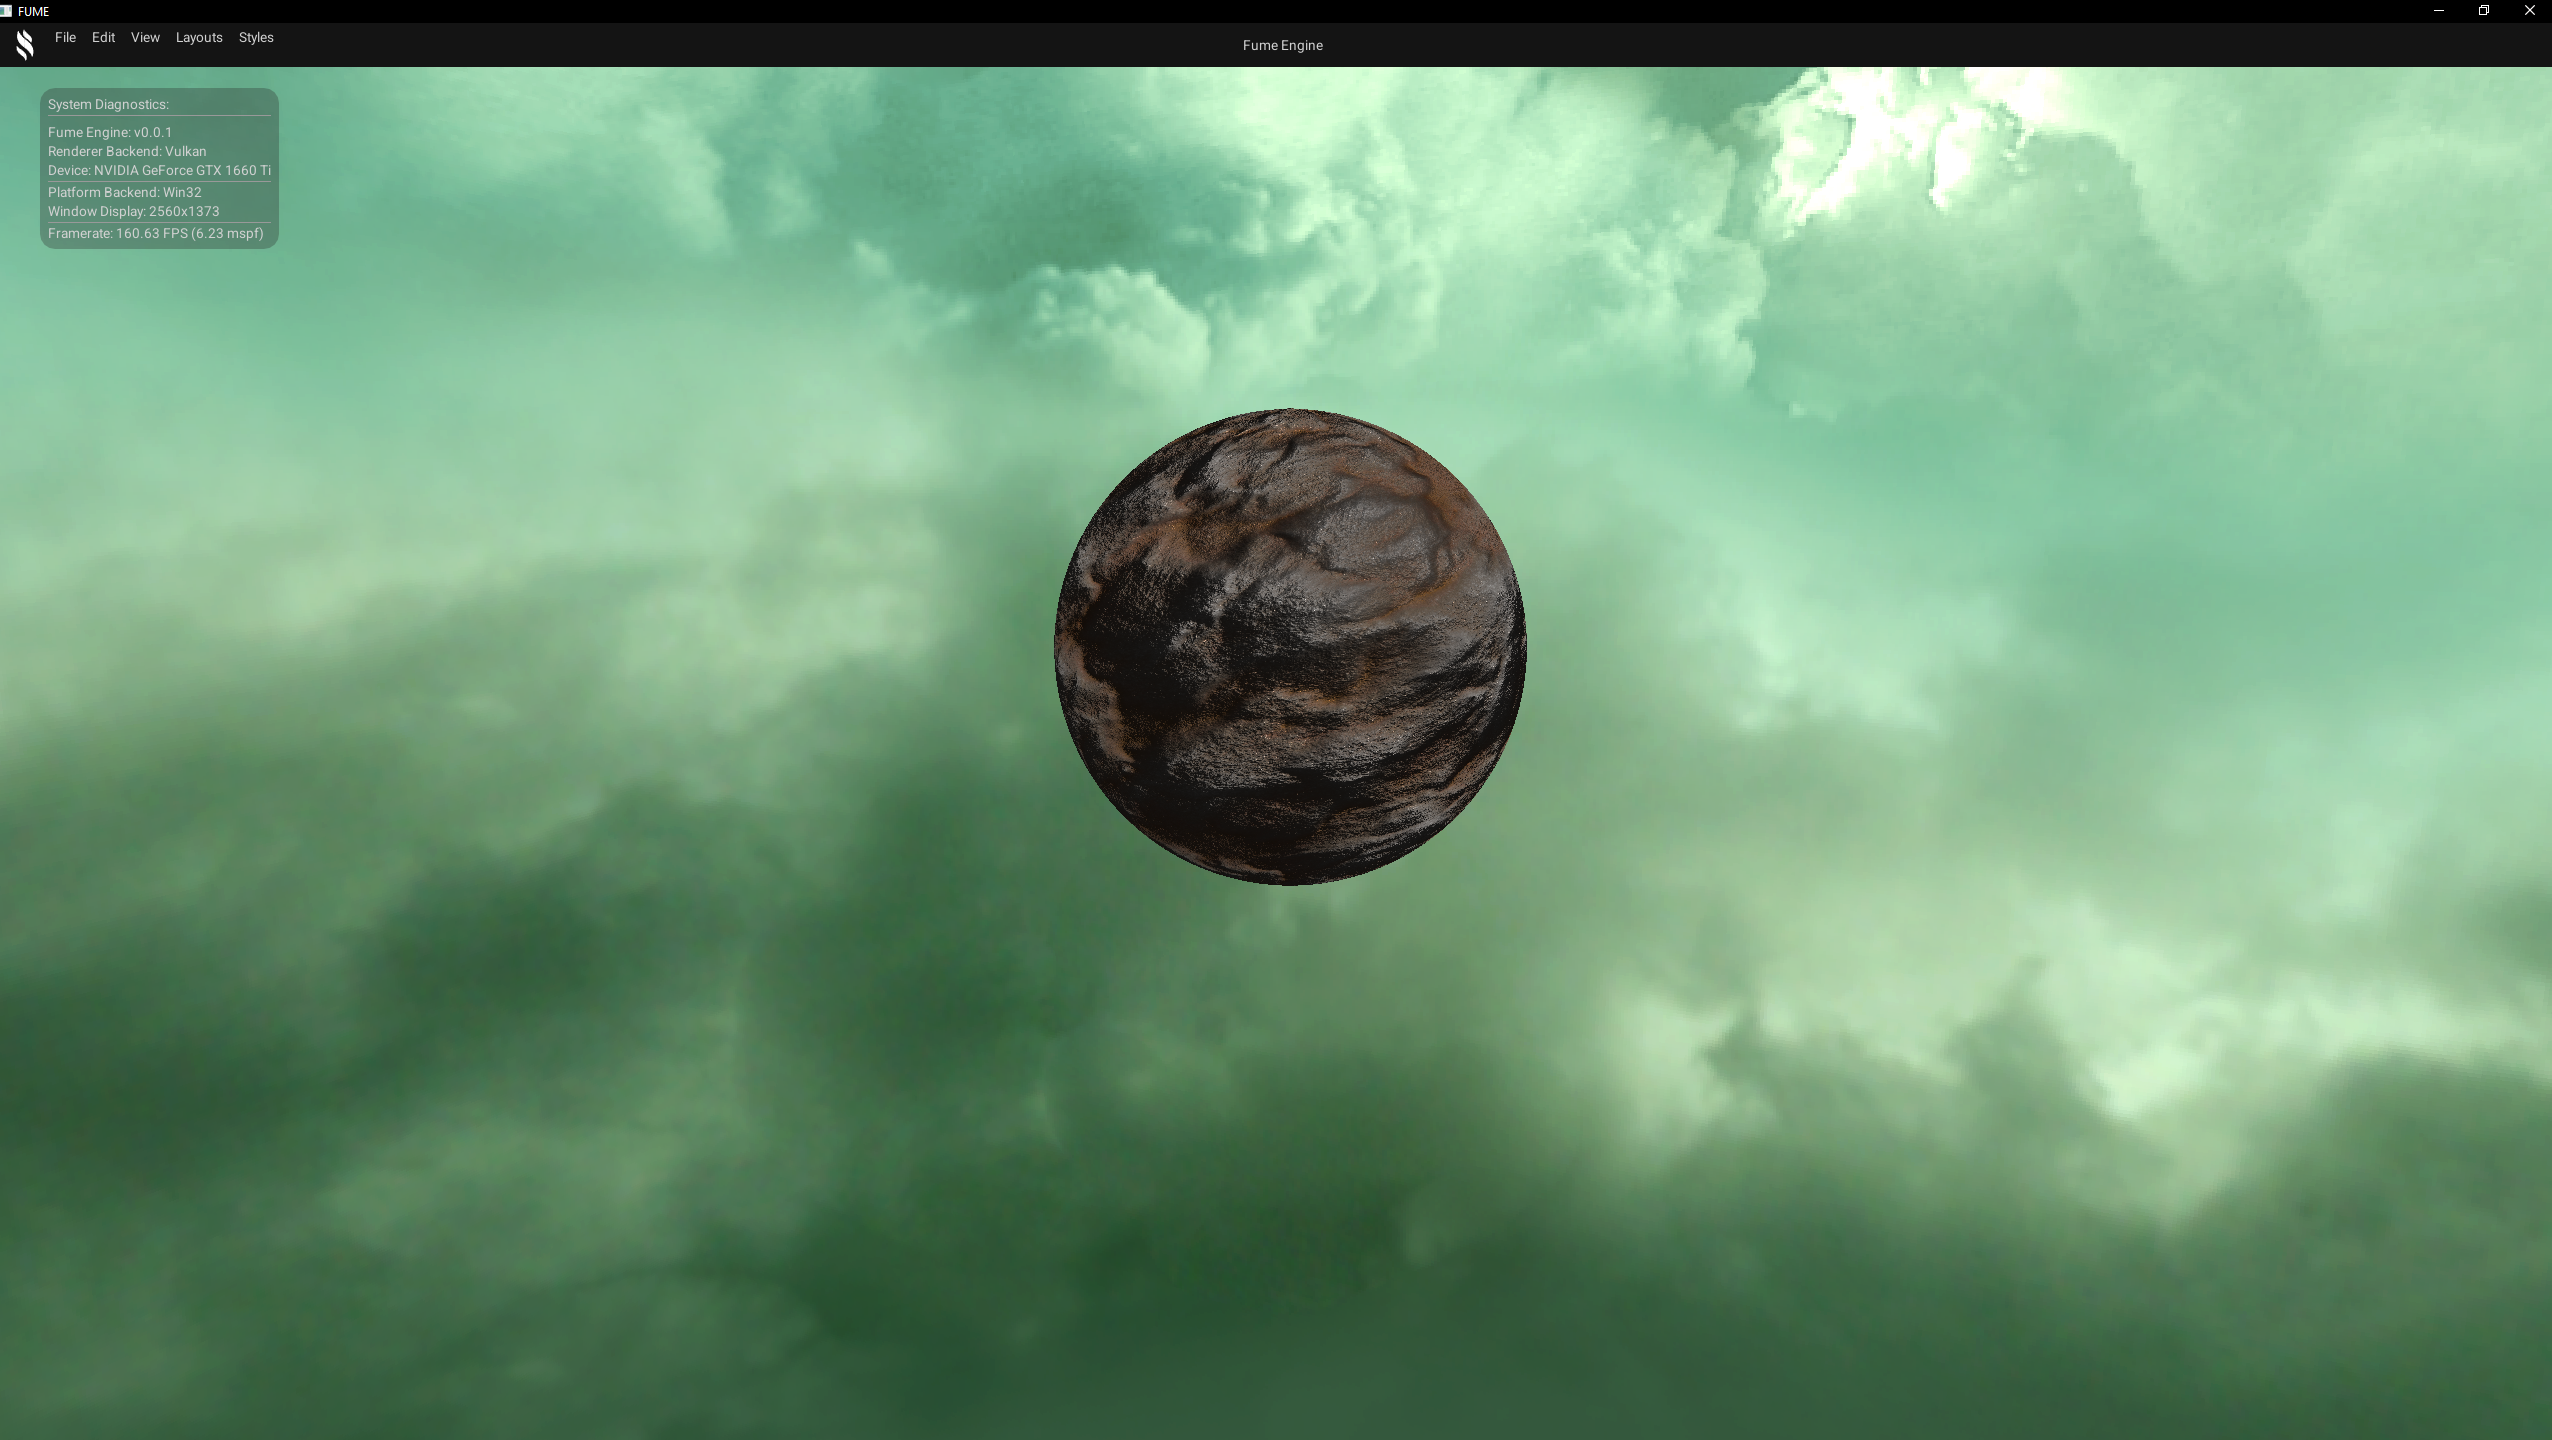
Cubemap Skybox
A basic cubemap-based skybox, rendered through a dedicated render pass within the rendering pipeline to simulate the environment. This pass can be enabled or disabled at runtime as needed.


D3D12 Backend
Vulkan Backend
Grid Effect
A world-space grid used to visualize orientation and scale, primarily for editor and debugging purposes. It is rendered through its own dedicated render pass, which can be enabled or disabled independently, and can be configurable via pixel shader parameters such as cell size and grid colors.
D3D12 Backend
Vulkan Backend
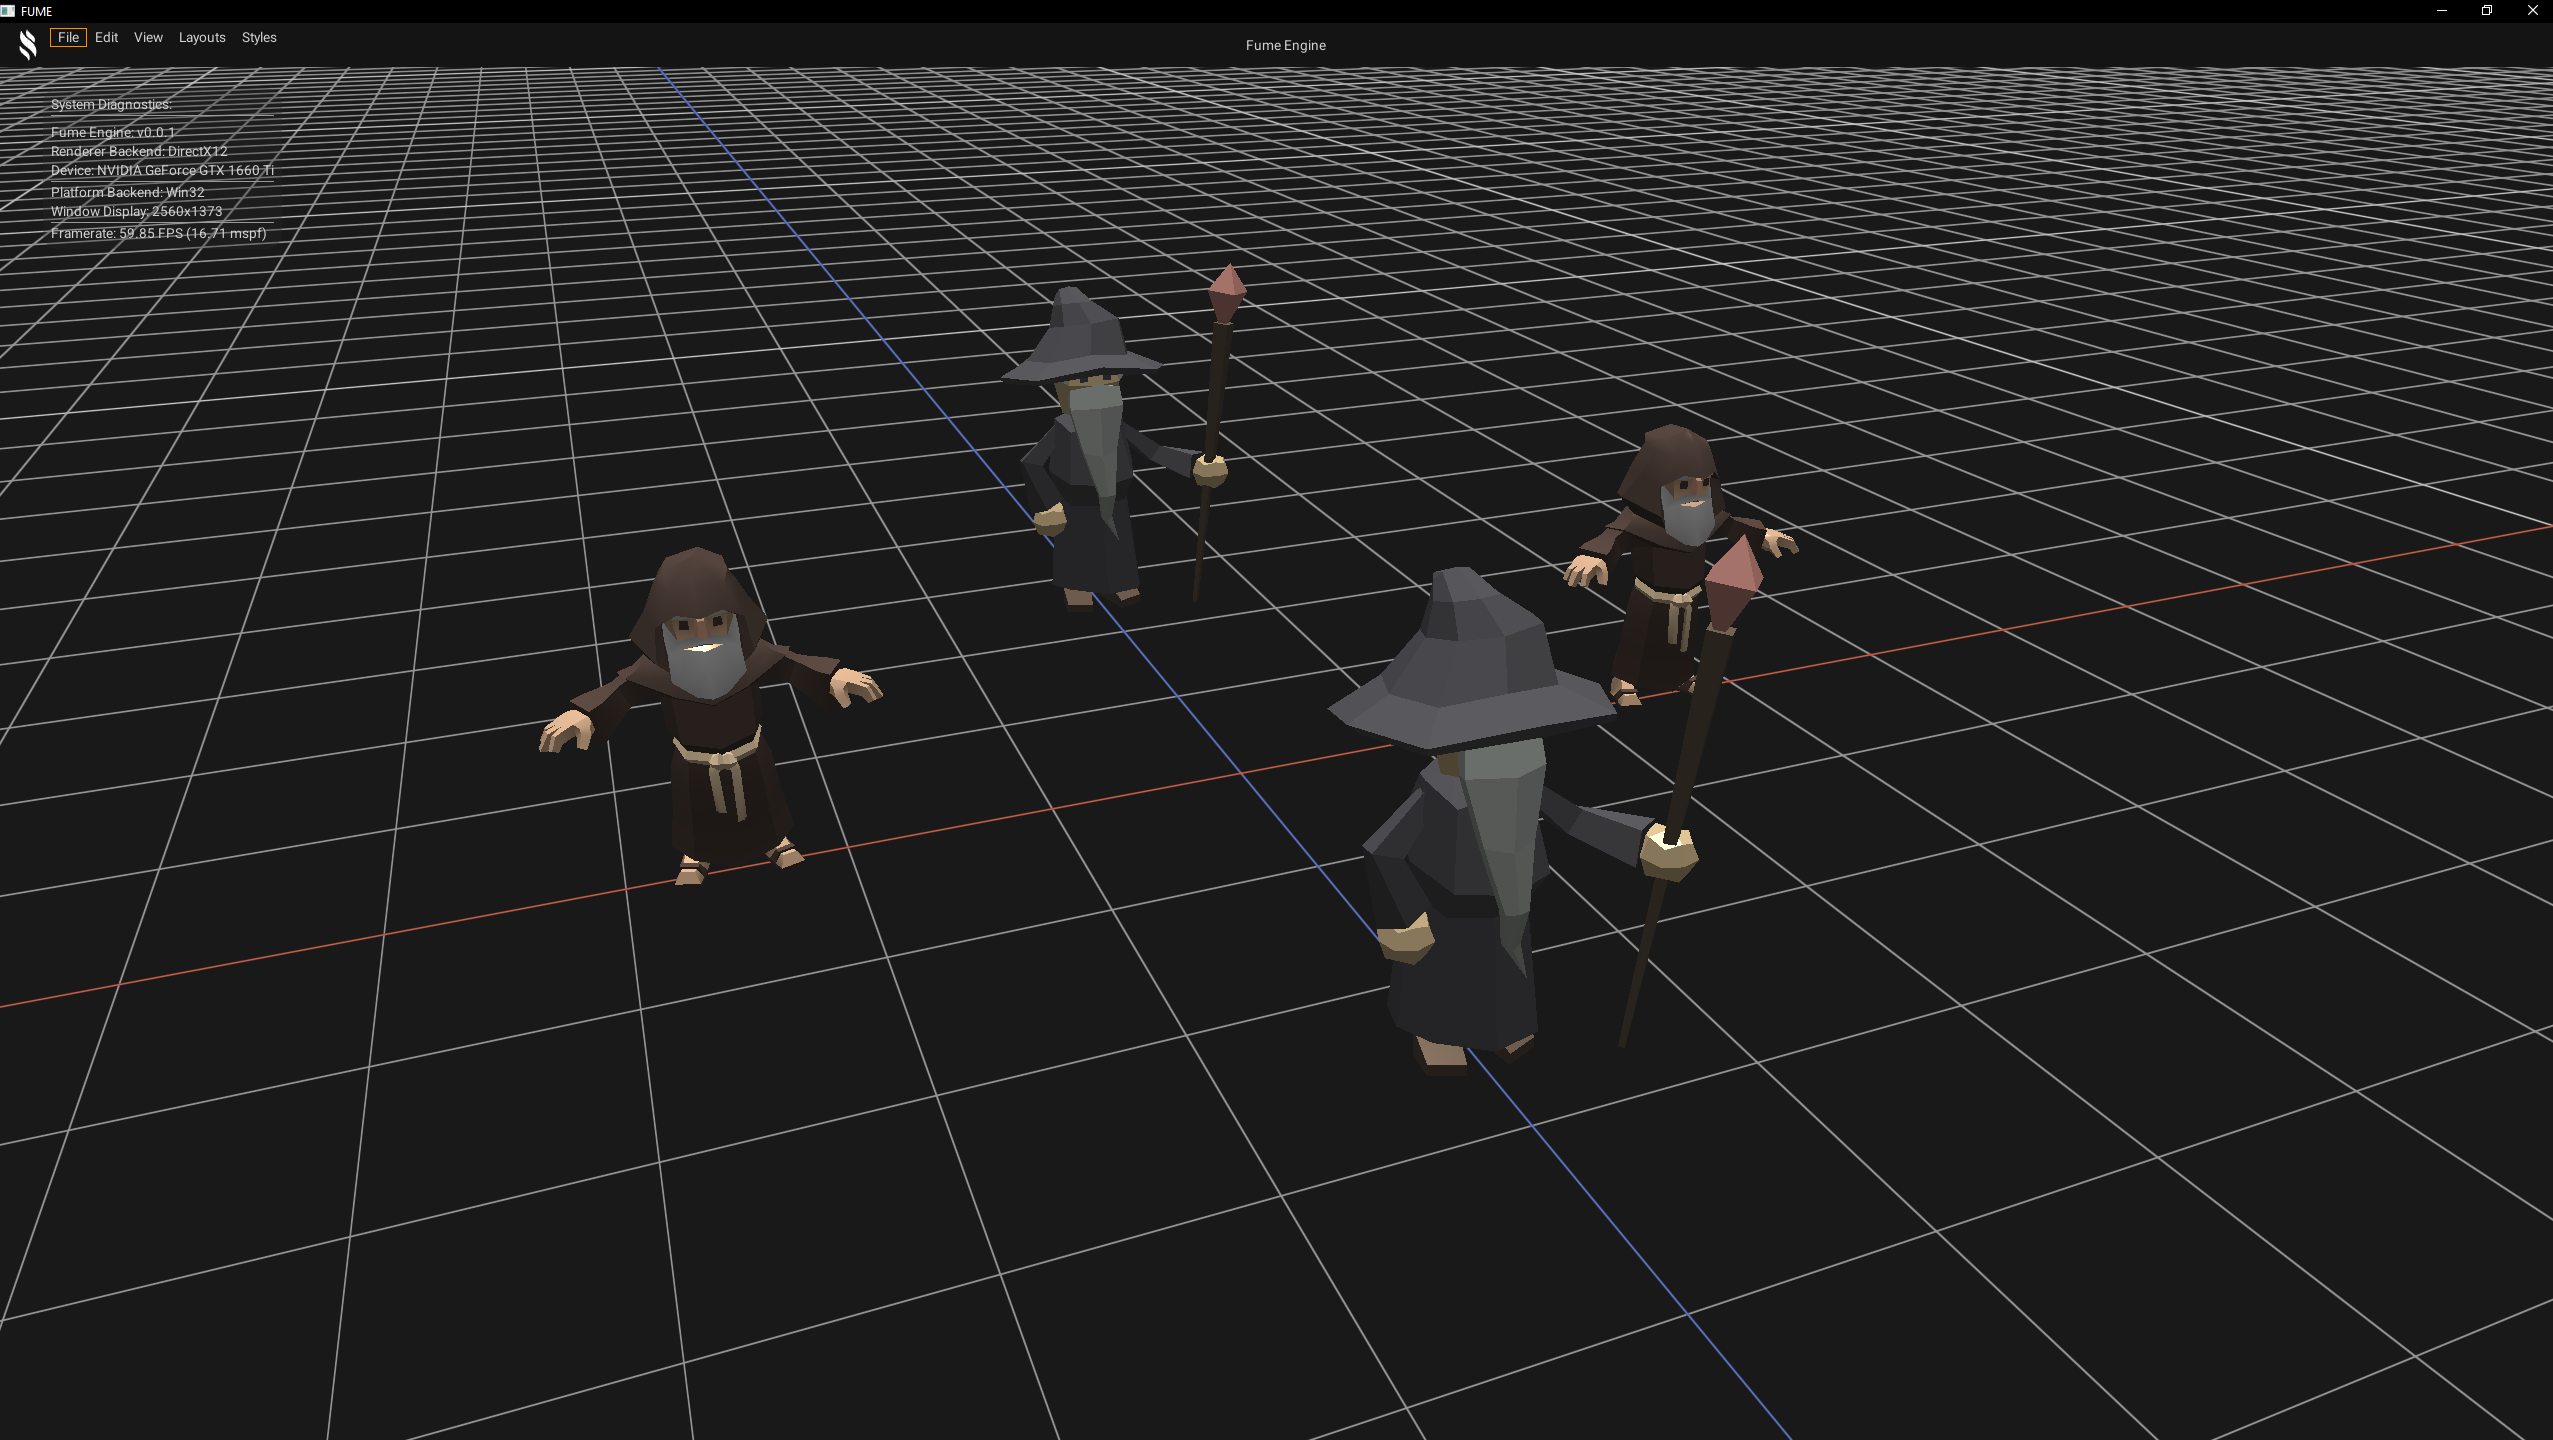
Geometry Rendering
Scene geometry rendering, through its own dedicated render pass, which renders static meshes with their corresponding transforms and unlit materials with simple properties such as textures and solid colors.
D3D12 Backend
Vulkan Backend
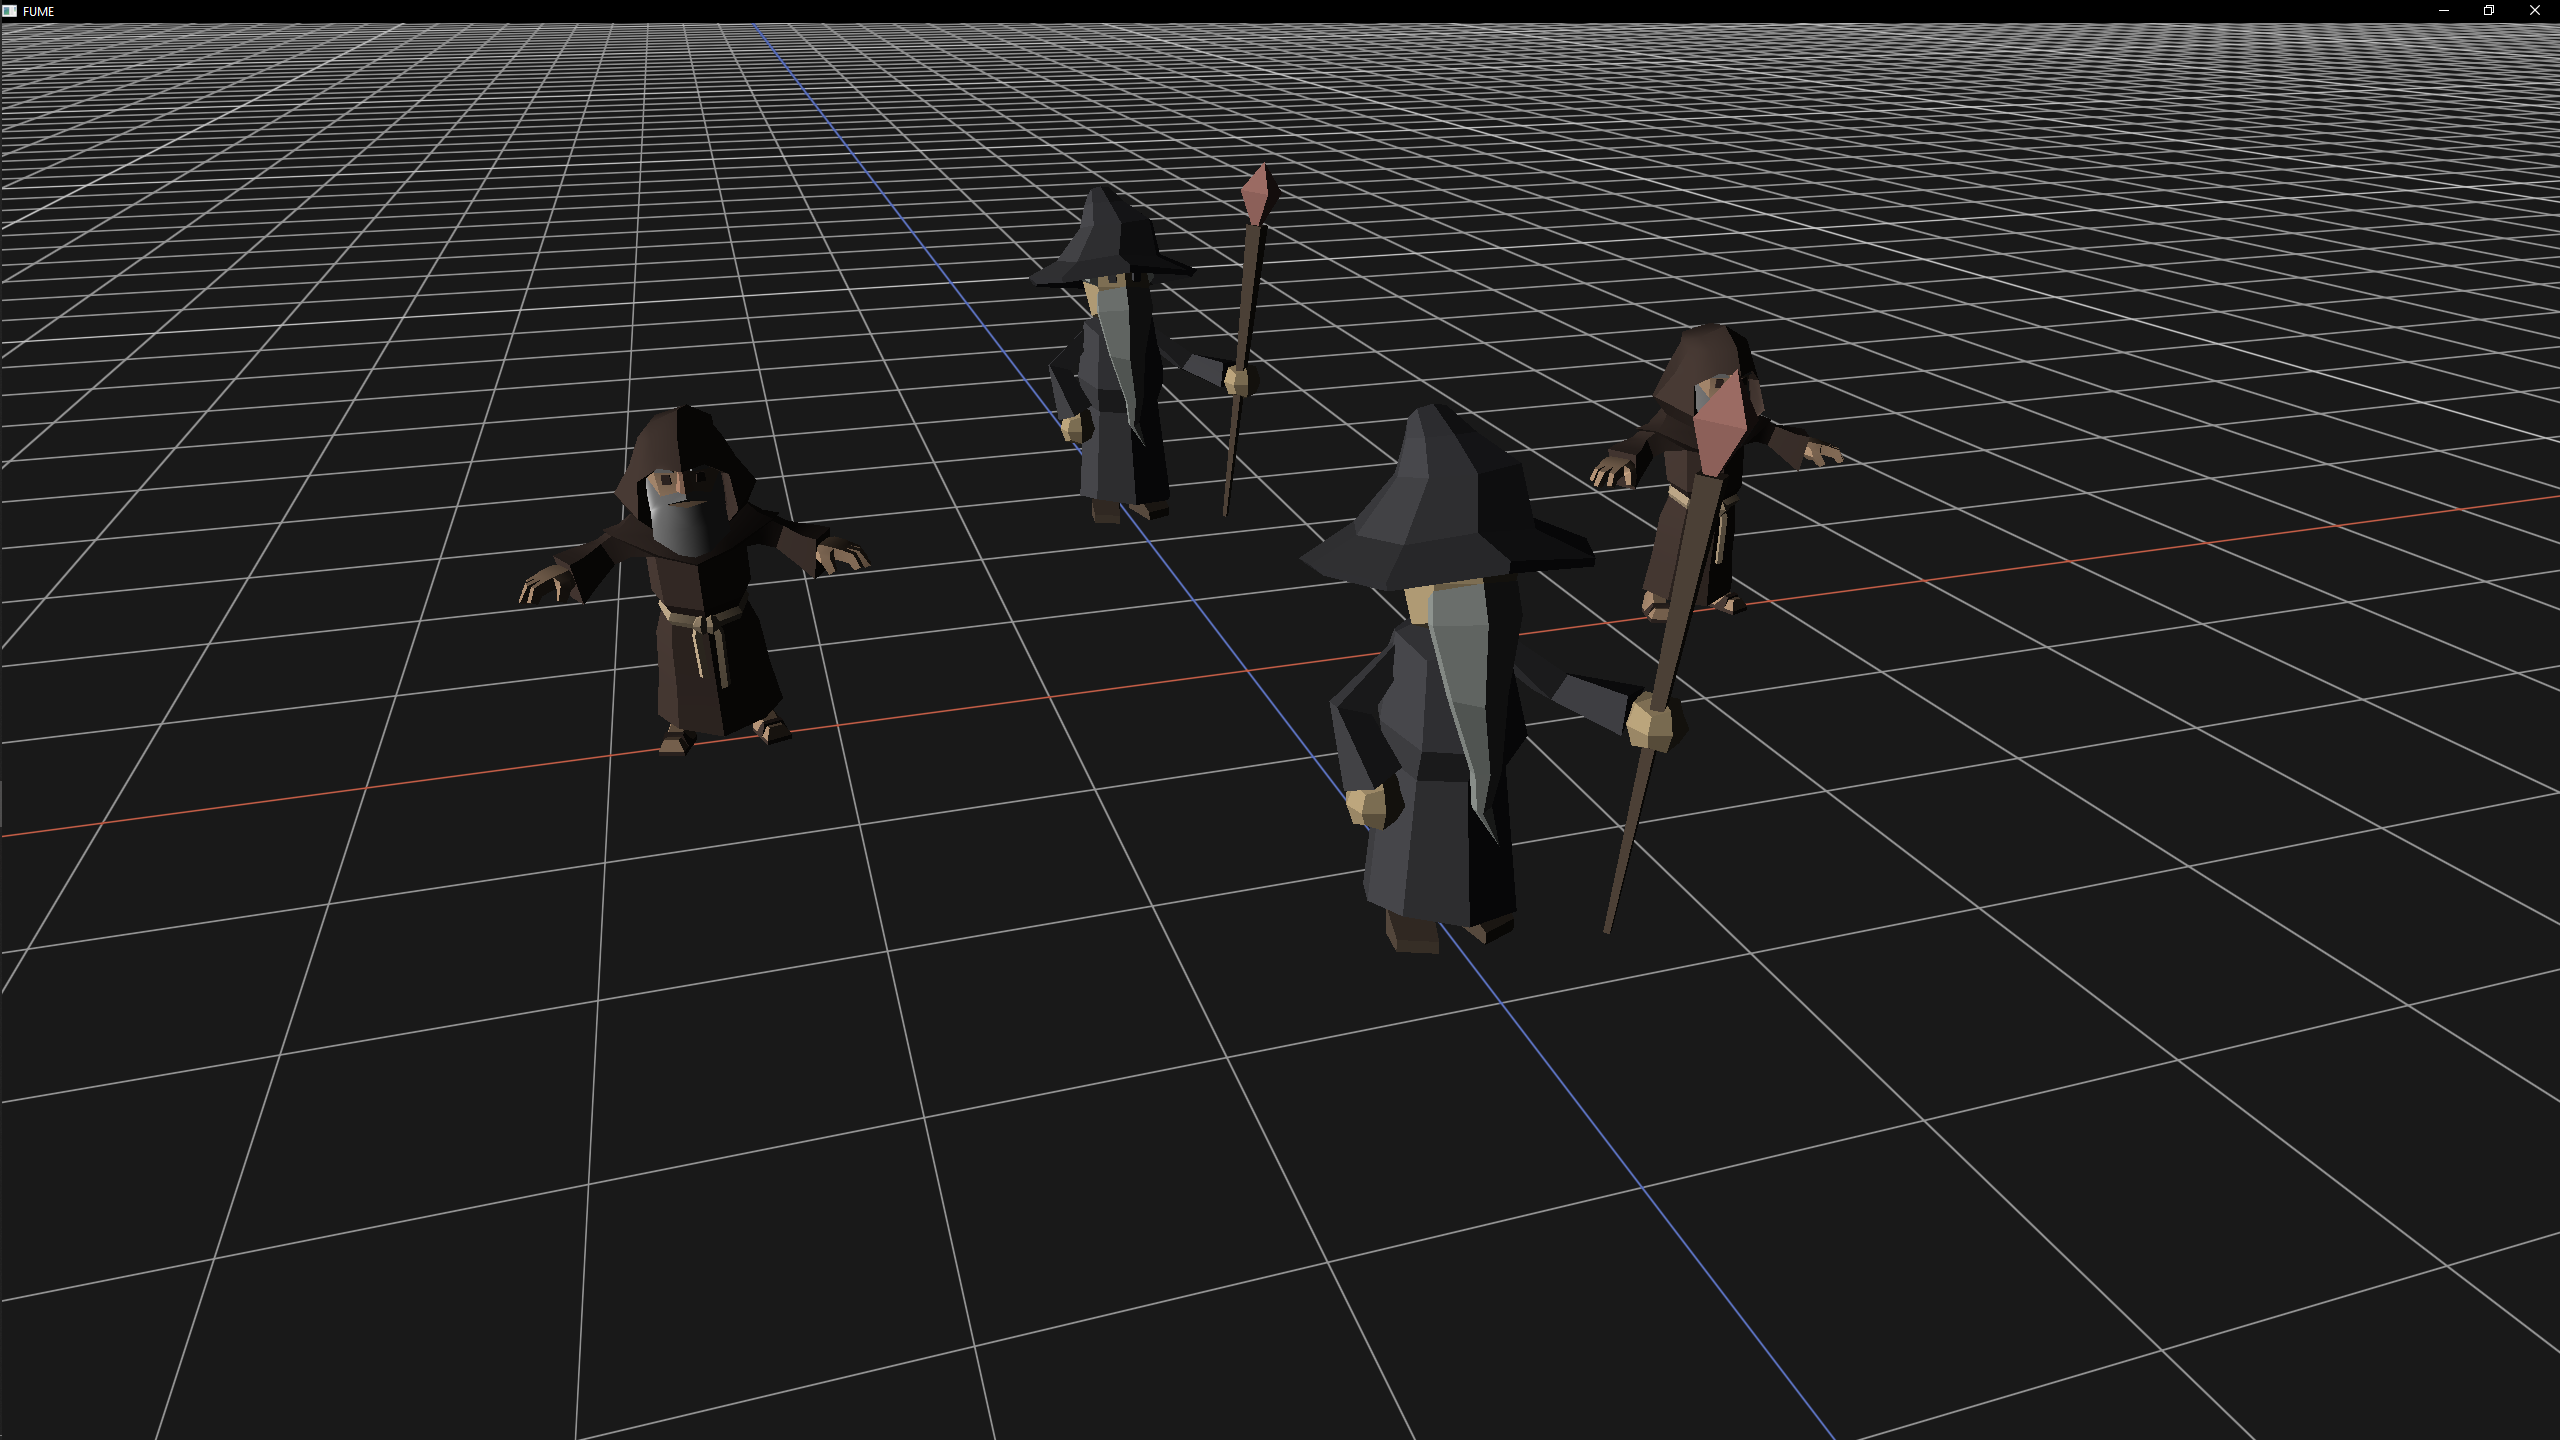
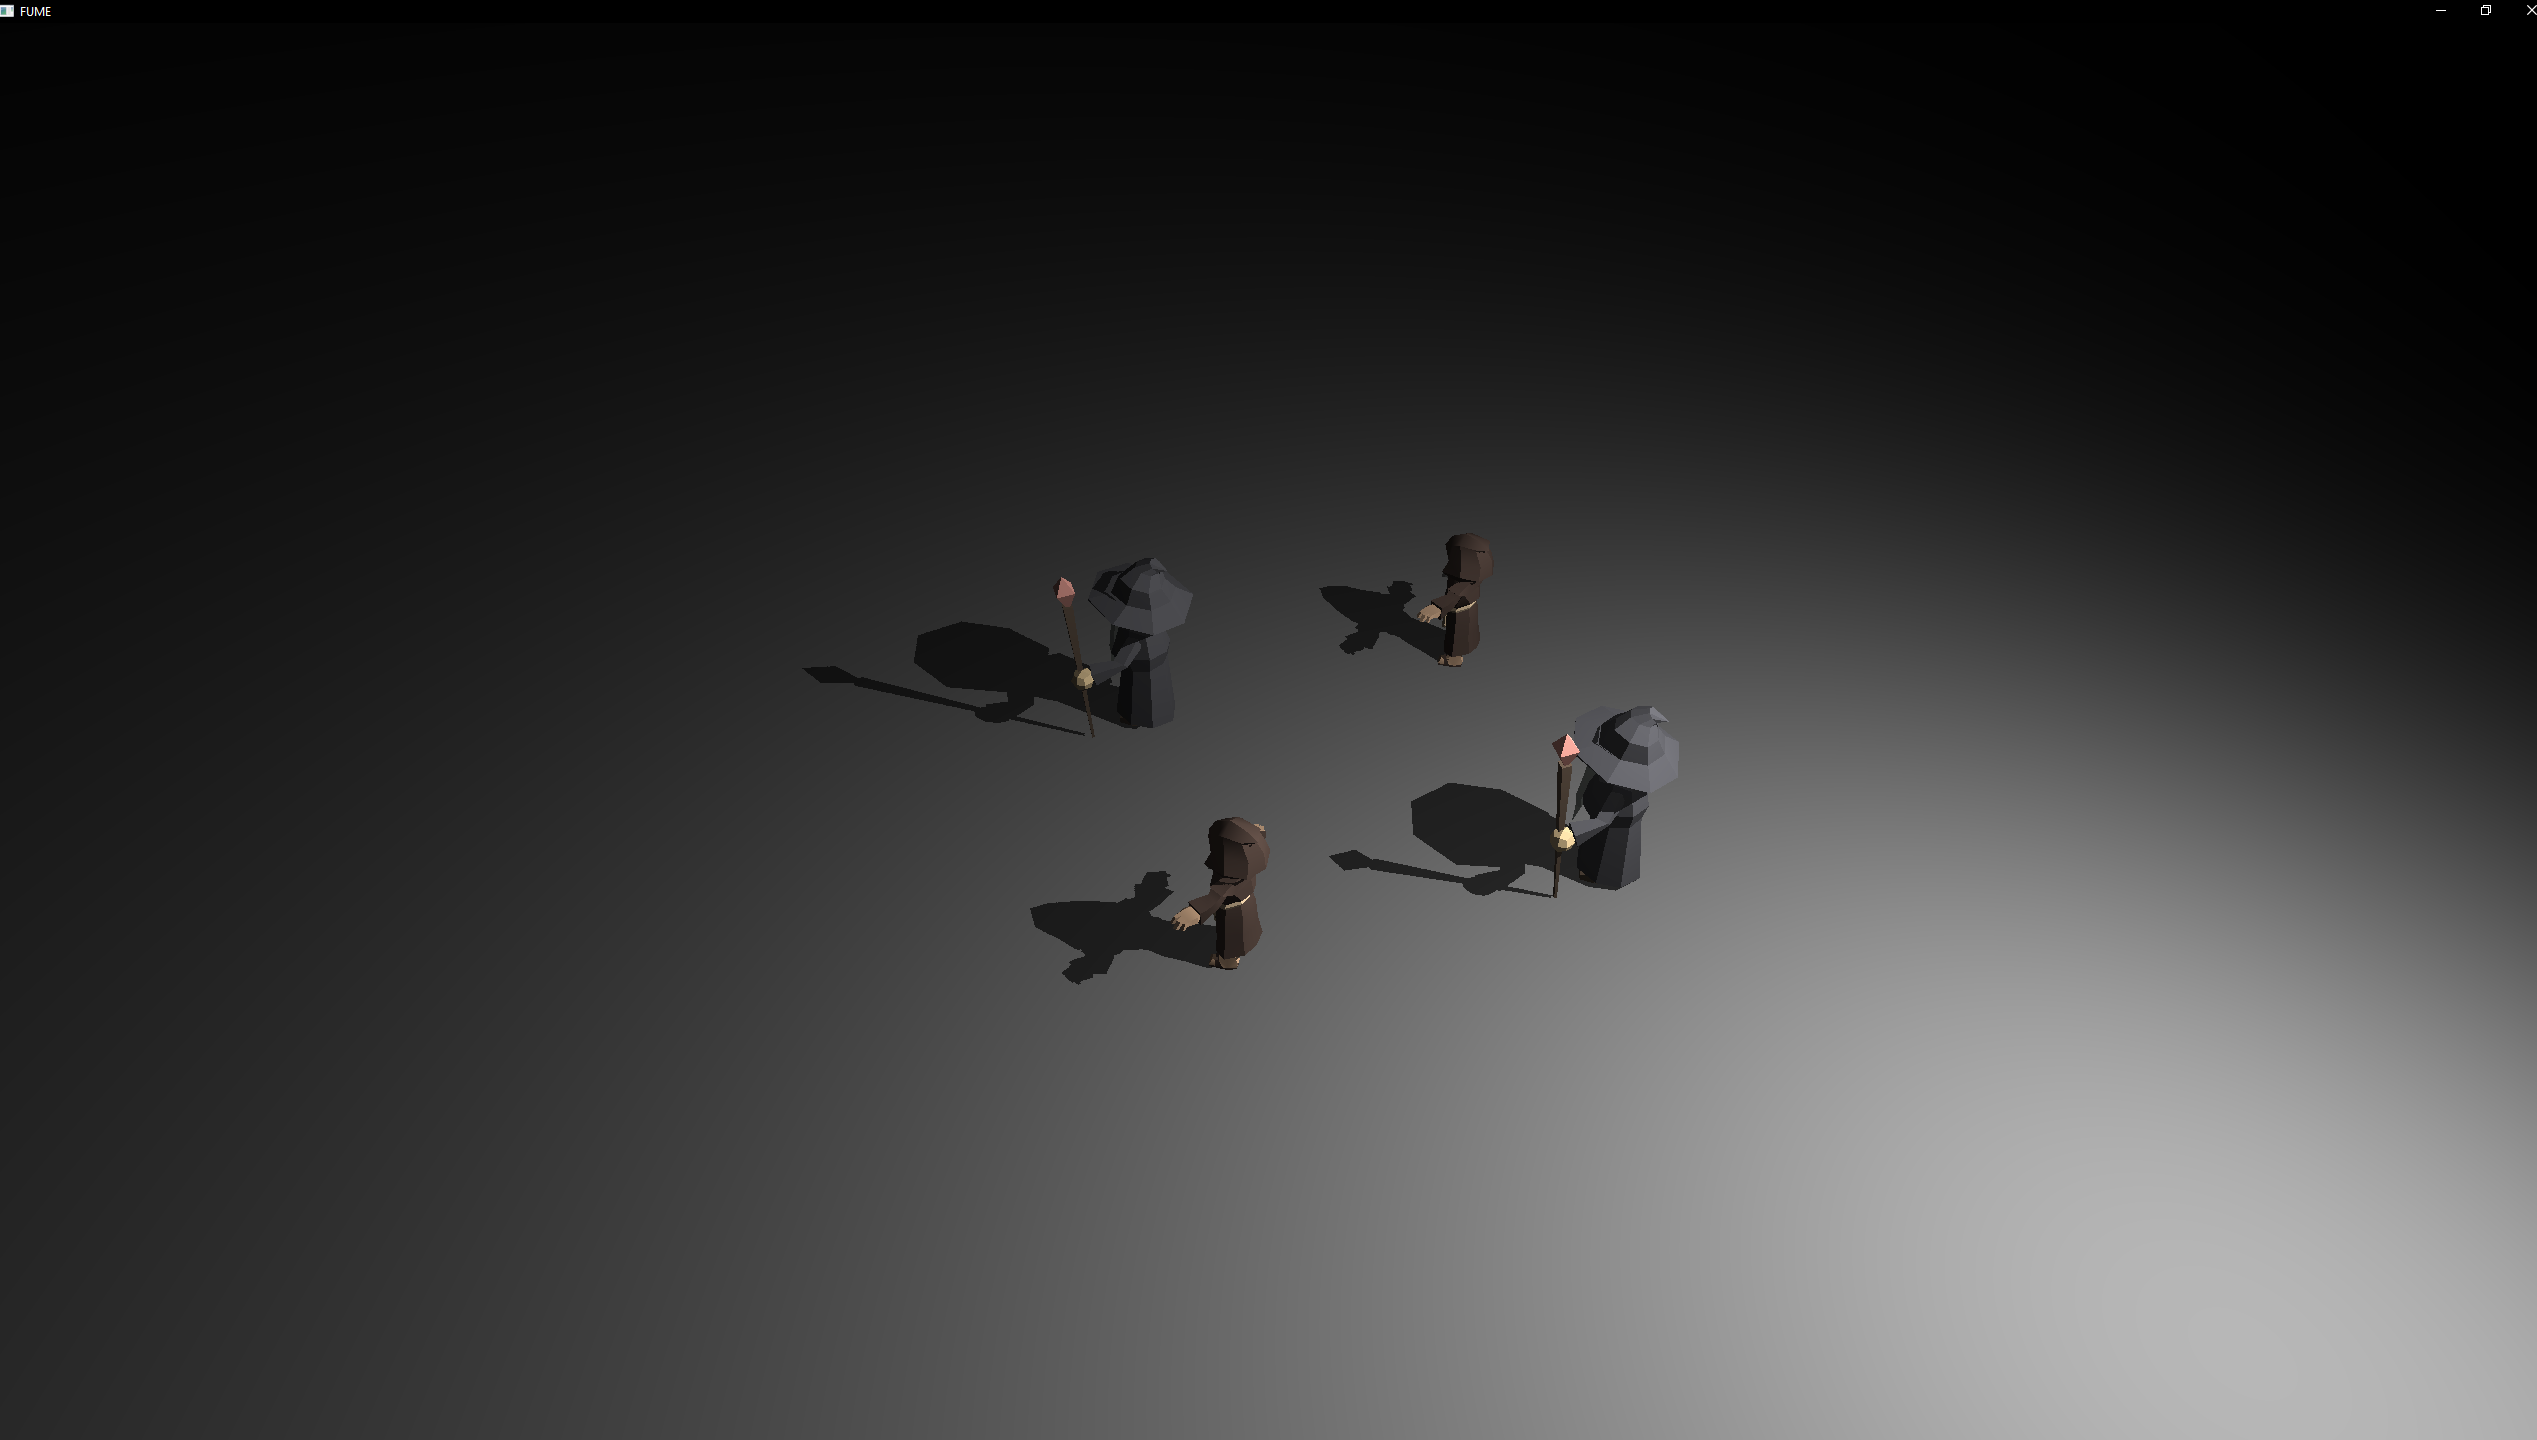
Phong Lighting
Classic lighting model composed of ambient, diffuse, and specular components. Multiple light types have been implemented to emulate this model, including directional, point, and spot lights, in order to provide a basic approximation of light–surface interaction.
Directional Light
Point Light
Spot Light
D3D12 Backend
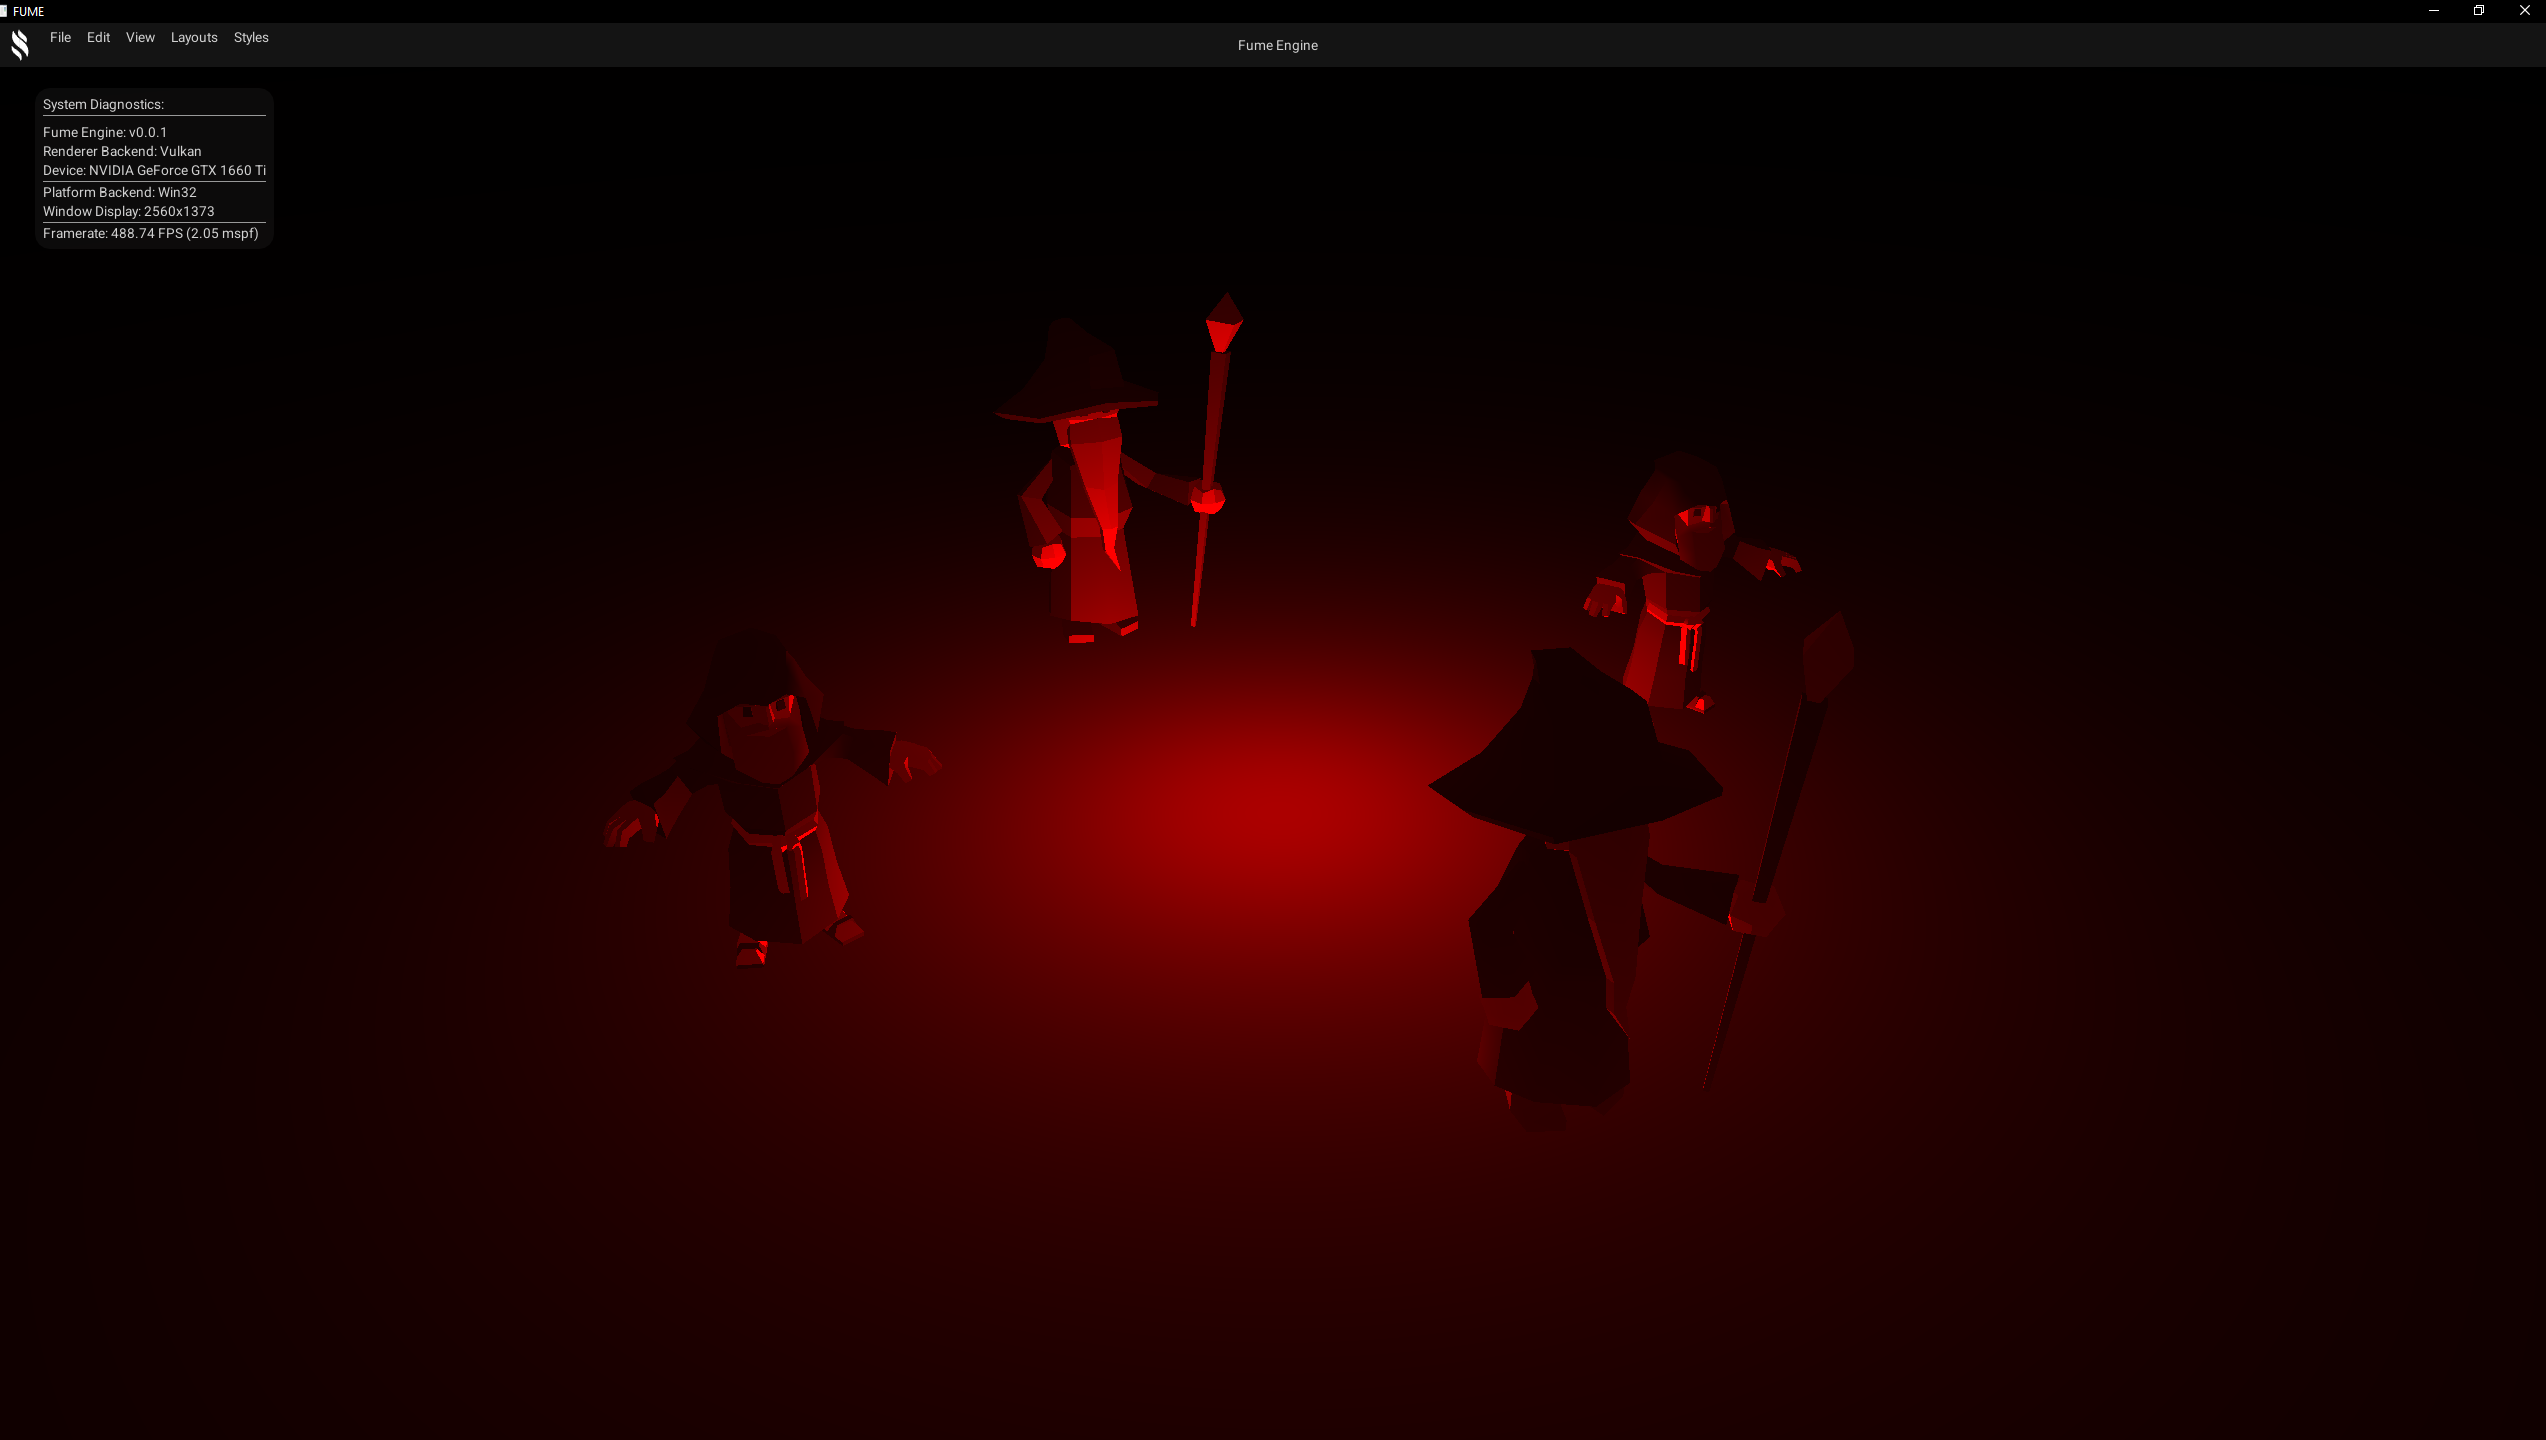
Vulkan Backend
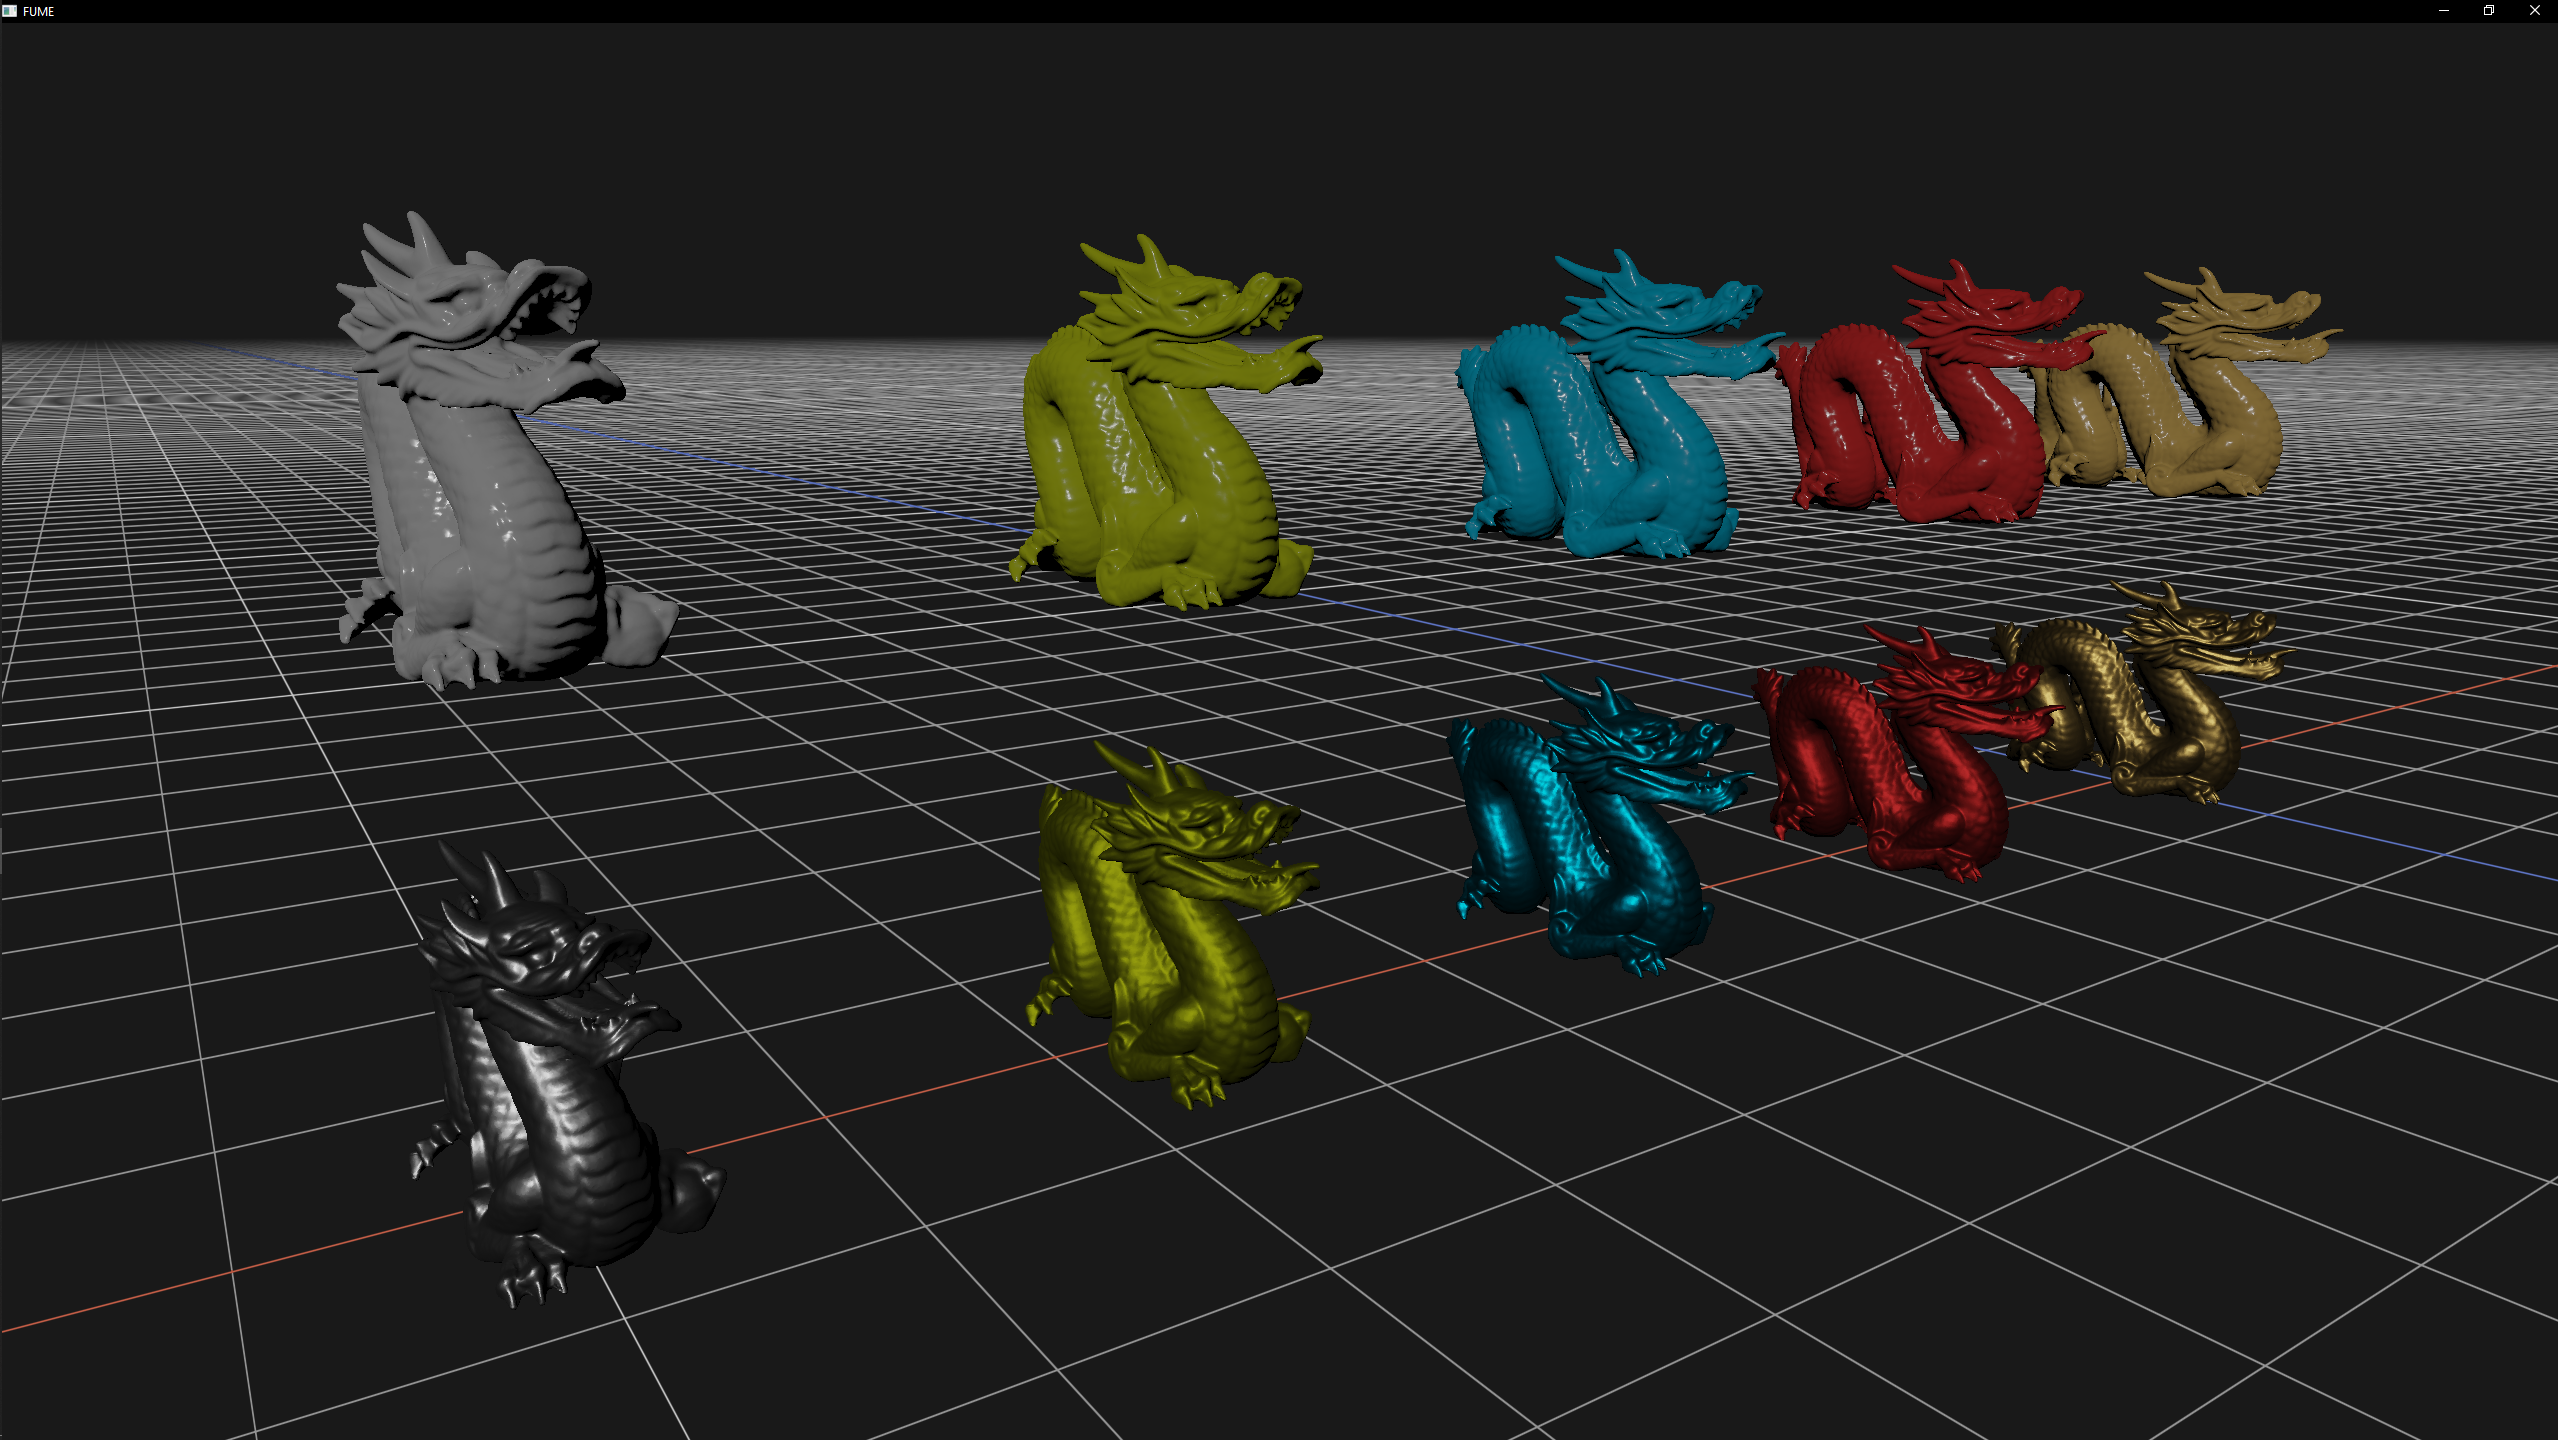
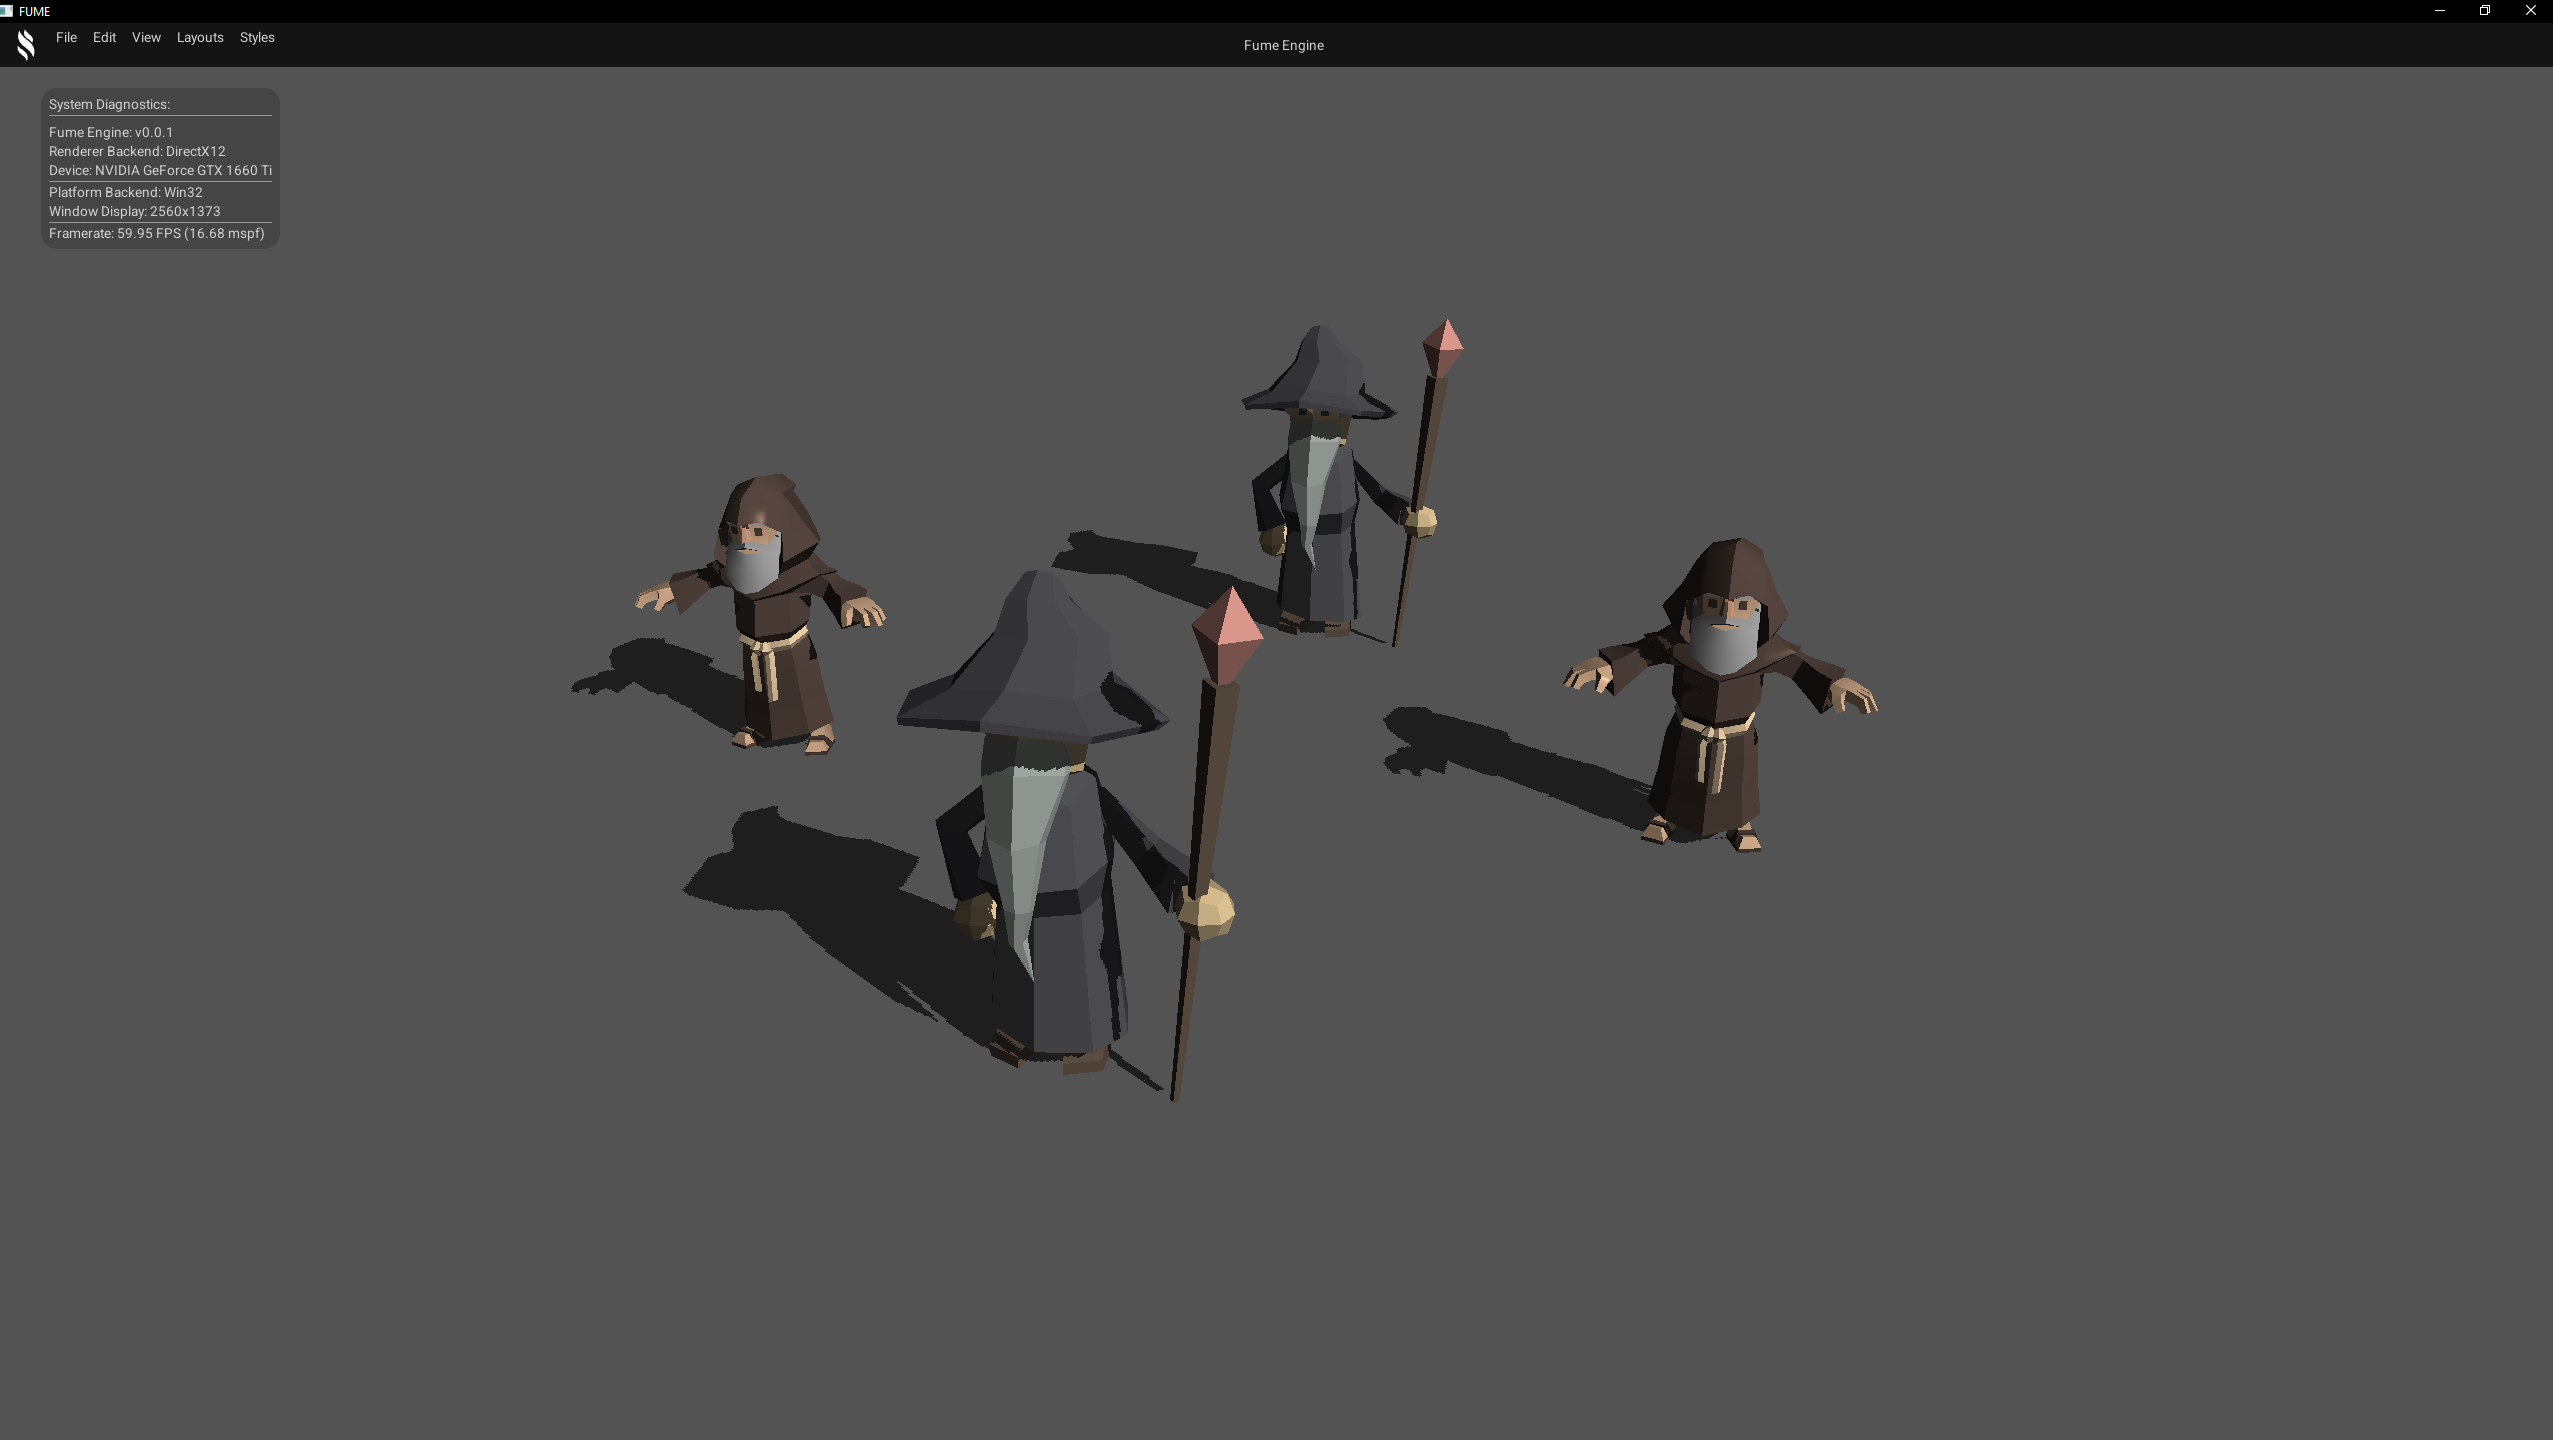
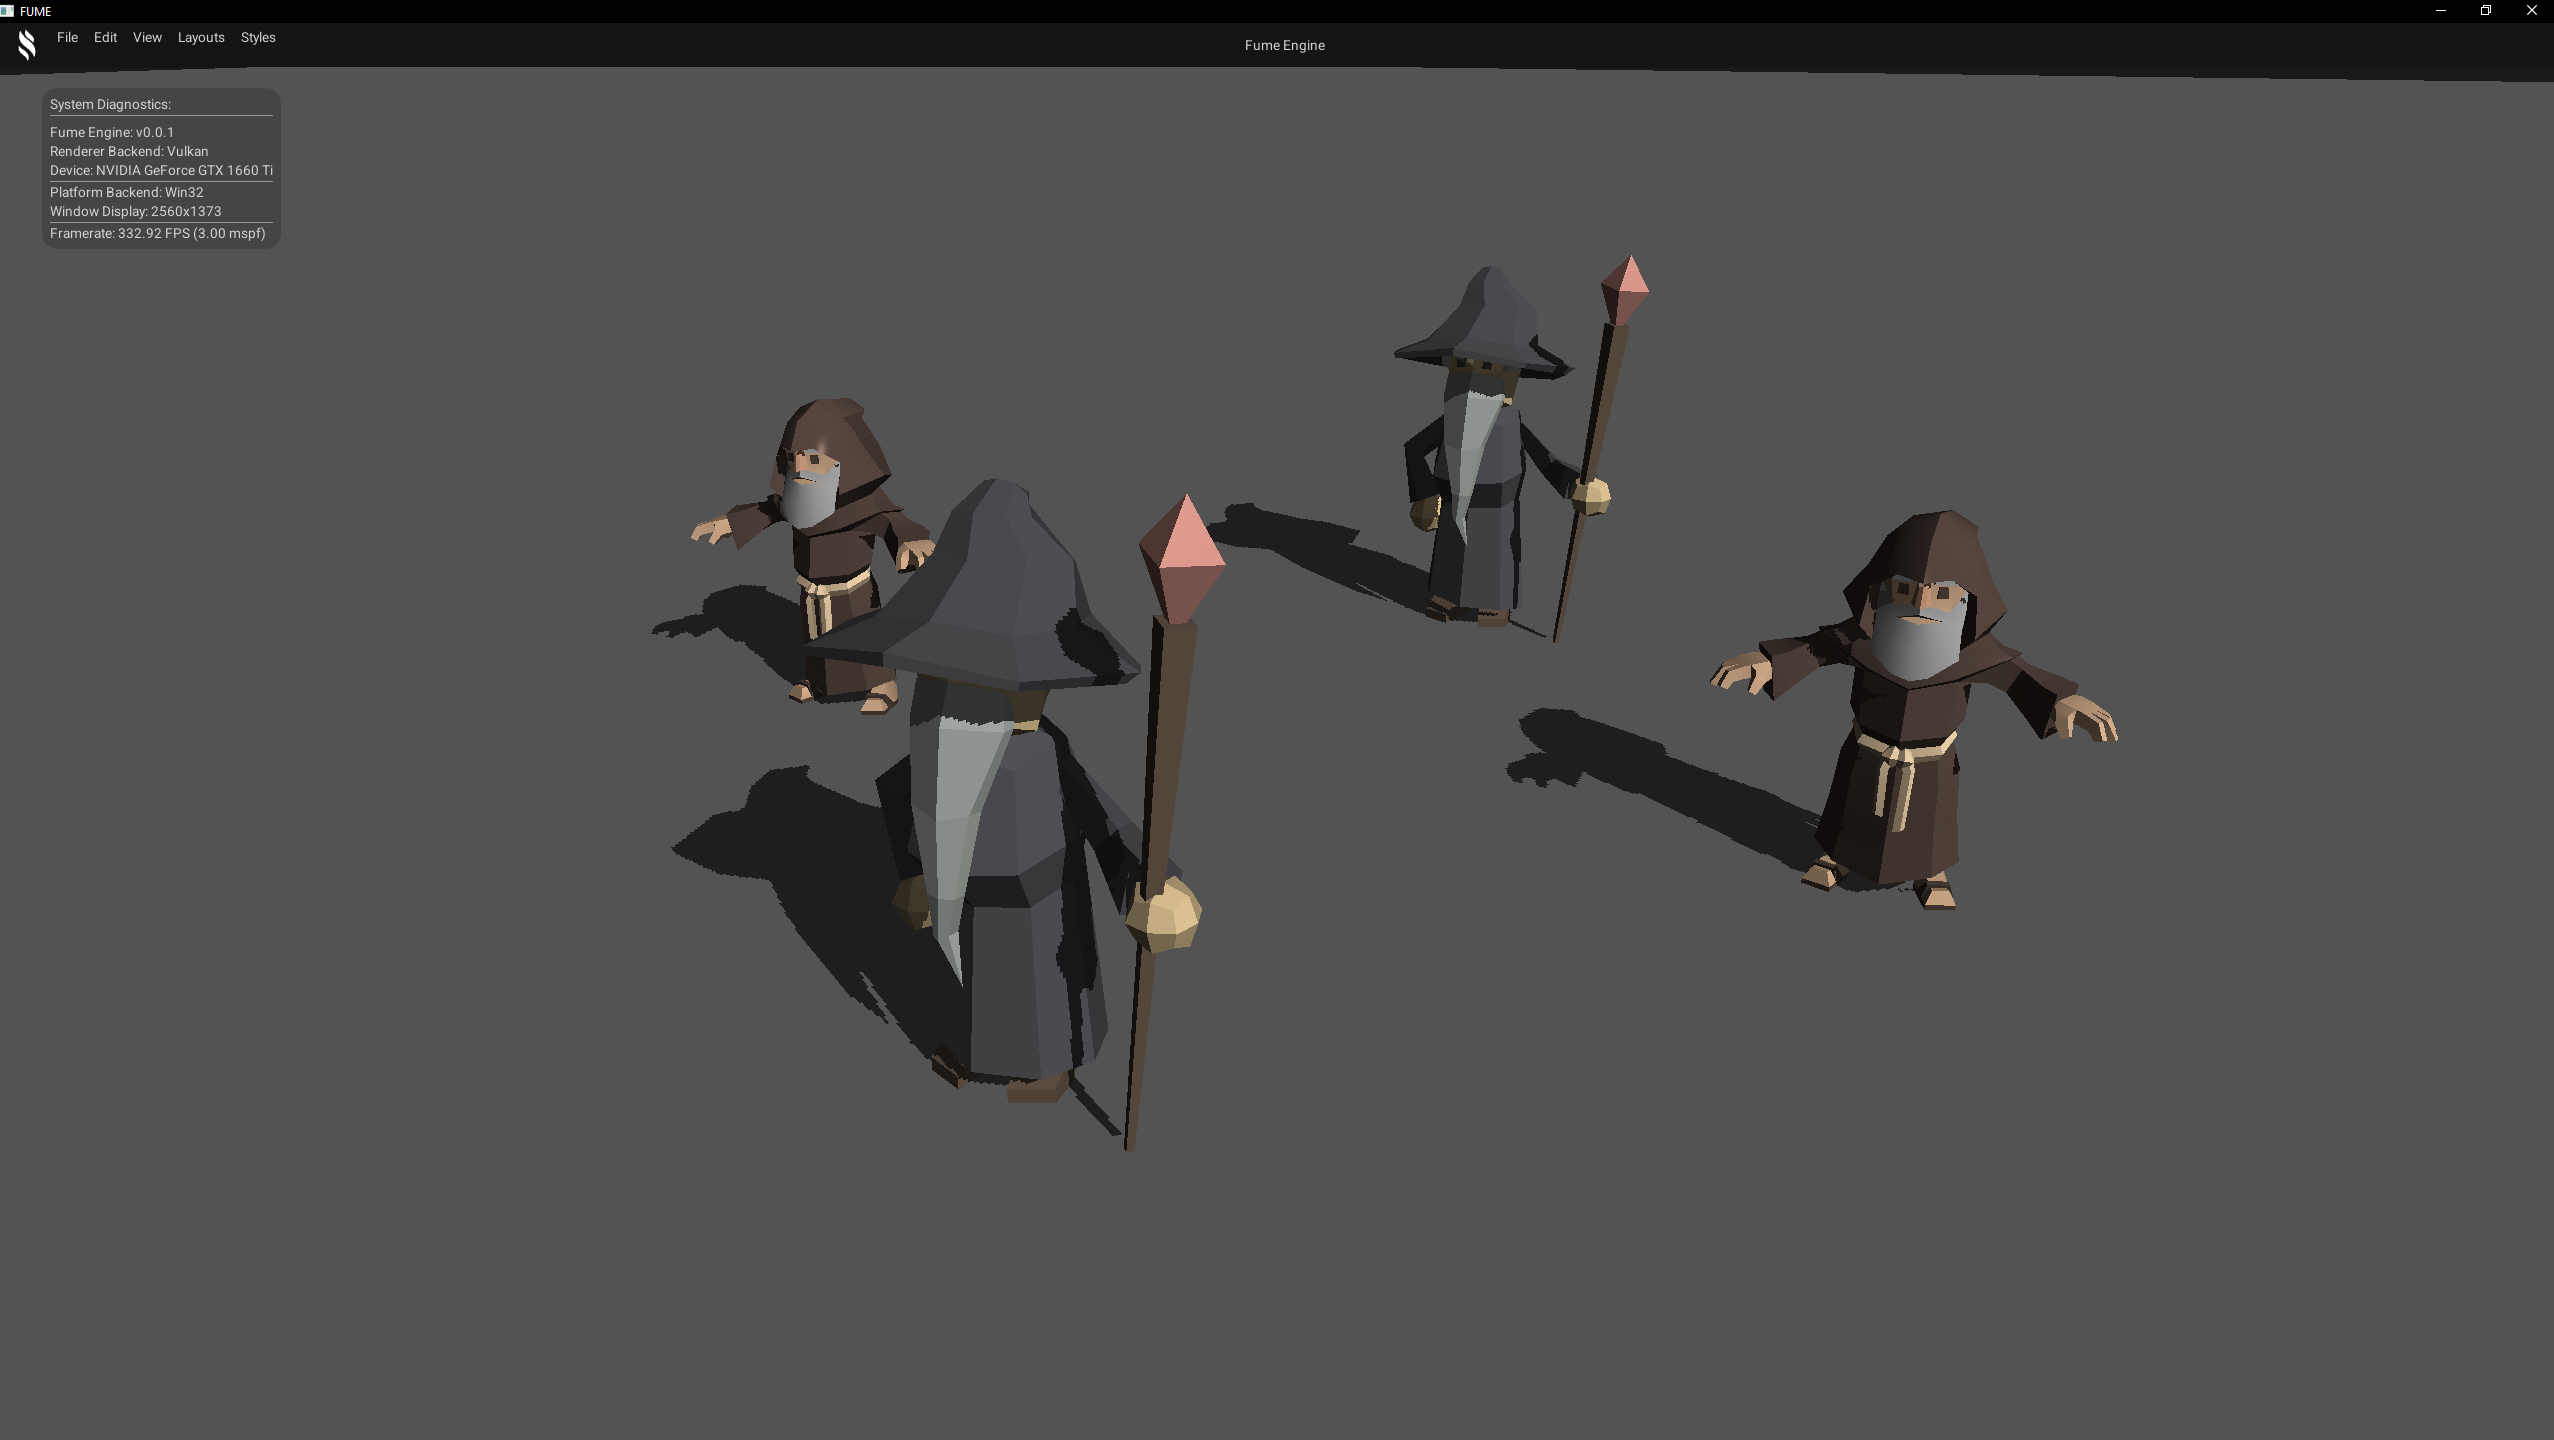
PBR Lighting
Classic Physically Based Rendering (PBR) is implemented using a metalness–roughness workflow to achieve more realistic material responses. PBR Lighting also supports multiple light types, including directional, point, and spot lights, providing consistent and physically plausible lighting across different surfaces.

D3D12 Backend

Vulkan Backend
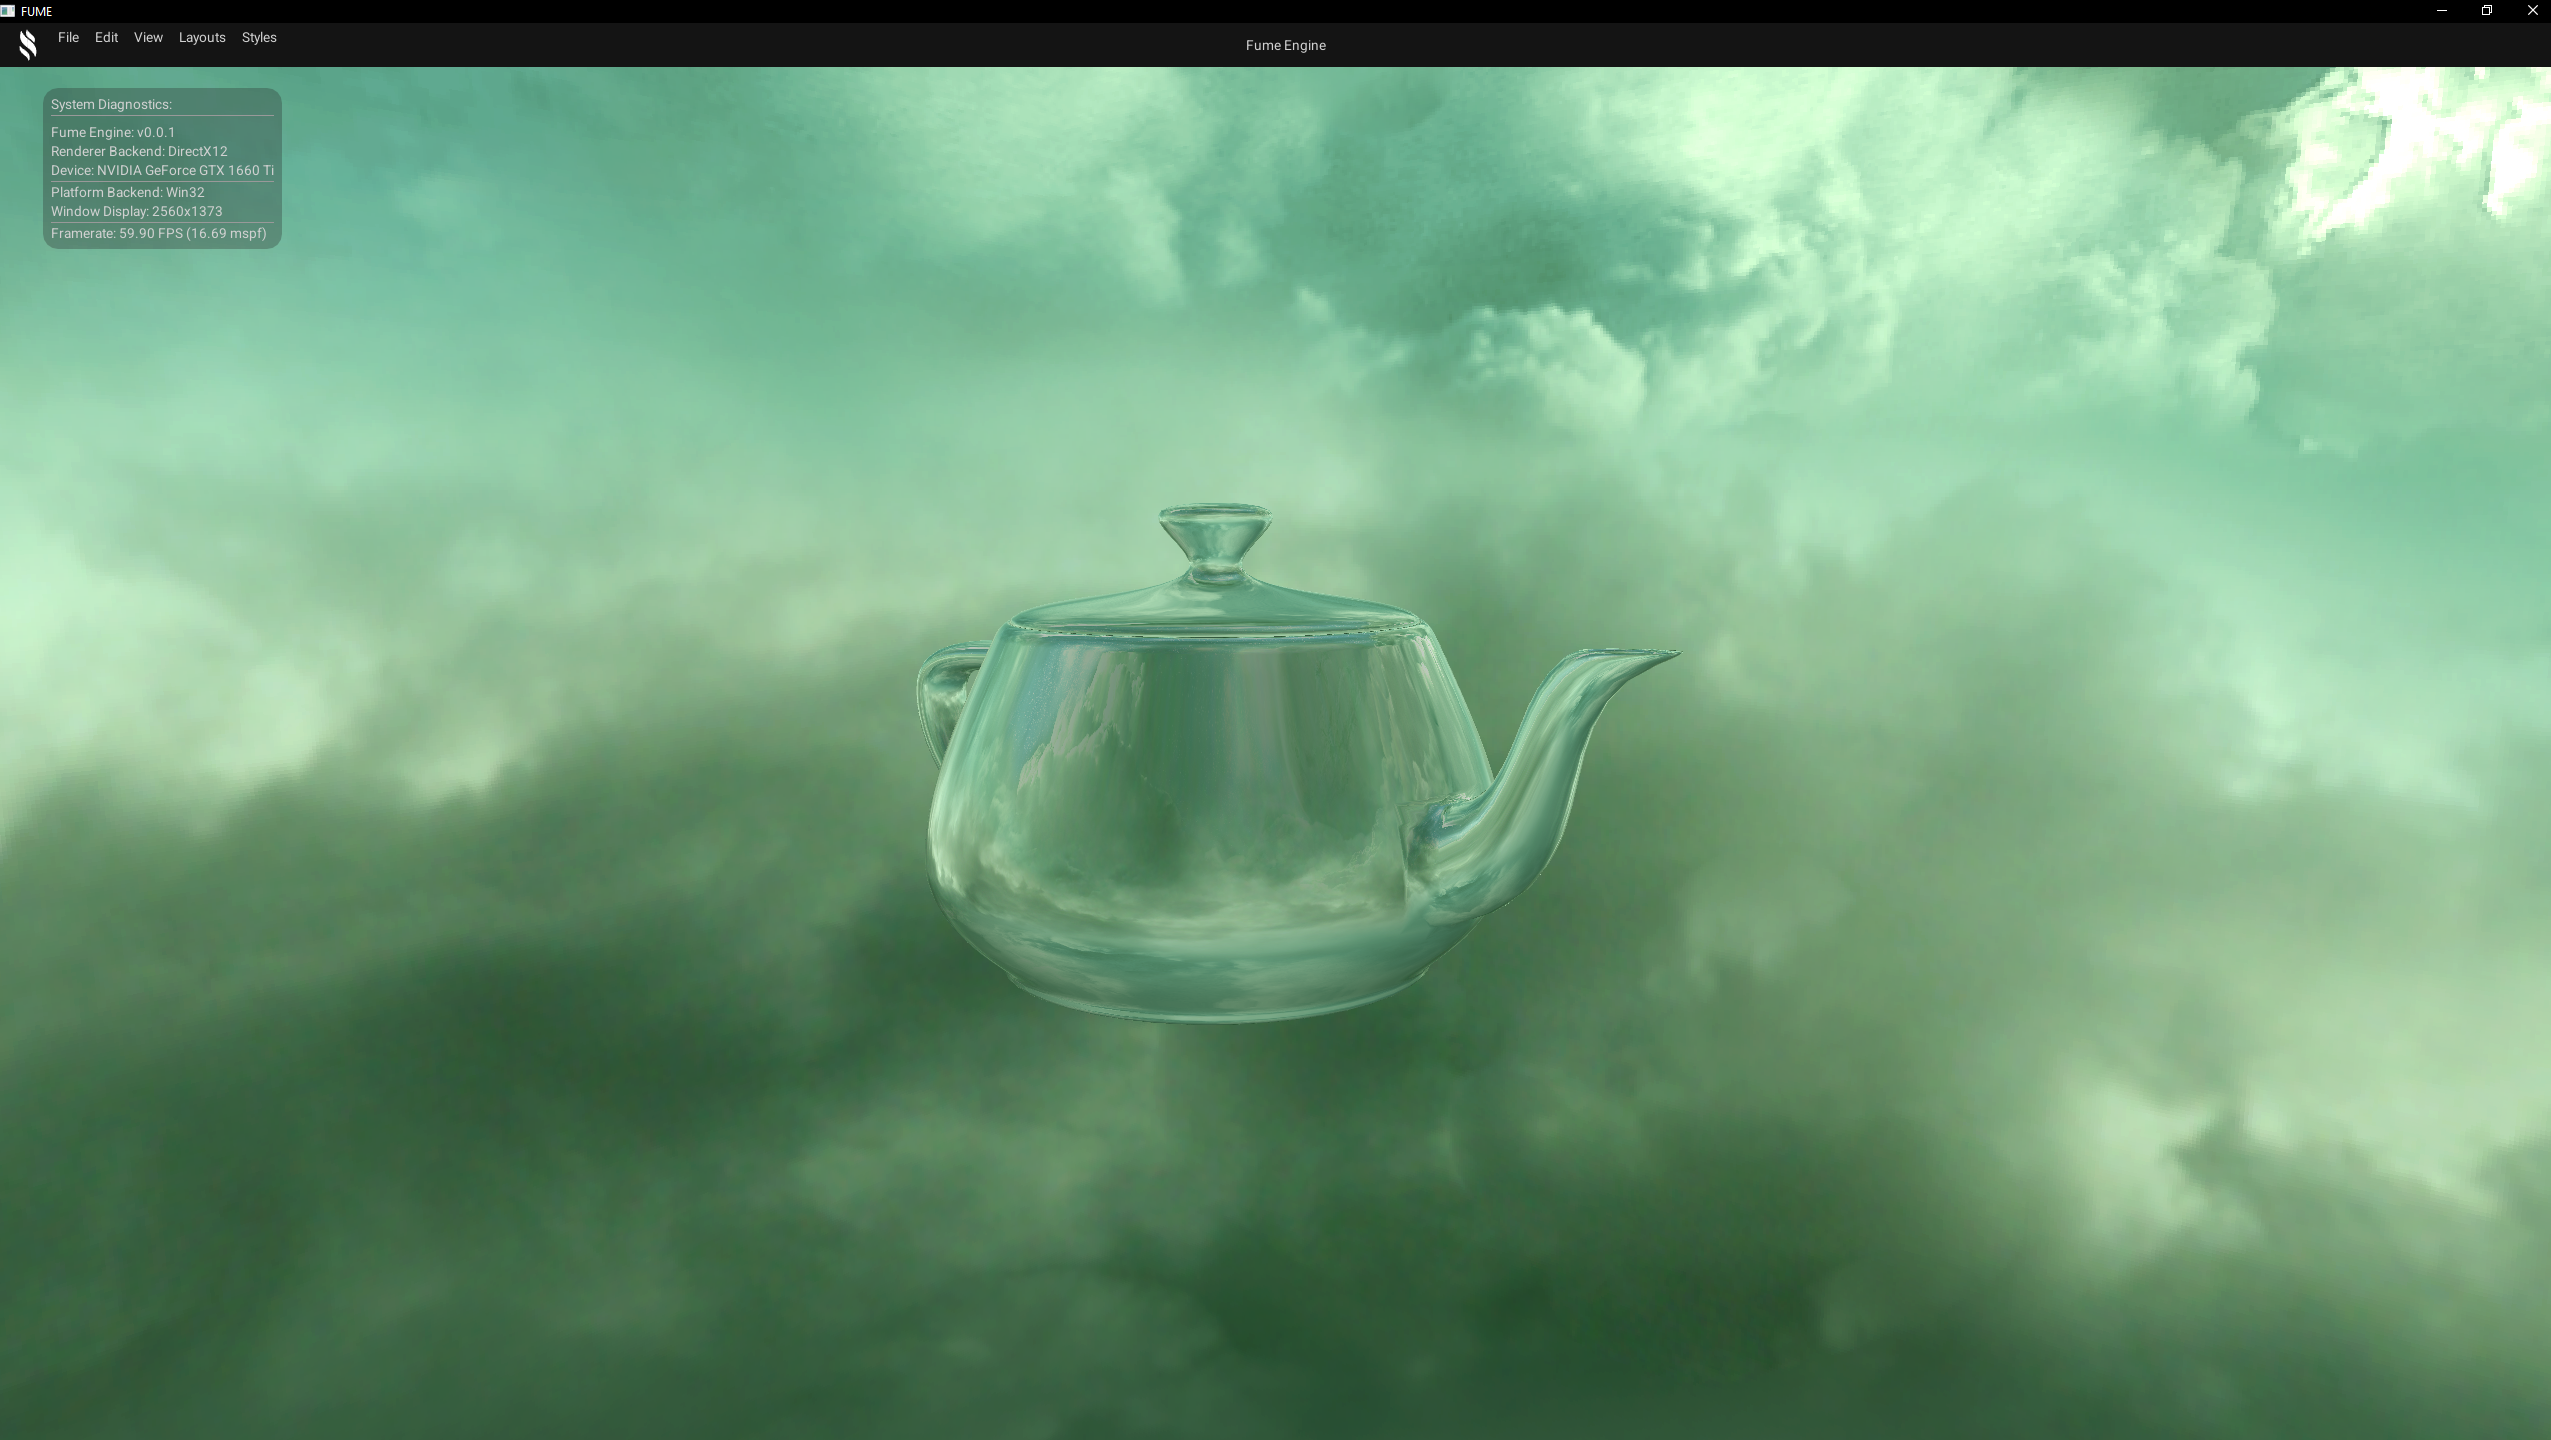
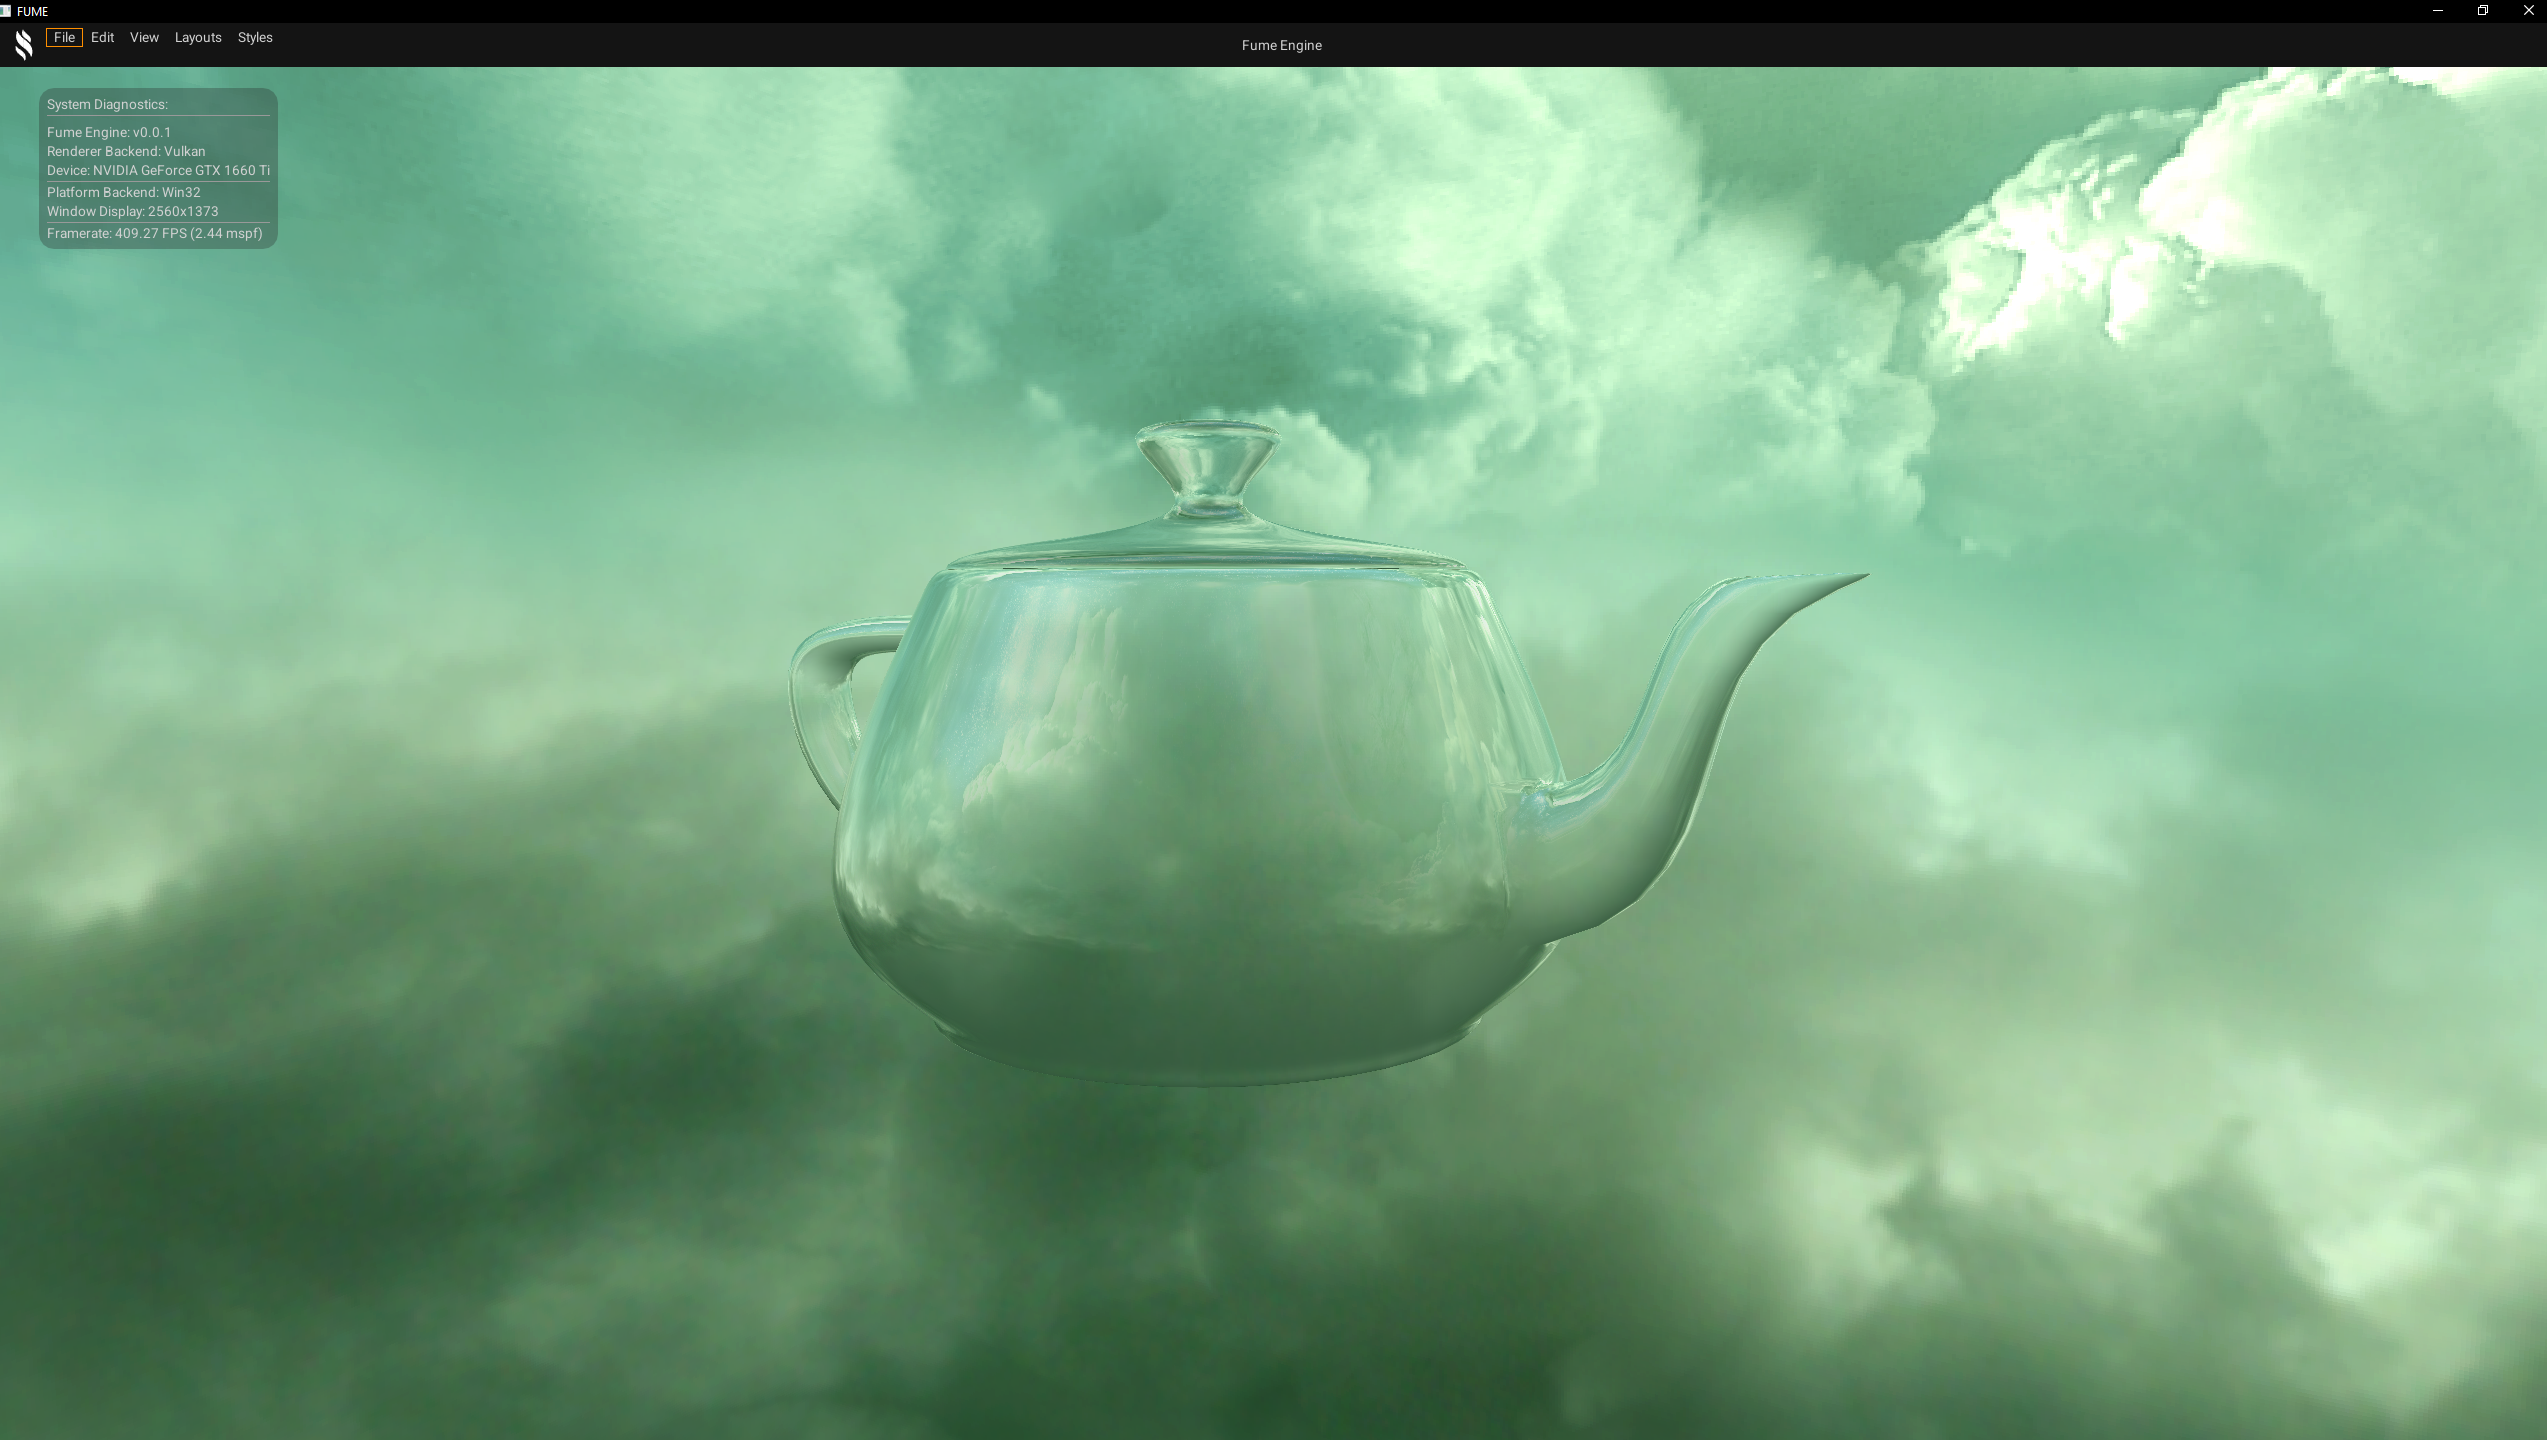
Reflections & Refractions
Simulates light interactions on reflective and transparent surfaces, allowing realistic reflections and refractions. The technique is fully customizable through parameters such as Fresnel power, index of refraction, reflection factor, amongst others. The Skybox is used to generate reflections on reflective materials, enhancing realism in the scene.

D3D12 Backend
Vulkan Backend
Normal Mapping
Basic normal mapping effect that adds surface detail without increasing geometry complexity. It uses a normal map texture to modify the surface normals, creating the illusion of bumps, grooves, and fine details under lighting.

D3D12 Backend
Vulkan Backend
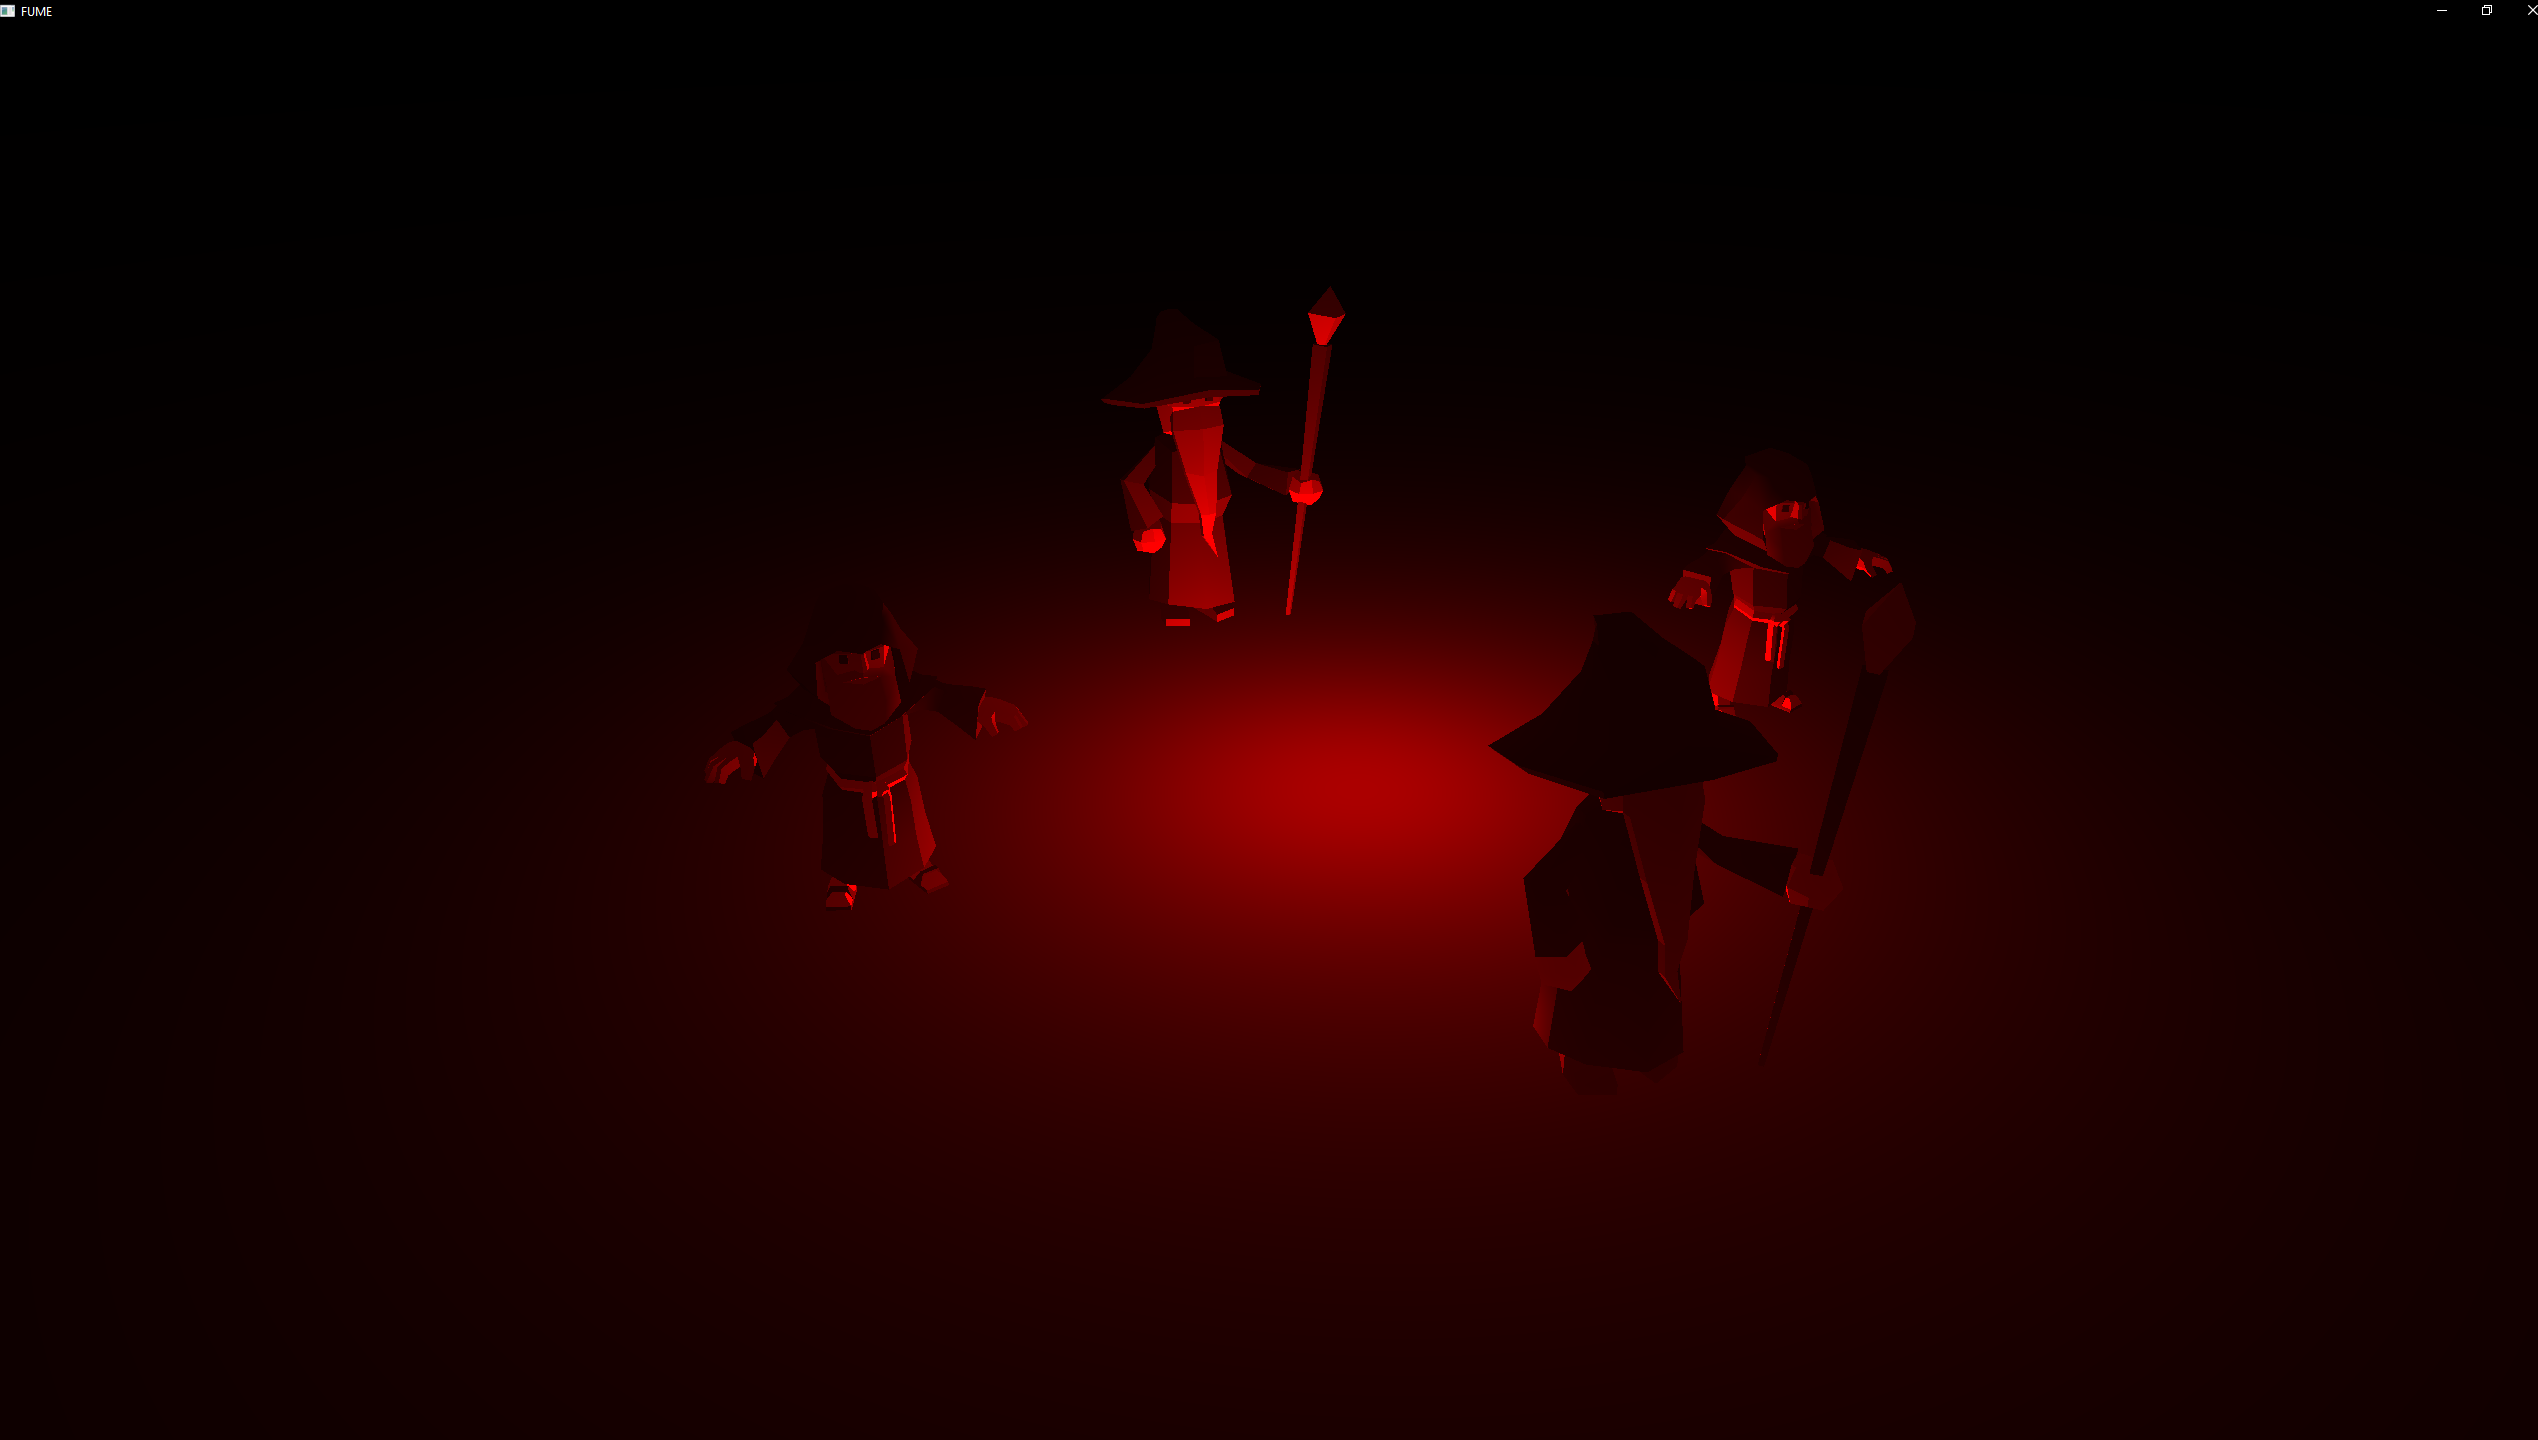
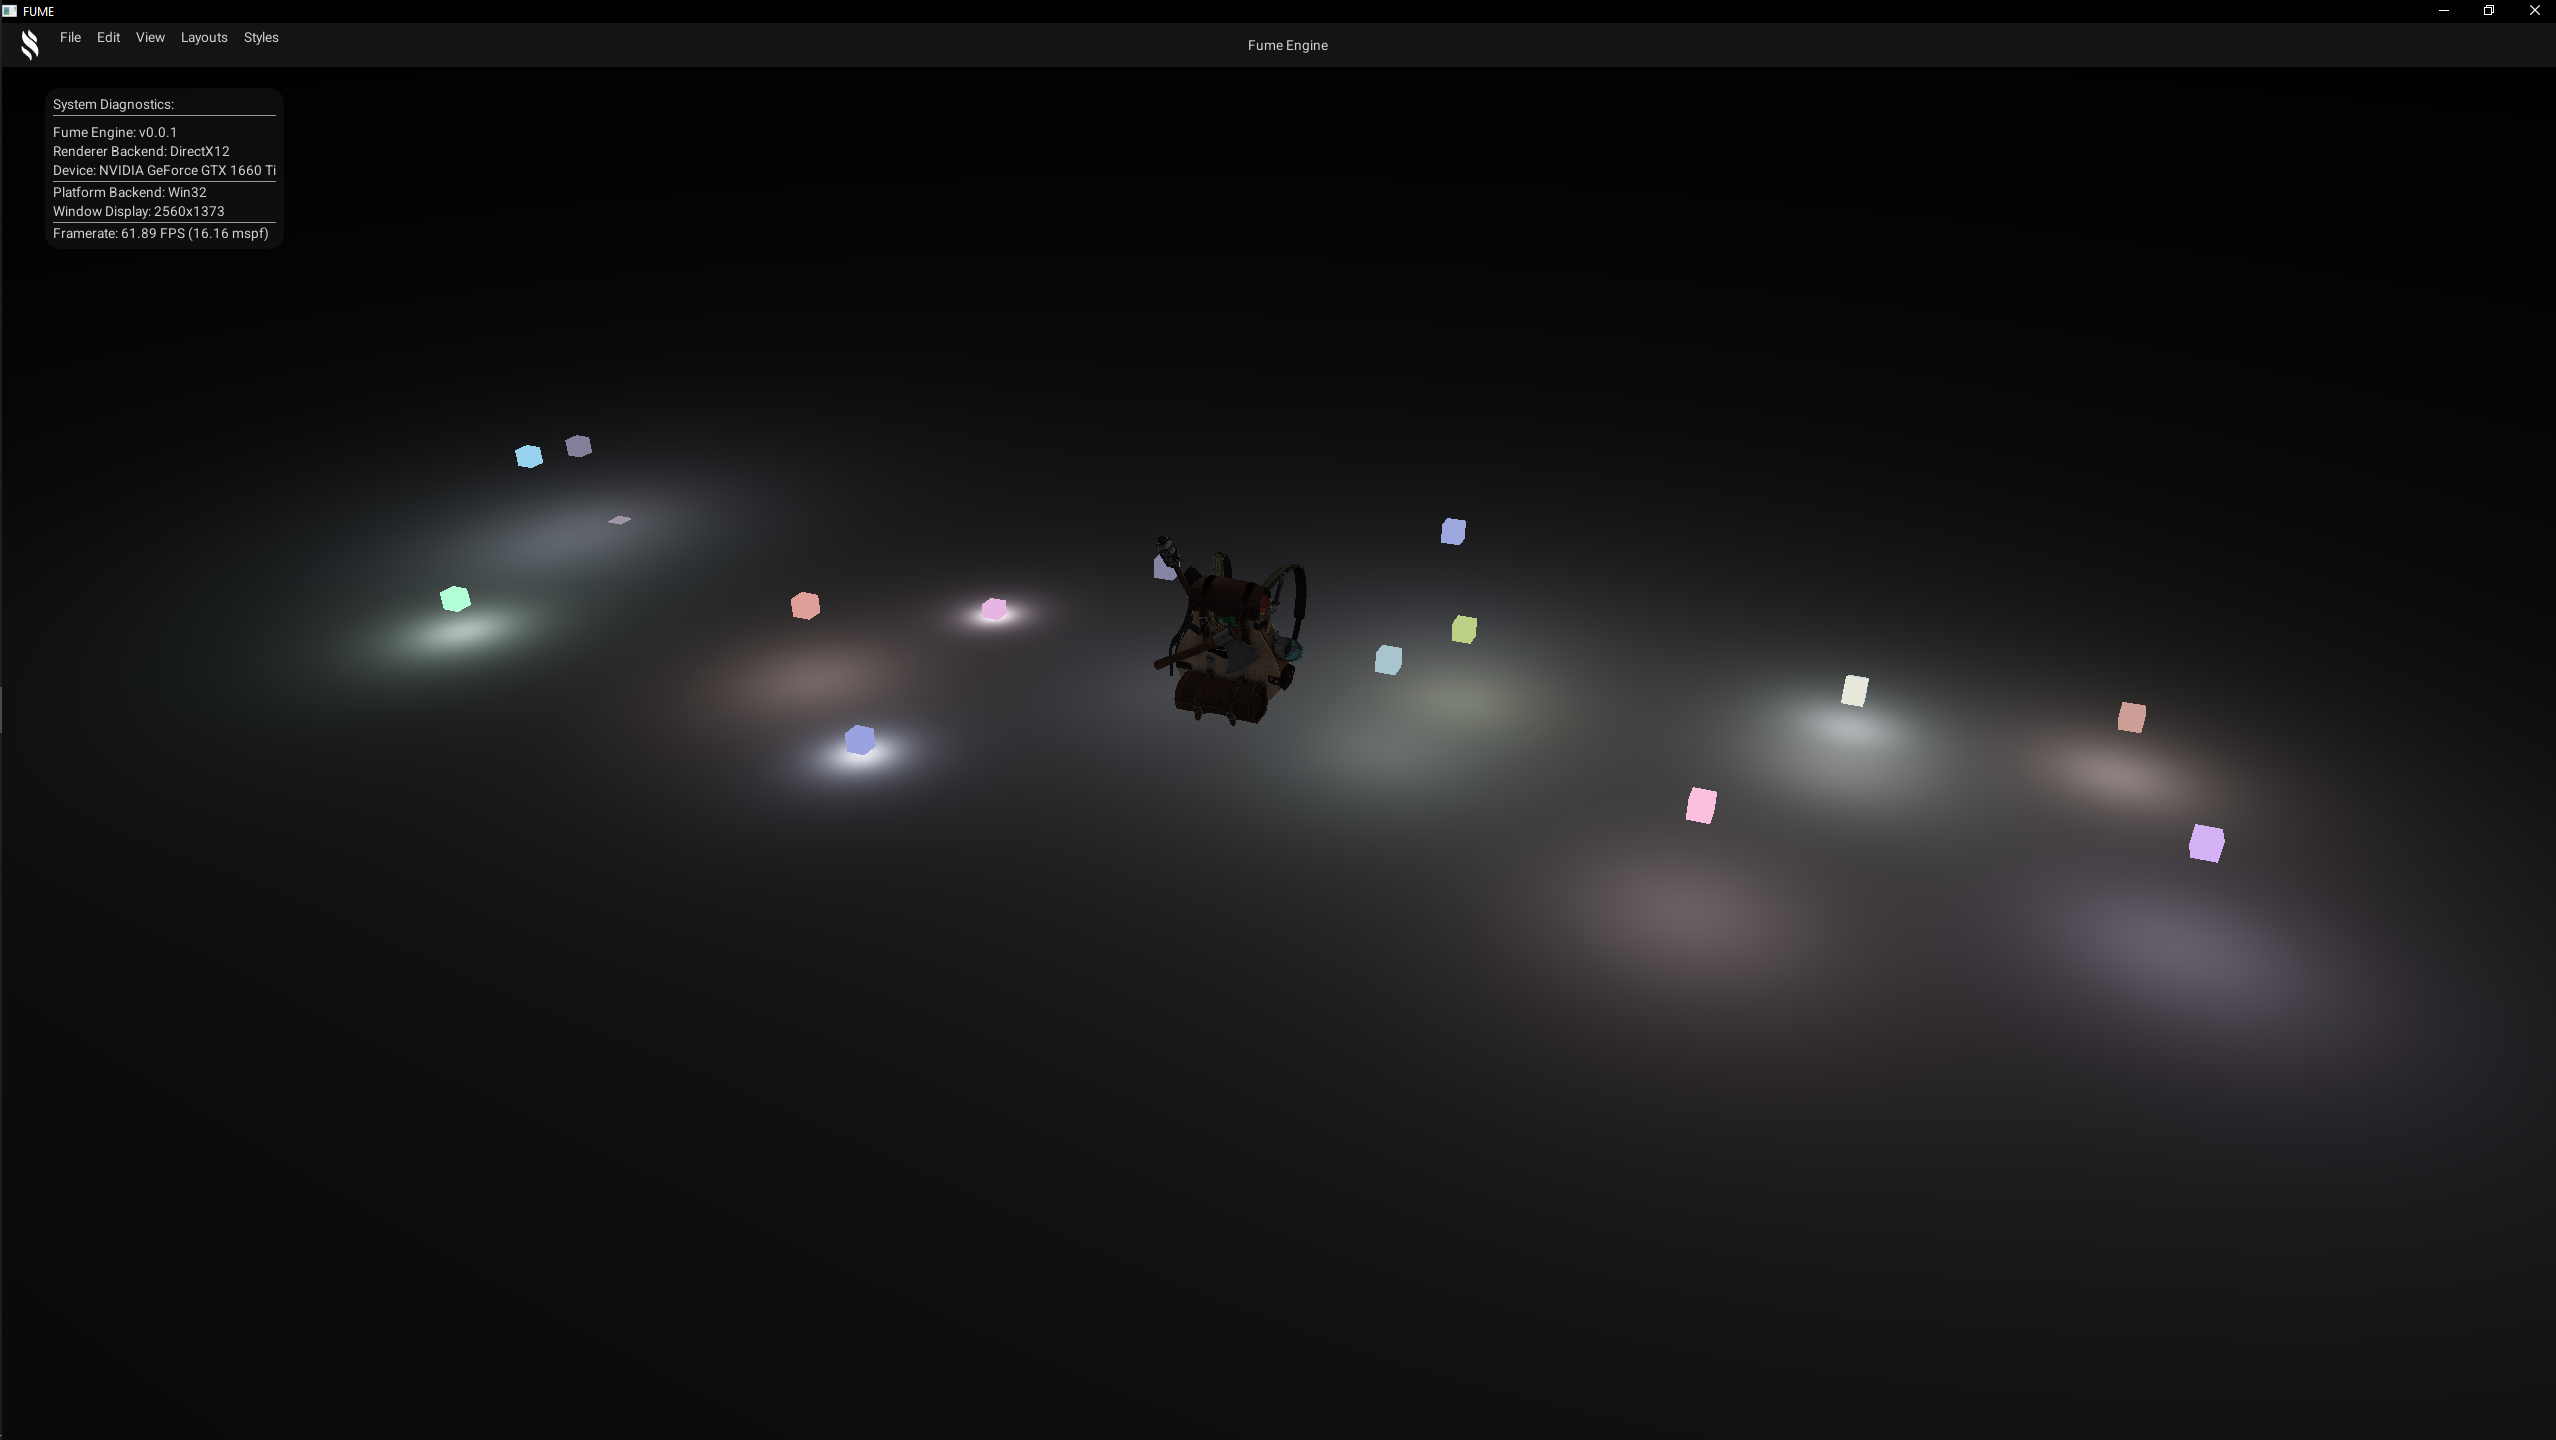
Shadow Mapping
Generates real-time shadows in a basic implementation, currently rendering shadows from a single light. The technique is designed to support multiple light types, including directional, point, and spot lights in order to emulate shadows.
Directional Light Shadow
Point Light Shadow
Spot Light Shadow
D3D12 Backend
Vulkan Backend
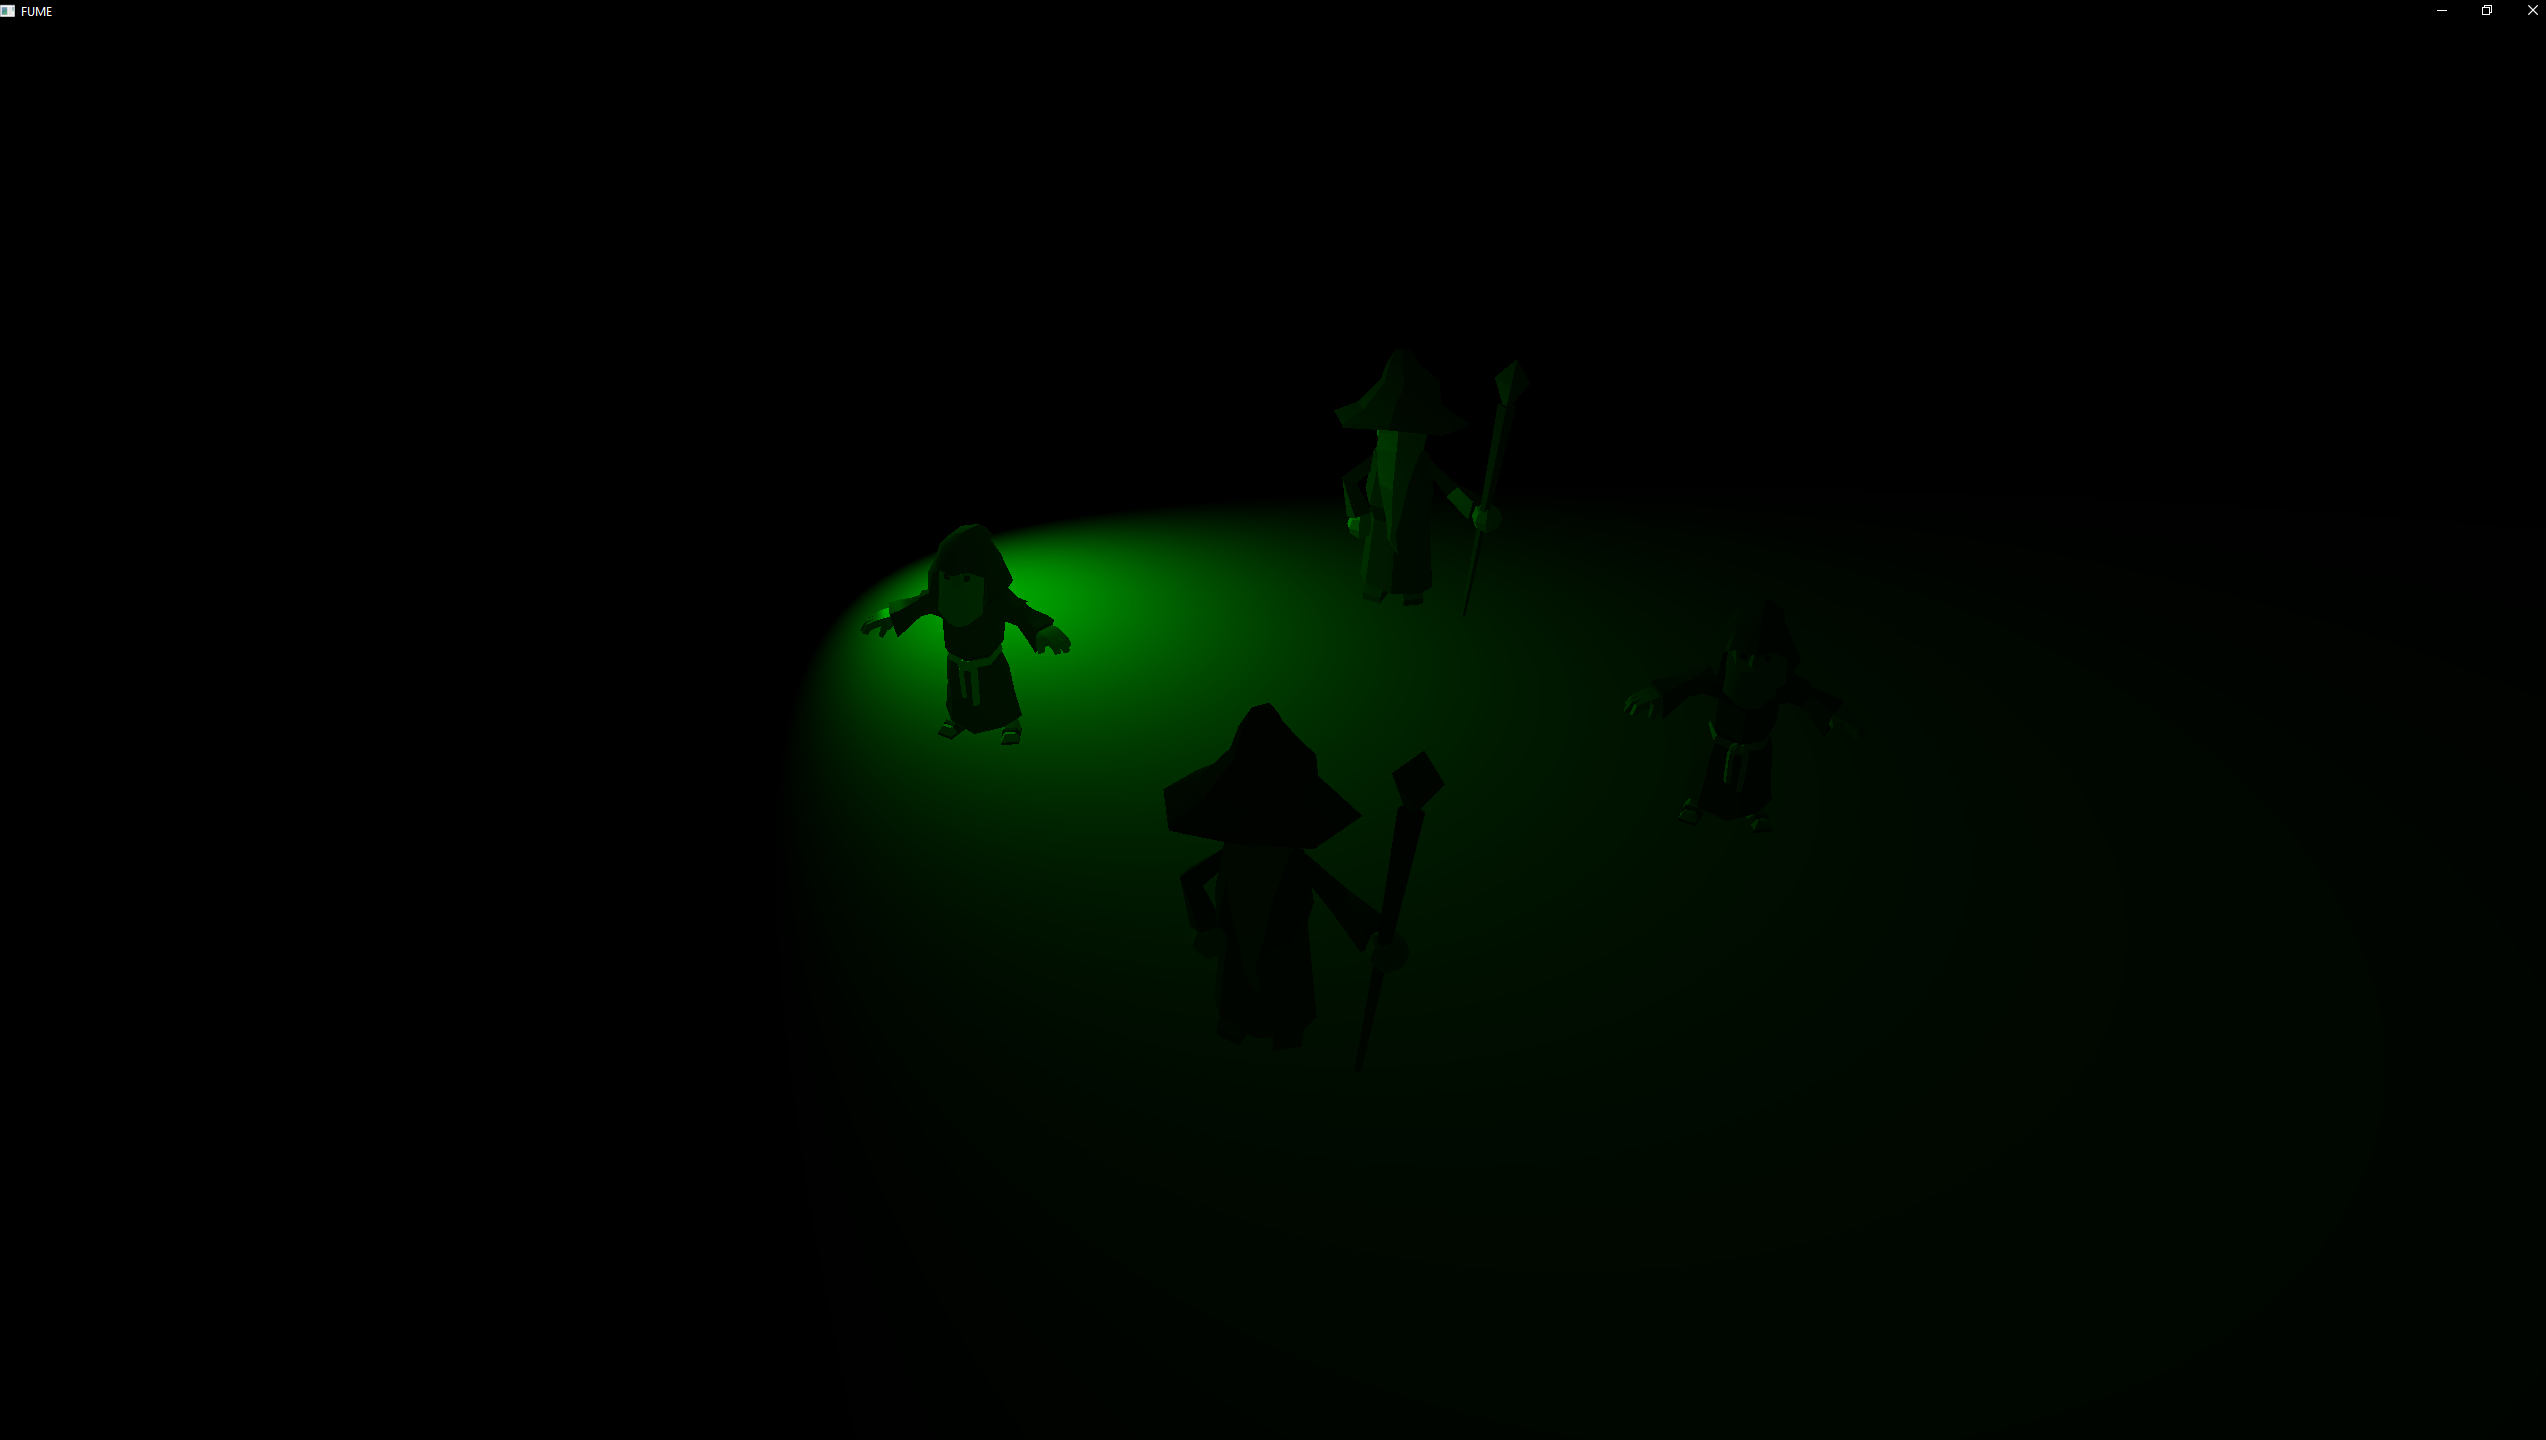
Deferred Shading
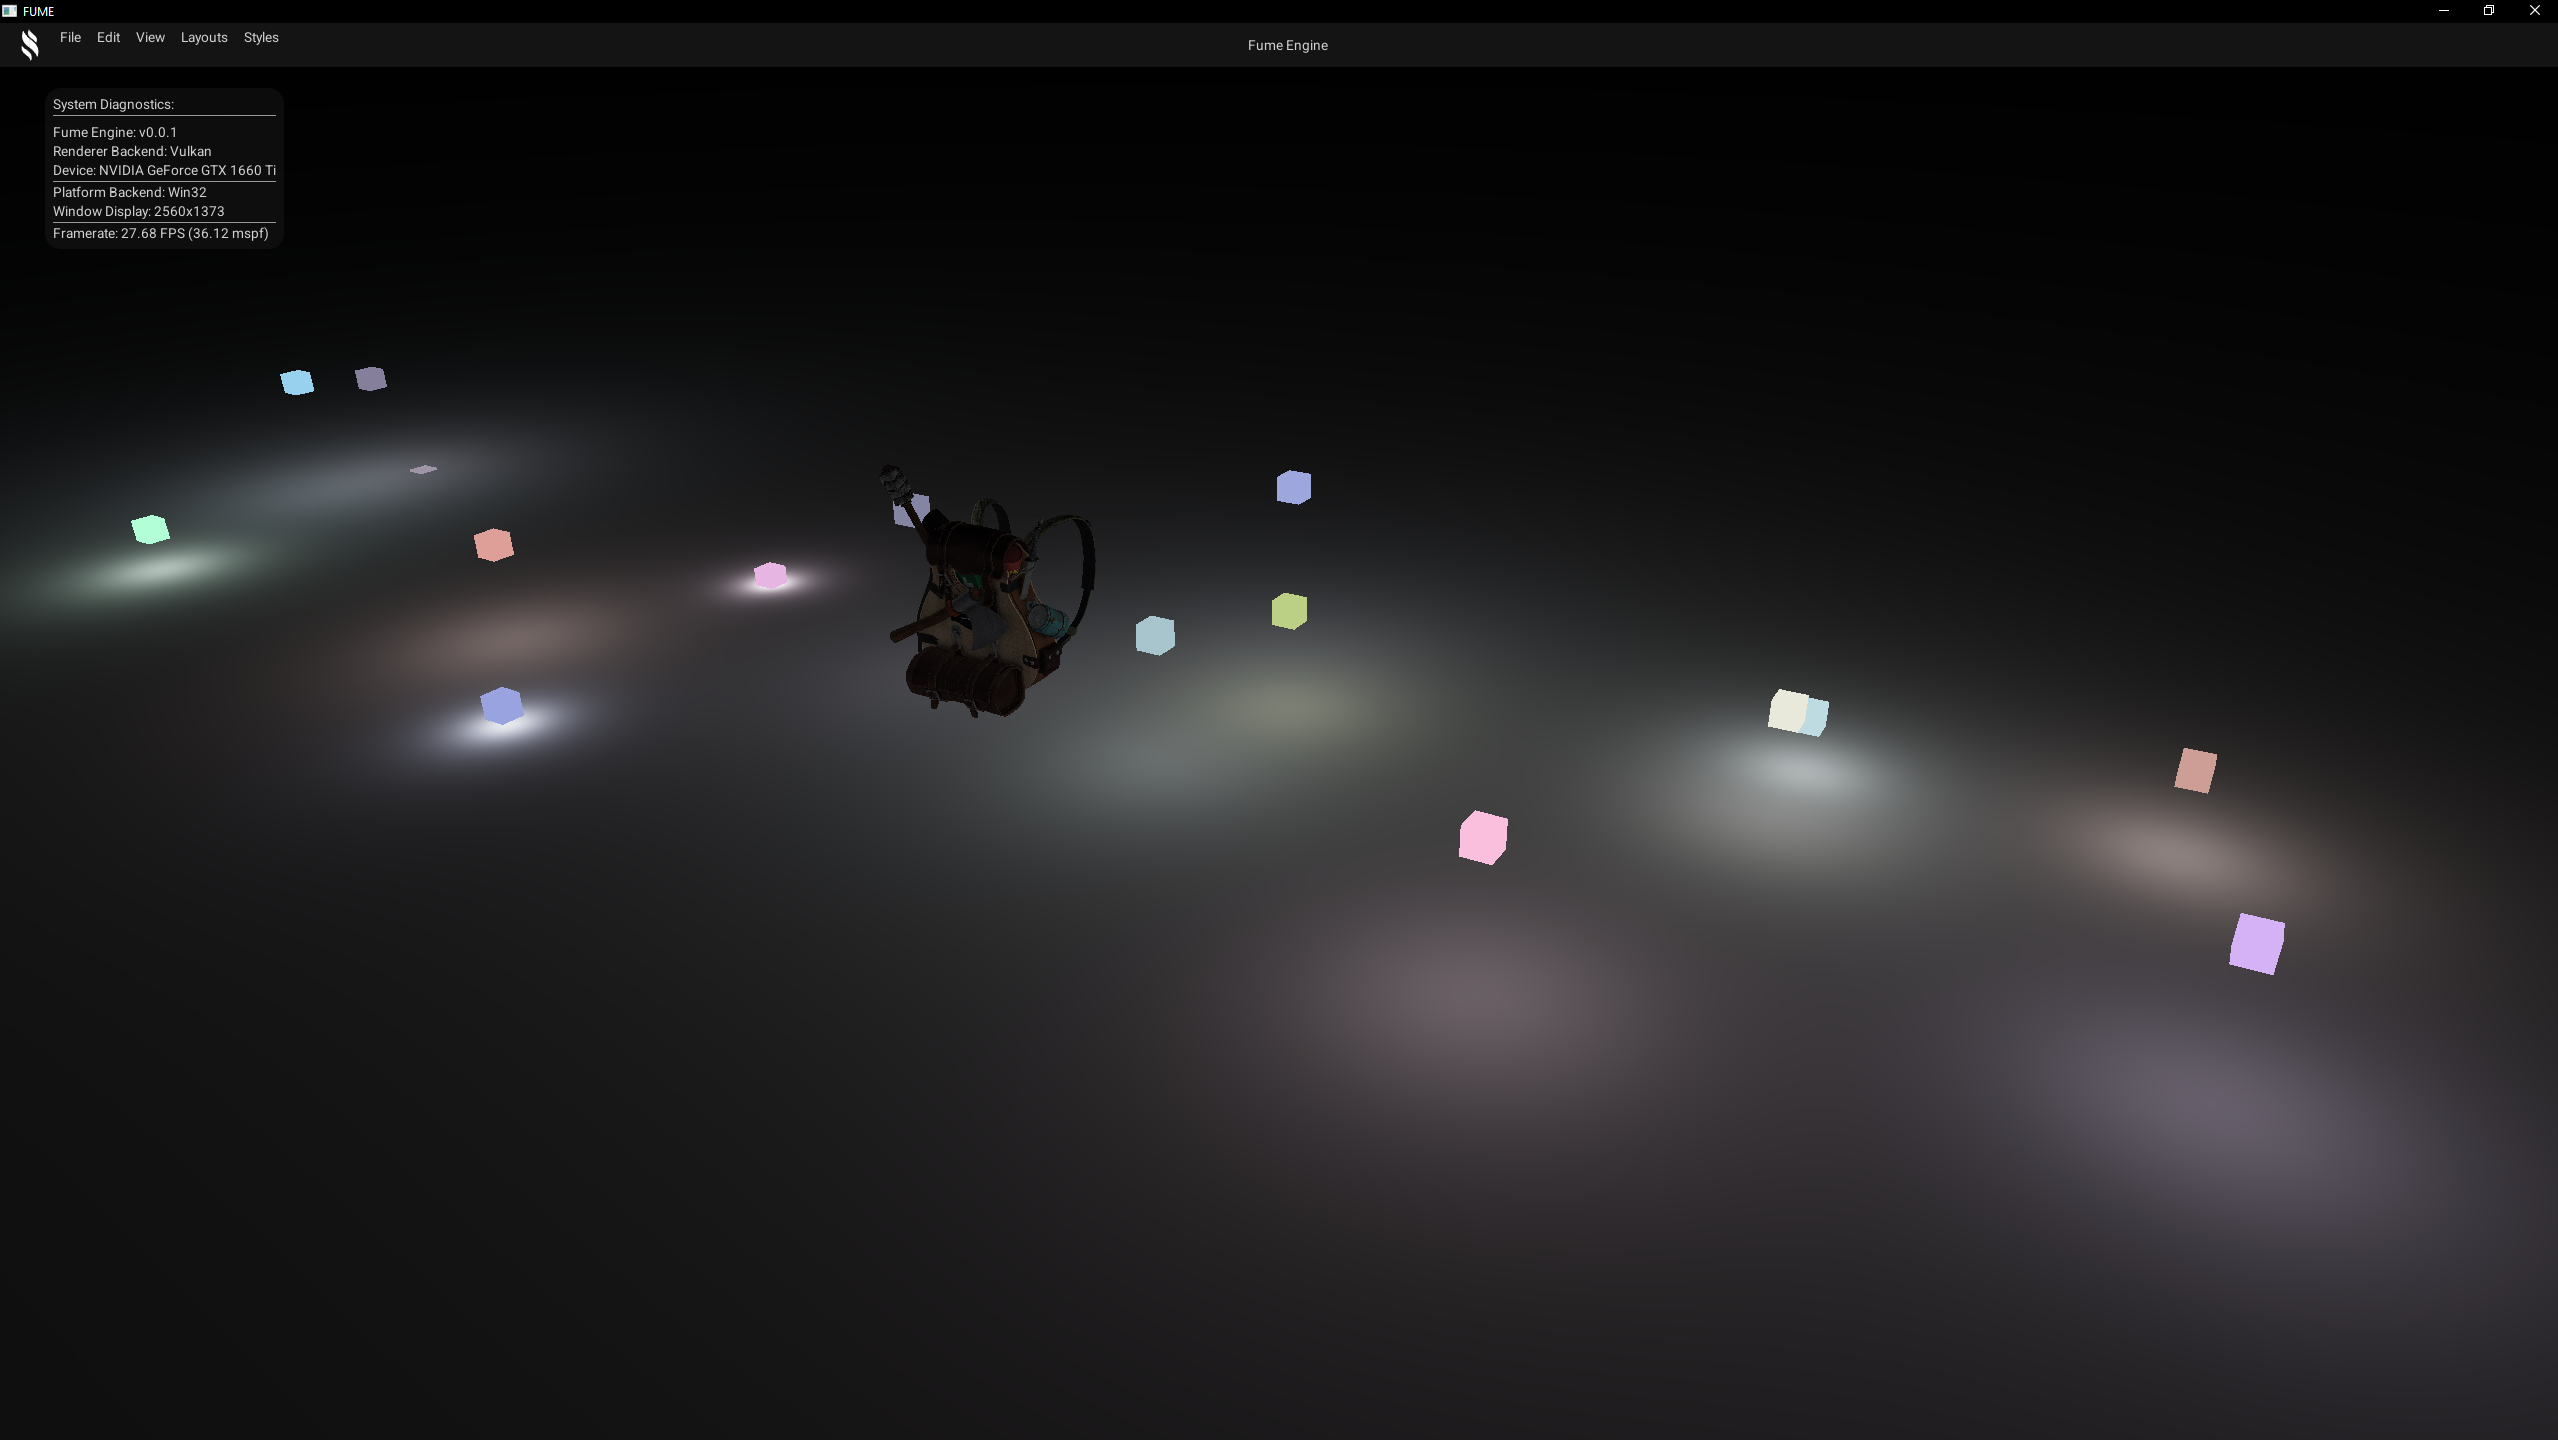
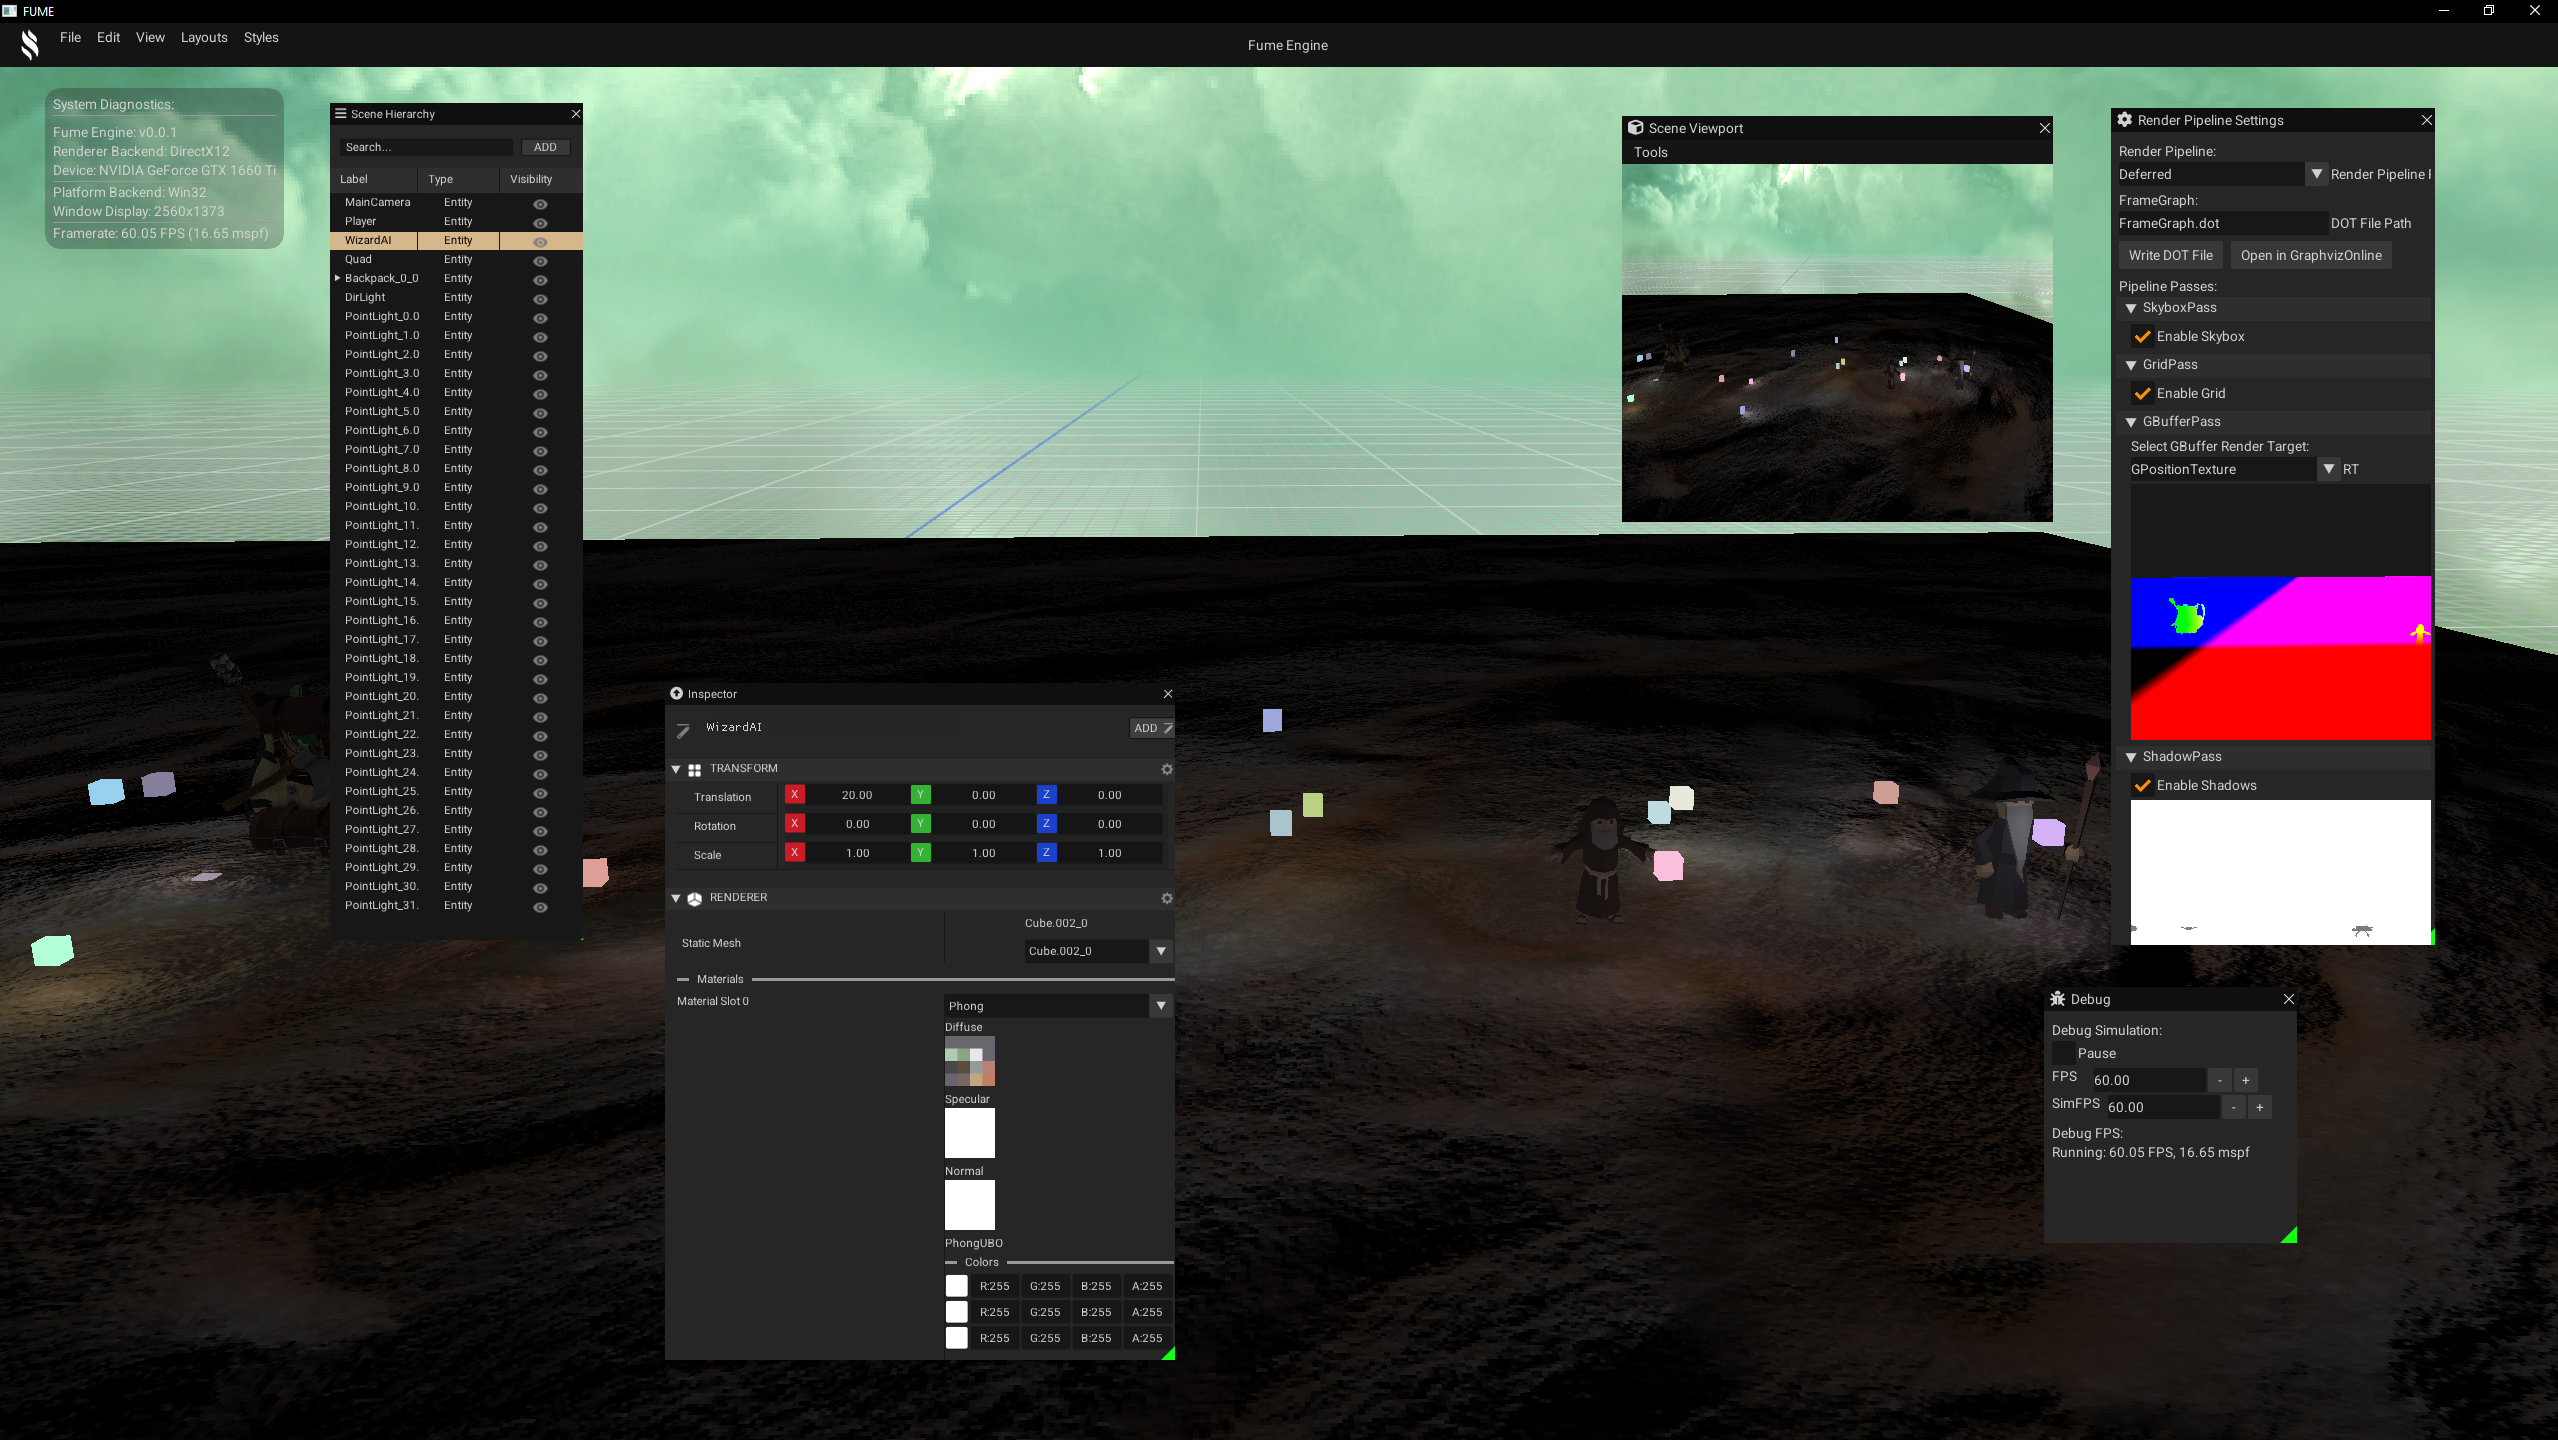
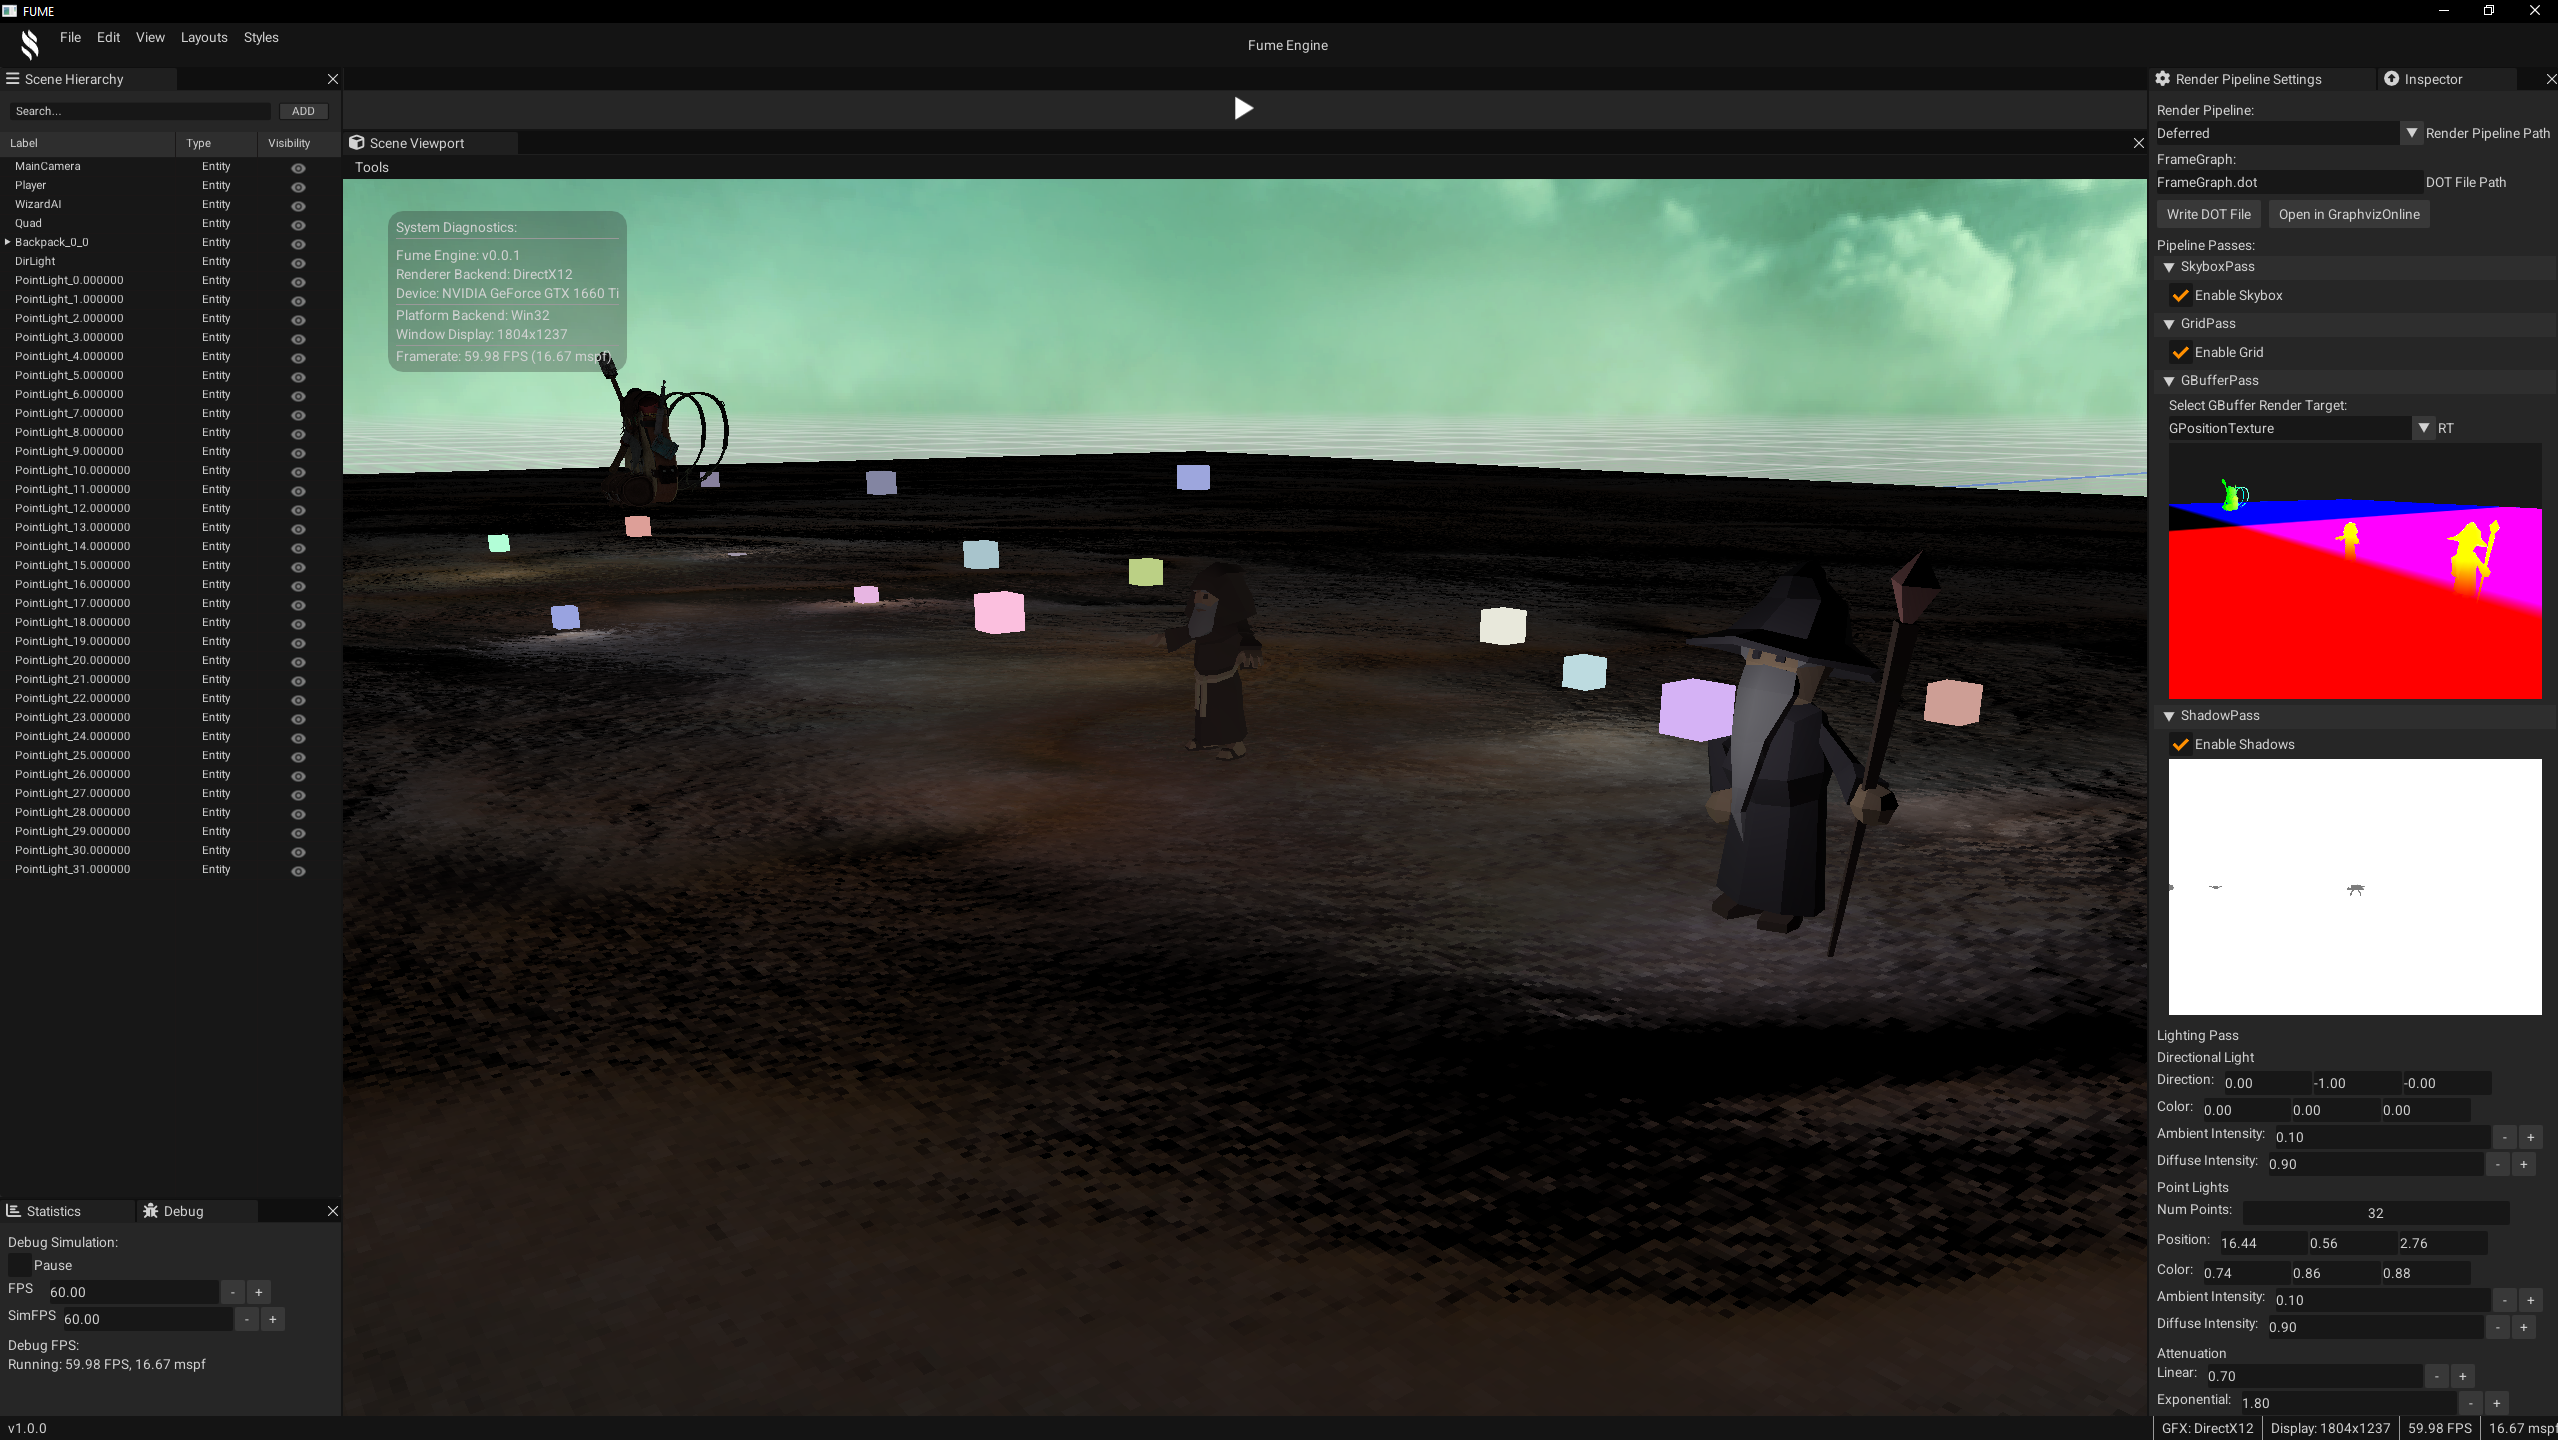
Basic Deferred rendering which splits geometry and lighting work into passes for efficient handling of multiple lights. The implementation uses two main passes: a G-buffer pass that stores geometry information, and a lighting pass that computes illumination. Additionally, a third debug pass renders cubes at the positions of the lights, helping visualize and debug the lighting setup.


G-Buffer textures
D3D12 Backend
Vulkan Backend
FUME GUI
The FUME GUI module is a standalone static library that encapsulates all user interface–related functionality within the engine. Its primary goal is to provide a framework-agnostic GUI layer, allowing the engine and its SDK to interact with UI systems through a unified API, while keeping concrete UI framework implementations fully decoupled.
This design allows the engine to support multiple UI frameworks transparently.
Nowadays, Dear ImGui is the only implemented backend, but the architecture is intentionally prepared for future extensions.
GUI Framework Abstraction
All interaction with the GUI system begins through the GUI class, which acts as the public entry point exposed by the engine SDK.
This class provides a set of static functions designed to be easily callable from engine-level or application-level code without requiring knowledge of the underlying UI framework.
Internally, the GUI class selects the active UI API via a lightweight enumeration:
enum class API { None = 0, ImGui = 1 };
During initialization, the GUI system instantiates the appropriate backend implementation based on the selected API:
void GUI::Init(const platform::IWindow* aWindow, Render::IRHI* aRHI)
{
    switch (GetAPI())
    {
        case API::None: throw "Graphical User Interface API not supported";
        case API::ImGui: sData.GUIBackend = std::make_unique<ImGuiSystem>(*aWindow, *aRHI);
    }

    assert(sData.GUIBackend != nullptr);
    sData.GUIBackend->Initialise();
    sData.IsVisible.value = false;
}
Once initialized, all high-level GUI calls are forwarded directly to the active backend implementation.
void GUI::Render()
{
    assert(sData.GUIBackend !=nullptr);
    if (GUI::IsVisible())
            sData.GUIBackend->Render();
}
This ensures that application code remains completely agnostic to the underlying UI framework in use.
ImGui Rendering Backend
The concrete ImGui implementation is encapsulated in the ImGuiSystem, which integrates ImGui rendering through the Render Hardware Interface (RHI).
Rather than binding directly to Vulkan or DirectX 12, the ImGui system requests a backend renderer from the RHI based on the active graphics API.
mRenderBackend = mRHI.GetContext()->CreateImGuiRendererBackend(
    ImGui::GetCurrentContext(),
    AllocFunc,
    FreeFunc,
    UserData
);

mRenderBackend->Initialise(*mRHI.GetDevice());
This approach allows the RHI to expose explicit hooks for UI frameworks, enabling easier debugging, validation, and profiling. Currently, the implementation wraps the official ImGui Vulkan and DirectX 12 backends, but the abstraction ensures that these details remain isolated from higher-level systems.
The following code snippets illustrate how the per-frame flow is handled to update and render ImGui within the engine throught different phases:
Begin phase
Initializes a new ImGui frame by updating fonts, synchronizing the renderer backend, and preparing platform and ImGui contexts.
void ImGuiSystem::Begin()
{
    mRenderBackend->Update(*mRHI.GetDevice());

    ImGui_ImplWin32_NewFrame();
    ImGui::NewFrame();
}
End phase
Finalizes ImGui command recording and updates platform windows when multi-viewport support is enabled.
void ImGuiSystem::End()
{
    ImGui::Render();

    if (ImGui::GetIO().ConfigFlags & ImGuiConfigFlags_ViewportsEnable)
    {
        ImGui::UpdatePlatformWindows();
    }
}
Render phase
Submits the recorded ImGui draw data to the graphics backend and renders additional platform windows if required.
void ImGuiSystem::Render()
{
    mRenderBackend->Render(*mRHI.GetDevice());

    if (ImGui::GetIO().ConfigFlags & ImGuiConfigFlags_ViewportsEnable)
    {
        ImGui::RenderPlatformWindowsDefault();
    }
}
This design choice prevents the GUI module and the ImGui system from directly exposing or depending on graphics APIs, preserving the API-agnostic architecture established by the Fume Renderer.
Editor UI & Widget System
At the application level, UI development is performed directly using ImGui, without any additional abstraction layer. Since the engine already knows which UI framework is active, editor code can freely use native ImGui constructs such as windows, buttons, sliders, and docking layouts.
UI functionality is organized into modular widgets, each representing a distinct editor panel or window. Widgets are registered by their type with the widget manager, enabling automatic integration into the editor interface. Once registered, the manager handles all lifecycle, update, and render logic, making the system fully data-driven: adding a new widget only requires creating it and registering it—the manager takes care of the rest.
mWidgetManager.RegisterEditorWidget<DockSpaceWidget>();
mWidgetManager.RegisterEditorWidget<MenuBarWidget>(mLayoutManager);
mWidgetManager.RegisterEditorWidget<FooterWidget>();
mWidgetManager.RegisterEditorWidget<ToolBarWidget>(true,true);
mWidgetManager.RegisterEditorWidget<DebugWidget>(mActiveScene);
mWidgetManager.RegisterEditorWidget<StatsWidget>();
mWidgetManager.RegisterEditorWidget<ViewportWidget>();
mWidgetManager.RegisterEditorWidget<RenderPipelineWidget>();
mWidgetManager.RegisterEditorWidget<SceneHierarchyWidget>(mActiveScene);
mWidgetManager.RegisterEditorWidget<InspectorWidget>(mActiveScene);
mWidgetManager.RegisterEditorWidget<AppInfoWidget>(mLayoutManager, true, true);
As an example, the following snippet code defines the completed ToolBarWidget used in my editor.
The widget just needs the Renderer layer to create texture resources for the icons and the proper ImGui code:
class ToolBarWidget : public IEditorWidget
{
public:
    explicit ToolBarWidget(EditorWidgetManager& aManager) : IEditorWidget(aManager) {};
    explicit ToolBarWidget(EditorWidgetManager& aManager, bool aHideLabel=false, bool aHideCloseBtn=false)
        : IEditorWidget(aManager,aHideLabel,aHideCloseBtn) {};
    ~ToolBarWidget() {};

    EDITOR_WIDGET("ToolBar", ToolBar, "", eWidgetType::Bars);

    virtual void Initialise() override
    {
        mWindowFlags = ImGuiWindowFlags_NoDecoration
                     | ImGuiWindowFlags_NoScrollbar
                     | ImGuiWindowFlags_NoScrollWithMouse;

        m_IconPlay = Renderer::CreateTexture2D("assets/icons/PlayButton.png");
        m_IconStop = Renderer::CreateTexture2D("assets/icons/StopButton.png");
    }

    virtual void Shutdown() override
    {
        auto* GFXDevice = Renderer::GetGFX().GetDevice();
        GFXDevice->DestroyTexture(m_IconPlay);
        GFXDevice->DestroyTexture(m_IconStop);
    }

    virtual void PreDraw() override
    {
        ImGui::PushStyleVar(ImGuiStyleVar_WindowPadding, ImVec2(0, 2));
        ImGui::PushStyleVar(ImGuiStyleVar_ItemInnerSpacing, ImVec2(0, 0));
        ImGui::PushStyleColor(ImGuiCol_Button, ImVec4(0.f, 0.f, 0.f, 0.01f));
        auto& colors = ImGui::GetStyle().Colors;
        const auto& buttonHovered = colors[ImGuiCol_ButtonHovered];
        ImGui::PushStyleColor(ImGuiCol_ButtonHovered,
            ImVec4(buttonHovered.x, buttonHovered.y, buttonHovered.z, 0.5f));
        const auto& buttonActive = colors[ImGuiCol_ButtonActive];
        ImGui::PushStyleColor(ImGuiCol_ButtonActive,
            ImVec4(buttonActive.x, buttonActive.y, buttonActive.z, 0.5f));
    };

    virtual void PostDraw() override
    {
        ImGui::PopStyleVar(2);
        ImGui::PopStyleColor(3);
    };

    virtual void Draw() override
    {
        float size = ImGui::GetWindowHeight() - 4.0f;

        std::shared_ptr<Render::ITexture> icon {mMode == EditorMode::Edit ? m_IconPlay : m_IconStop};
        ImGui::SetCursorPosX((ImGui::GetWindowContentRegionMax().x * 0.5f) - (size * 0.5f));
        if (ImGui::ImageButton(icon.get(), ImVec2(size, size), ImVec2(0, 0), ImVec2(1, 1), 0))
        {
            if      (mMode == EditorMode::Edit) SetMode(EditorMode::Play);
            else if (mMode == EditorMode::Play) SetMode(EditorMode::Edit);
        }
    }

    EditorMode GetMode() { return mMode; }
    void SetMode(EditorMode aMode)
    {
        if (mMode == aMode) return;
        mMode = aMode;
    }

private:
    std::shared_ptr<Render::ITexture> m_IconPlay, m_IconStop;
    EditorMode mMode {EditorMode::Edit};
};
As a result, this is how the UI Widget System looks like in the editor:
Editor Layout Management
The EditorLayoutManager handles multiple UI configurations, defining which widgets are active and how they are arranged on screen.
Layouts are represented as data structures referencing serialized ImGui .ini files and the widgets they enable.
The first layout defines a full-featured editor view, activating all main panels and tools:
LayoutData EditorLayout
{
    .Name        = "Editor",
    .IniFilePath = "assets/layouts/Editor.ini",
    .ViewMode    = eLayoutViewMode::Editor,
    .WidgetsToActive =
    {
        DockSpaceWidget::WIDGET_NAME,
        MenuBarWidget::WIDGET_NAME,
        FooterWidget::WIDGET_NAME,
        ToolBarWidget::WIDGET_NAME,
        DebugWidget::WIDGET_NAME,
        StatsWidget::WIDGET_NAME,
        ViewportWidget::WIDGET_NAME,
        AppInfoWidget::WIDGET_NAME,
        RenderPipelineWidget::WIDGET_NAME,
        SceneHierarchyWidget::WIDGET_NAME,
        InspectorWidget::WIDGET_NAME
    }
};
Full-featured Editor View
The second layout defines a minimal showcase view, focusing only on essential UI elements:
LayoutData MinimalLayout
{
    .Name        = "Minimal",
    .IniFilePath = "assets/layouts/Minimal.ini",
    .ViewMode    = eLayoutViewMode::Showcase,
    .WidgetsToActive =
    {
        MenuBarWidget::WIDGET_NAME,
        AppInfoWidget::WIDGET_NAME
    }
};

Minimal Showcase View
The editor supports switching seamlessly between full-featured editing layouts, minimal showcase views, and a UI-free default view that disables the ImGui rendering pass, with all layout persistence and widget activation handled in a fully data-driven way.
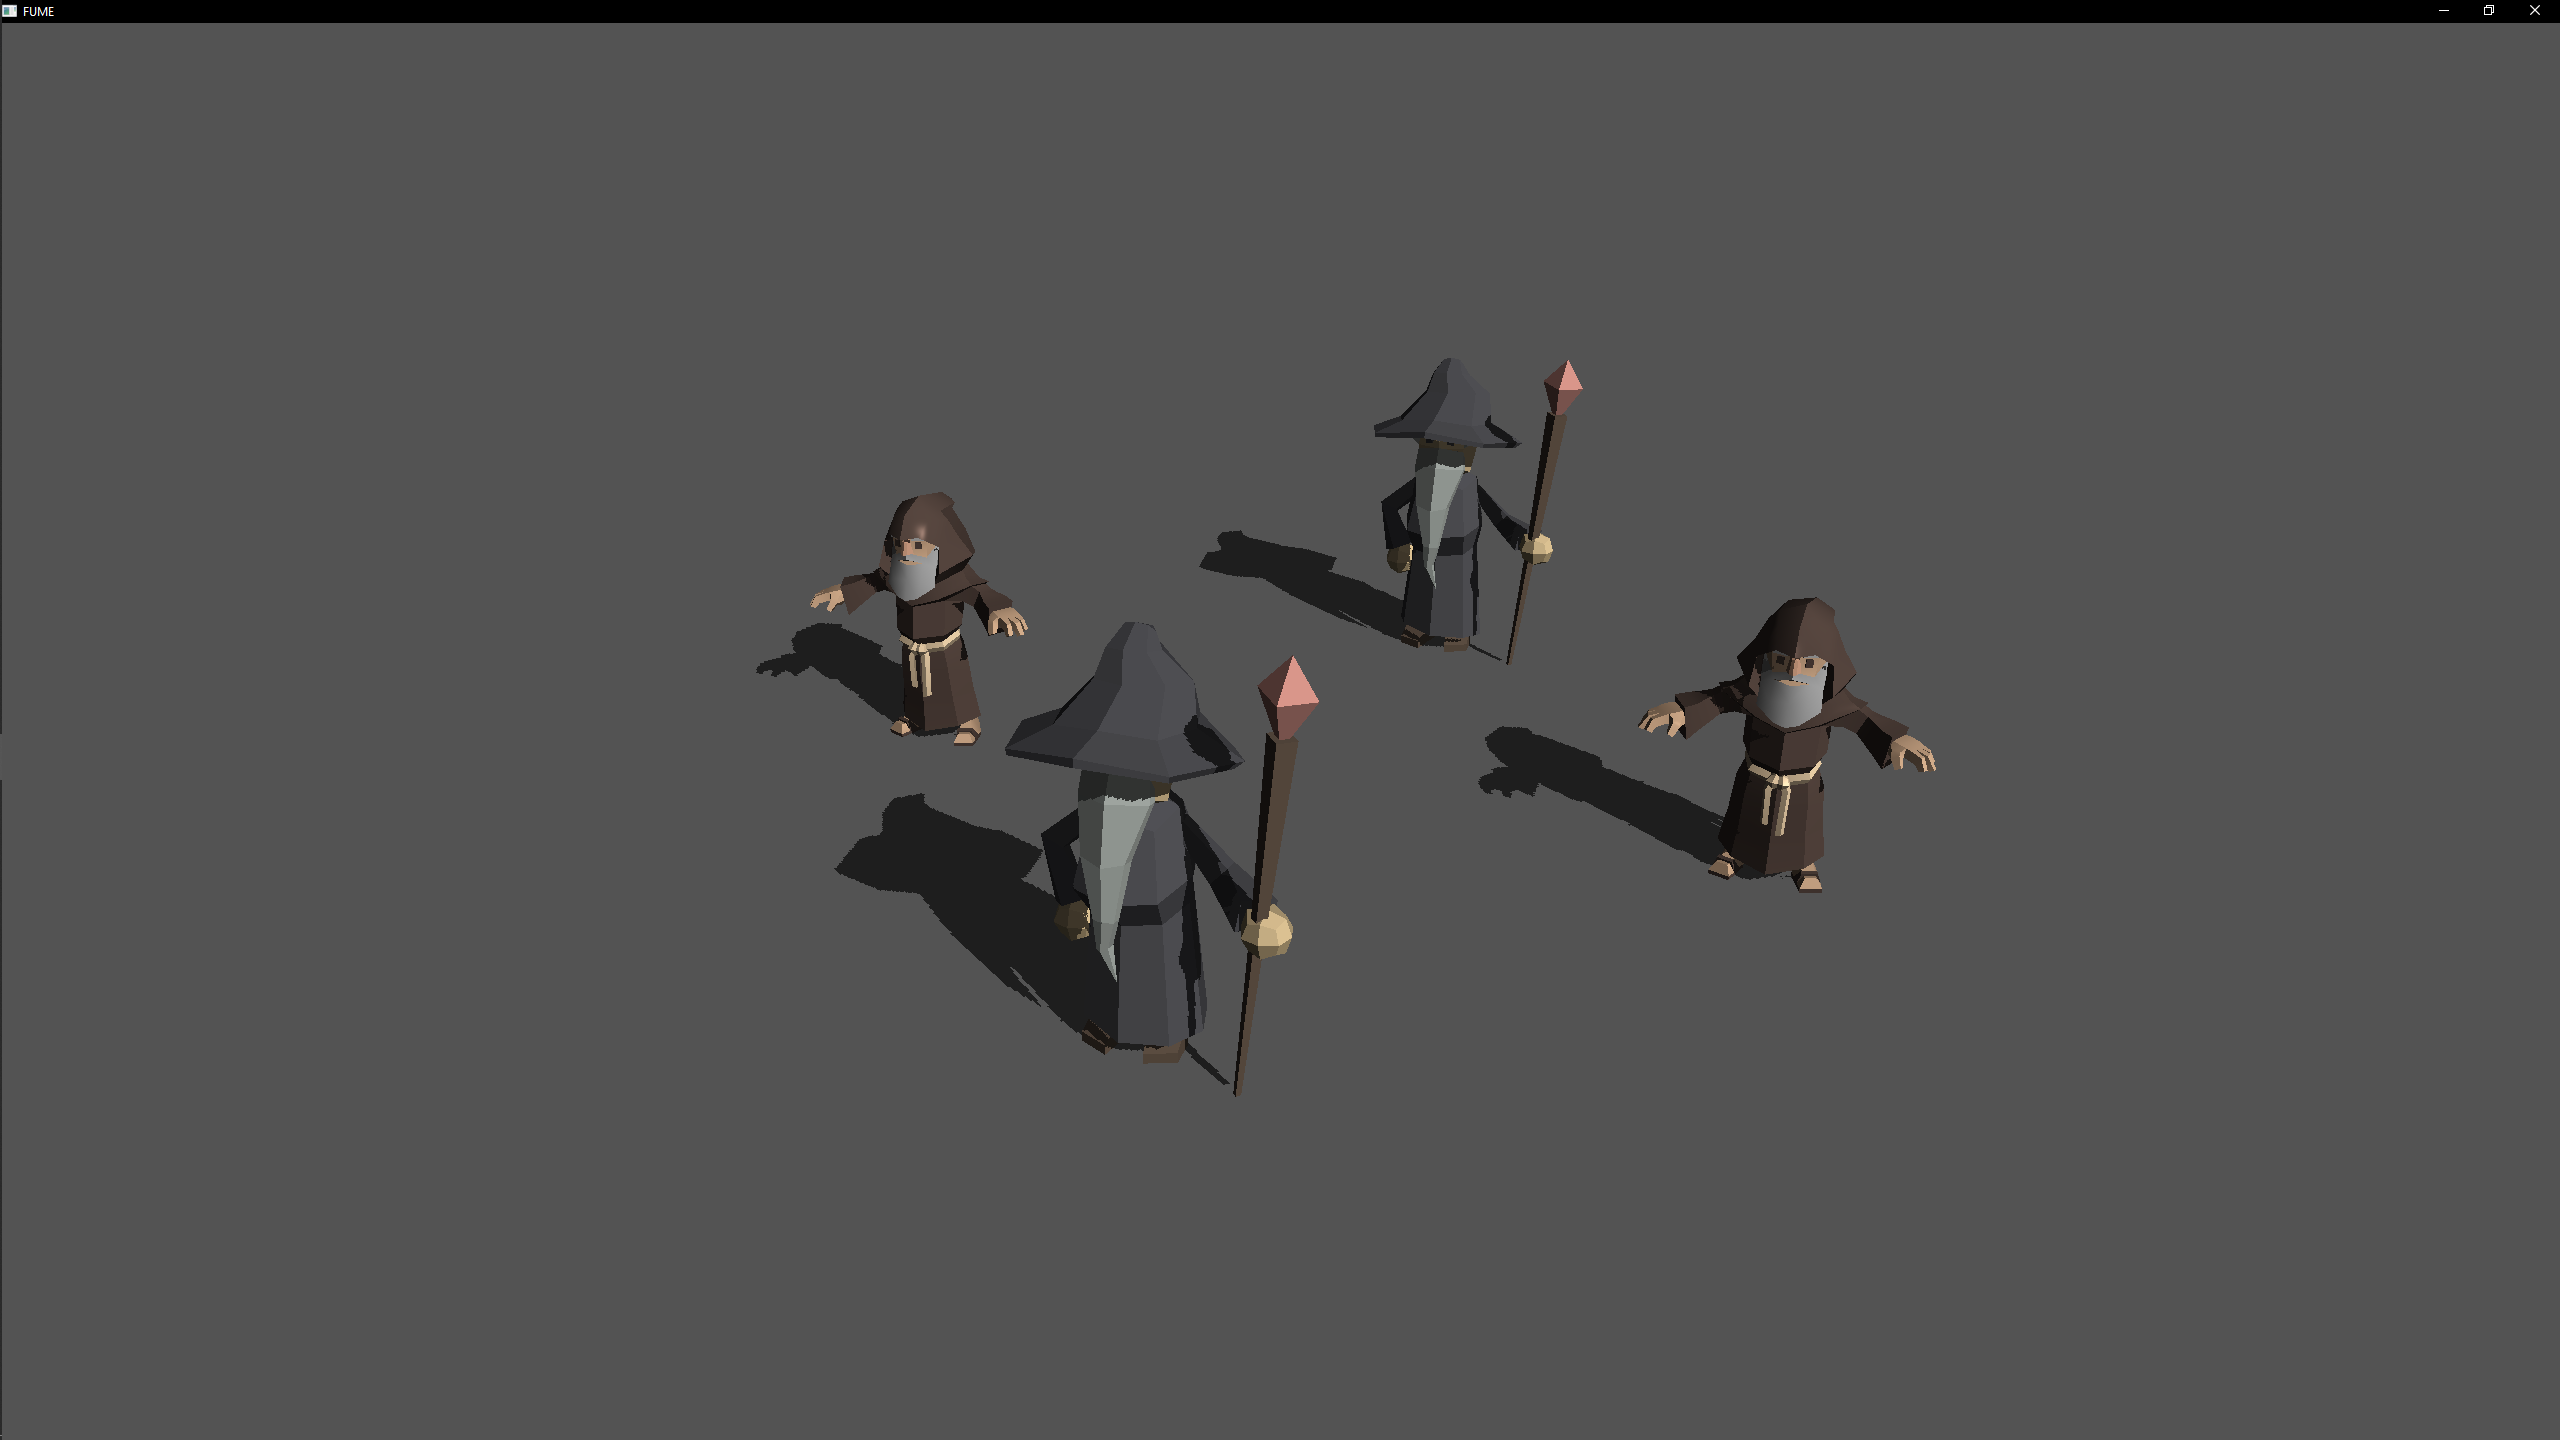
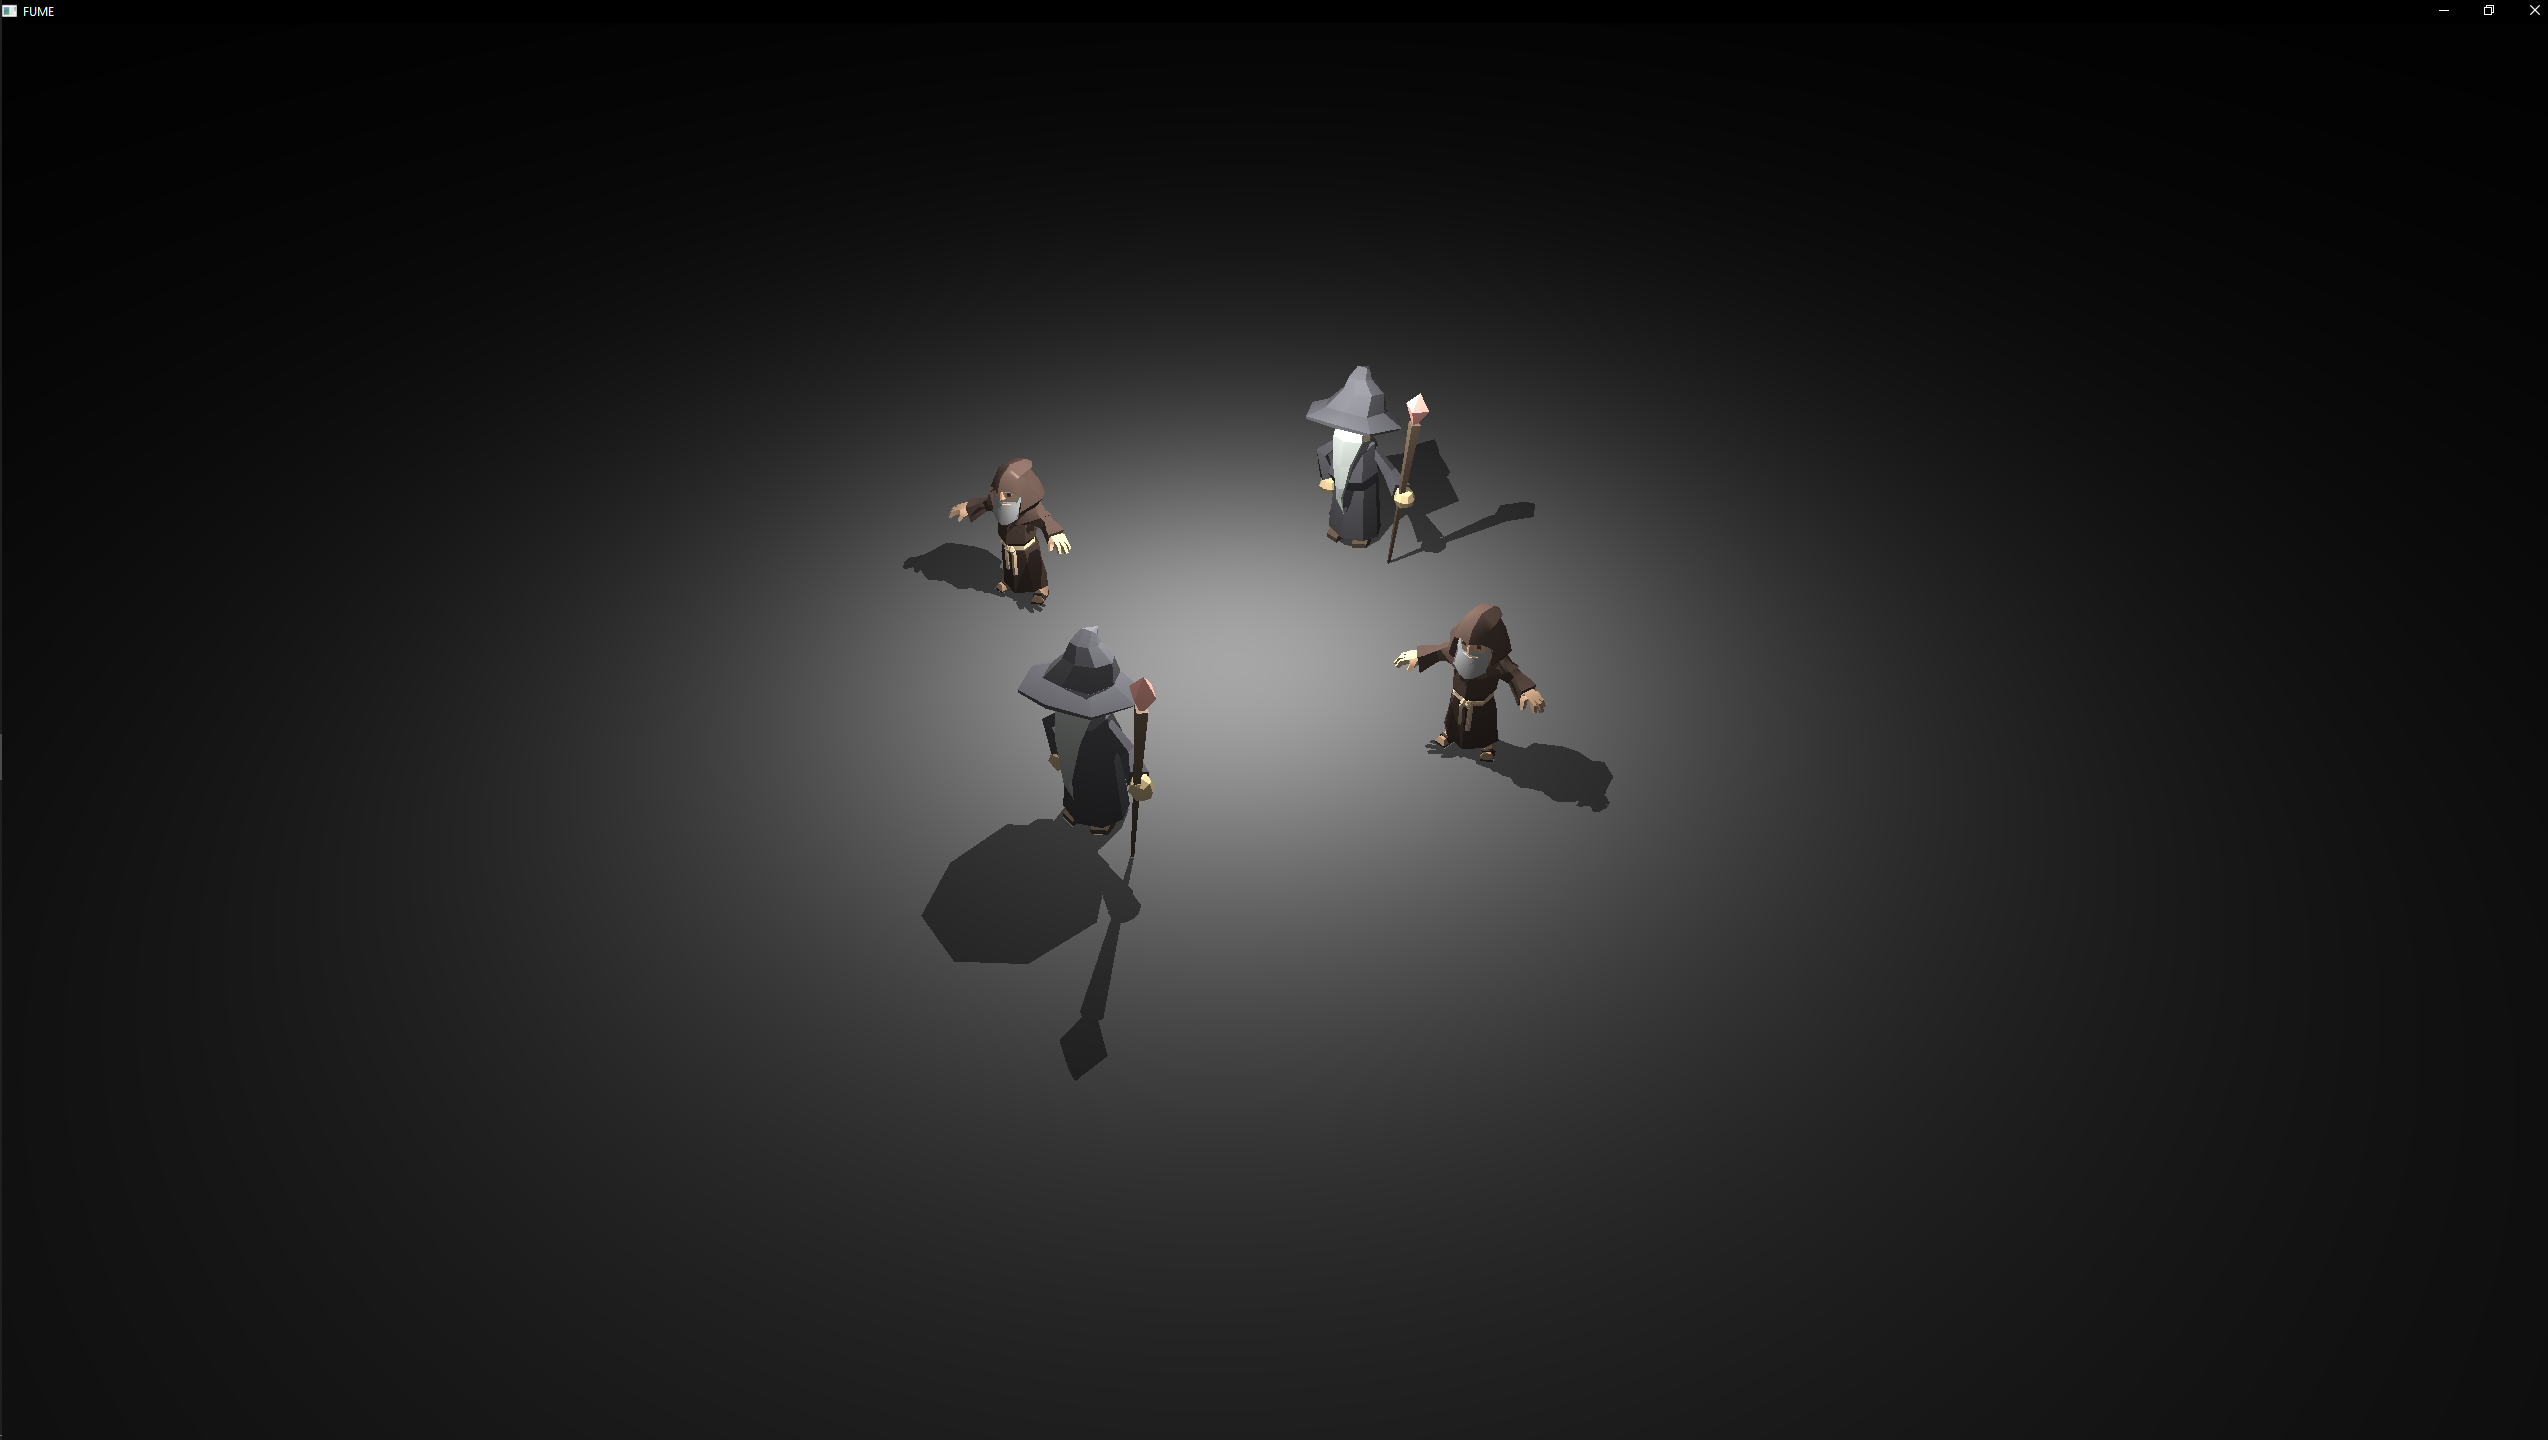
Entity Component System (ECS)
Another important part of a game engine is the Entity Component System (ECS). It moves the engine from handling raw 3D models in a scene to working with entities that split their data into different types of components.
At first, I planned to use the header-only library EnTT,
since it is highly recommended for ECS implementations.
However, after spending some time analyzing how it manages component usage,
and reading articles and watching talks about ECS design, resource management, and cache efficiency,
I decided to build my own ECS tailored to the engine’s needs.
Cache-friendly Approach
The overall approach is inspired by EnTT, especially the idea of grouping components of the same type into containers, where each component keeps a reference to the entity ID it belongs to.
With this design, the entity manager receives the requested components by typenames and returns only the entities that own those components as typenames. Systems then process each matching entity by accessing the required components and applying the corresponding behavior.
Components are treated as pure data containers, implemented as aggregate data structures with no logic. All behavior is handled by systems, which iterate over groups of entities that match their component requirements. For example, a physics system operates only on entities with both transform and physics components to update positions based on velocity.
Through decoupling entities from behavior and iterating directly over component sets, the system improves cache efficiency and reduces cache misses. Component data is stored contiguously in static arrays, allowing fast memory access and avoiding unnecessary jumps to RAM.
Compile-time Configuration
The Entity Manager is generated at compile-time using templates specialized
with lists of component typenames.
Through template metaprogramming, these lists allow the Entity Manager to register and create
the containers that store each component type during compilation.
A dedicated header lets the user define an alias with the component types they want to use. This makes the Entity Manager customizable to the needs of the application.
namespace ECS
{
    using ComponentList = FUME::MP::TypeList
    <
        FUME::TagComponent,
        FUME::TransformComponent,
        FUME::RendererComponent,
        FUME::CameraComponent,

        GAME::InputComponent,
        GAME::PhysicsComponent,
        GAME::AIComponent
    >;

    using EntityManager = FUME::EntityManager< ComponentList >;
    using Entity        = EntityManager::Entity;
}
It is implemented as simple and straightforward way for creating entities that are registered in the Entity Manager. These entities are later used to populate static component containers, where data is assigned using modern C++20 features such as aggregate structures and designated initializers.
auto& e = EM.createEntity();
EM.addComponent<FUME::TagComponent>(e, TagComponent{Name});
EM.addComponent<TransformComponent>(e, TransformComponent{Position, Rotation, Scale});
EM.addComponent<MeshComponent>(e, MeshComponent
{
    Mesh.MeshName,
    Mesh.BaseVertex, Mesh.BaseIndex, Mesh.NumVertices, Mesh.NumIndices,
    Model->GetVertexBuffer(), Model->GetIndexBuffer(), Materials.at(Mesh.MaterialIndex),
    Mesh.WorldTransform, CastShadow
});
Since the Entity Manager is configurable, both components and systems are treated as scriptable constructs. Users can define their own component types and decide how systems manipulate their data. For this reason, systems are considered custom scriptable systems.
In this block of code, we can see how straightforward it is to set up a custom scriptable system. This system queries the entities it needs based on the required components and processes them during update using a lambda that contains the desired behavior.
using REQUIRED_CMP = FUME::MP::TypeList< GAME::PhysicsComponent, FUME::TransformComponent >;

void OnStart(ECS::EntityManager& EM)
{
    RetrievedGroup = EM.Query< REQUIRED_CMP >();
}

void OnUpdate(ECS::EntityManager& EM, double const dt)
{
    const auto ExecuteSystemLogic = [&EM, dt]
    (ECS::Entity& e, GAME::PhysicsComponent& Phy, FUME::TransformComponent& Trs)
    {
        Trs.Position += Phy.Velocity * dt;
    }

    EM.ProcessQuery< REQUIRED_CMP >(RetrievedGroup, ExecuteSystemLogic);
}
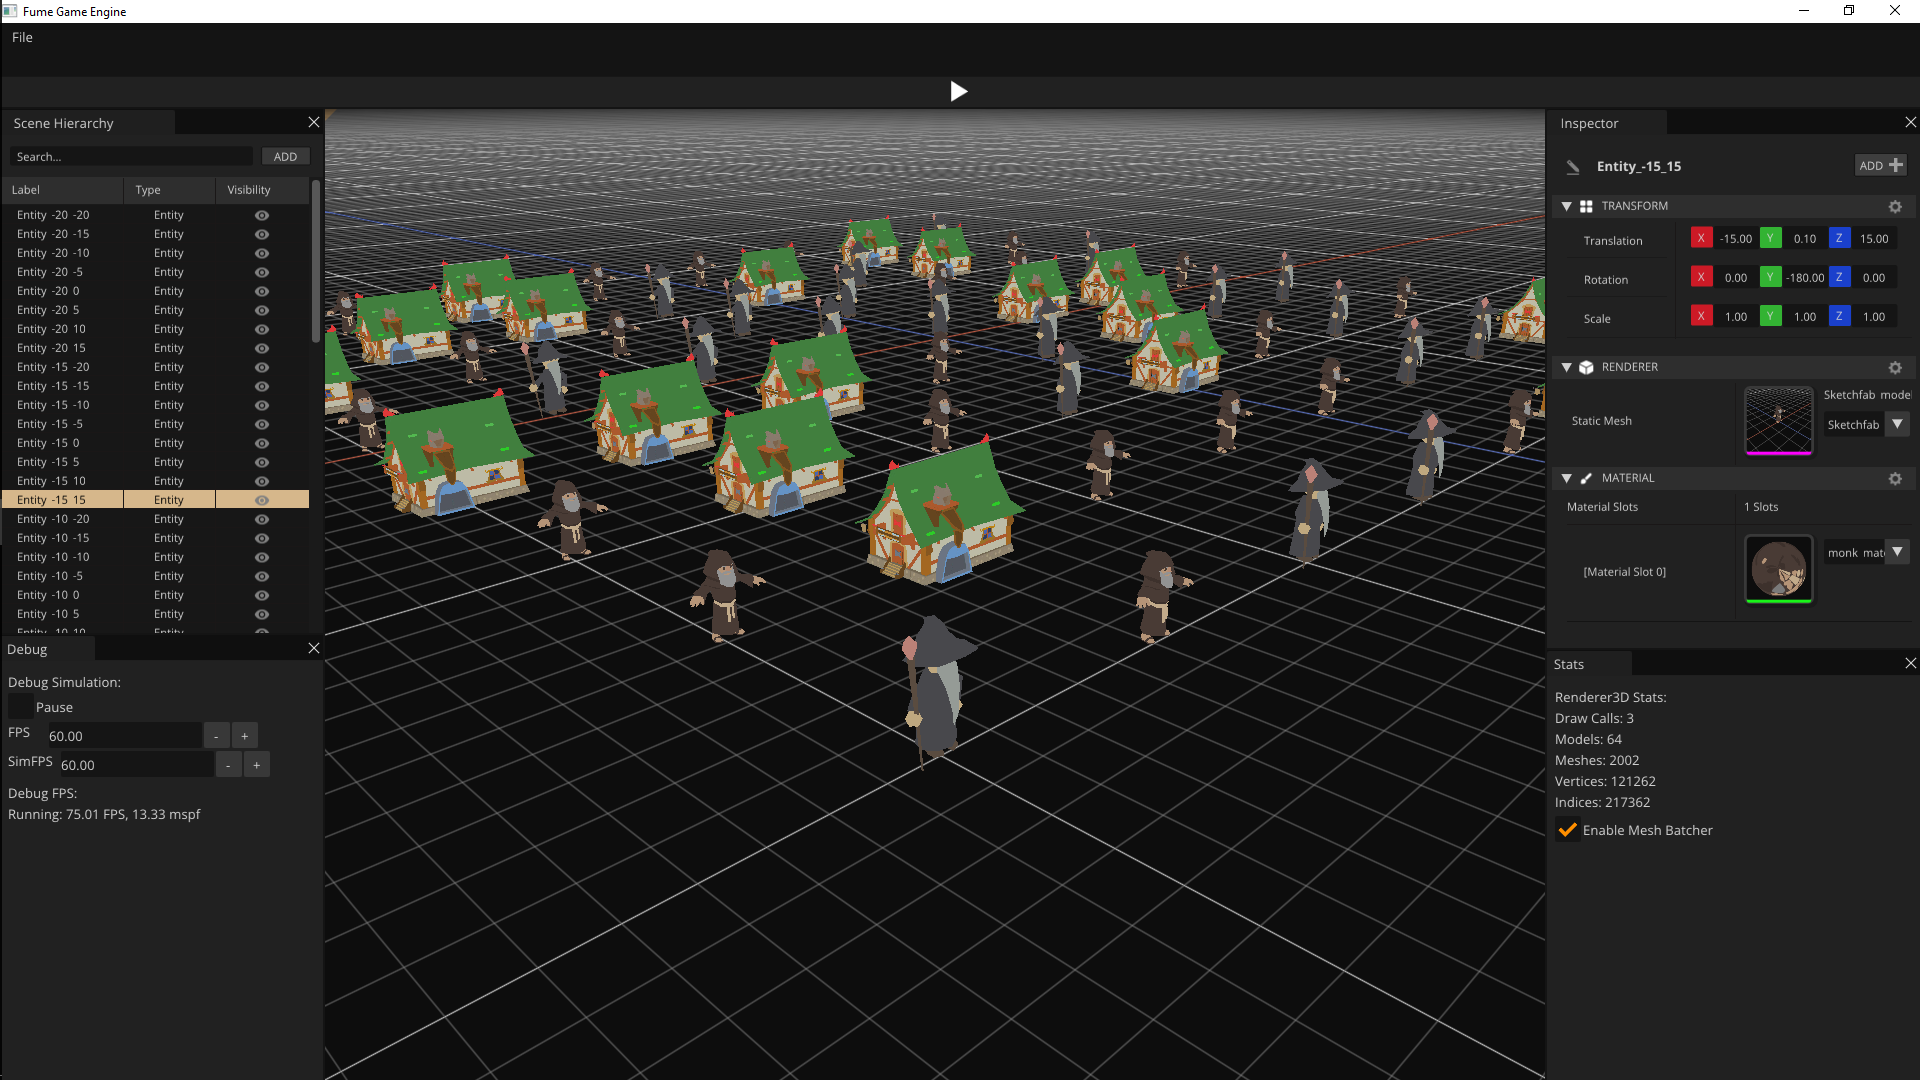
Below, we can see a bit of my ECS in action playing with the data—fully decoupled entities into multiple components types that we can be easily inspected and manipulated, as shown in the editor UI panels.
Scene Manager
The Scene System is part of the FumeCore SDK and provides a high-level abstraction for scene creation, loading, and execution.
Its design is centered around a SceneManager, responsible for managing scene storage and controlling which scenes are currently active within the editor.
Scene Creation
Scenes are created through the static SceneManager::CreateScene method.
Each scene is uniquely identified by name and registered internally in a scene map for fast lookup.
An optional additive flag defines whether the scene can coexist with other active scenes:
static std::shared_ptr<Scene> CreateScene(const std::string& aName, bool aAdditive =false)
{
    auto NewScene = std::make_shared<Scene>(aName, aAdditive);
    mSceneMap[aName] = NewScene;

    return NewScene;
}
Scene Loading
Once created, scenes can be loaded into the editor or runtime using SceneManager::LoadScene.
This function handles scene activation, supporting both single-scene and multi-scene (additive) workflows:
static void LoadScene(const std::shared_ptr<Scene>& aScene)
{
    assert(aScene != nullptr);
    assert(mSceneMap.contains(aScene->GetName()));

    if (std::find(mActiveScenes.begin(), mActiveScenes.end(), aScene) != mActiveScenes.end())
        return;

    if (aScene->IsAdditive())
    {
        mActiveScenes.push_back(aScene);
    }
    else
    {
        mActiveScenes.clear();
        mActiveScenes.push_back(aScene);
    }
}
Non-additive scenes replace the current active set, while additive scenes are appended, enabling multi-scene setups commonly used for layering gameplay, UI, or debug environments.
Scene Usage
In the editor application, scenes encapsulate both contextual data (such as camera controllers) and runtime scripting systems. A typical editor-side setup involves creating a default scene, configuring its camera, registering systems, and loading it as the active scene:
mActiveScene = SceneManager::CreateScene("DefaultScene");
mActiveScene->SetCameraController(mEditorCamera);

mActiveScene->AddSystem(std::make_unique<PhysicsSystem>());
mActiveScene->AddSystem(std::make_unique<AISystem>());
mActiveScene->AddSystem(std::make_unique<InputSystem>());

SceneManager::LoadScene(mActiveScene);
Scene States and Editor Modes
Scenes can transition between different execution states depending on the current editor mode. The system supports multiple states such as Stopped and Running, enabling seamless switching between editing and playing:
switch (EditorMode)
{
    case EditorMode::Edit:
    {
        for (const auto& Scene : Scenes)
            Scene->SetState(SceneState::Stopped);
    }
    break;

    case EditorMode::Play:
    {
        for (const auto& Scene : Scenes)
            Scene->SetState(SceneState::Running);
    }
    break;
}
Scene Update Flow
On the engine side, the Scene Runtime System iterates over all active scenes each frame and executes update phases only for those in the Running state.
The following snippet code exposes the Update() method from the scene system.
void Update()
{
    const auto& Scenes = SceneManager::GetActiveScenes();
    for (auto& Scene : Scenes)
    {
        if (Scene->GetState() == SceneState::Running)
        {
            auto& DebugCmp{ Scene->GetEntityManager().getSingletonComponent<DEBUG::DebugComponent>() };
            std::uint64_t nanos{static_cast<std::uint64_t>(1000000000 / DebugCmp.fps) };

            if (!DebugCmp.pause.value && DebugCmp.timer.ellapsed() > nanos)
            {
                auto dt{1.0 / DebugCmp.simfps };
                Scene->FixedUpdate(dt);
                DebugCmp.timer.start();
            }

            Scene->Update();
        }
    }
}
This structure allows for deterministic fixed-step updates while preserving per-frame logic execution.
Internally, each scene propagates update calls to its registered systems. The execution model follows a clear PreUpdate → Update → PostUpdate → FixedUpdate lifecycle:
void PreUpdate()
{
    for (auto& System : mSystems)
        System->OnPreUpdate(mECS);
}

void Update()
{
    for (auto& System : mSystems)
        System->OnUpdate(mECS);
}

void PostUpdate()
{
    for (auto& System : mSystems)
        System->OnPostUpdate(mECS);
}

void FixedUpdate(const double dt)
{
    for (auto& System : mSystems)
        System->OnFixedUpdate(mECS, dt);
}
This modular system-driven approach ensures that new gameplay or editor features can be introduced by simply registering additional systems, without modifying the core scene execution logic.
In the example below, we can see how AISystem is working amongst PhysicsSystem and InputSystem as we are moving our Player Entity.